doc_Babad's Macintosh
Tips - A Macintosh Tip or Three…
April
2008 Edition
By Harry {doc} Babad ©
2008 |

|
Product and company names
and logos in this review may be registered trademarks of their respective
companies.
The software related
tips were tested on a 2.8 GHz Intel Core 2 Duo iMac with 2 GB 667 MHz DDR2
SDRAM; running under Macintosh OS X OS X 10.5.2.
|
Disclaimer: When briefly reviewing share-freeware I will often
use the developer's product, functions and features descriptions. All other
comments are strictly my own and based on testing. Why need I rewrite the developer's narratives, if they
are clearly written? |
This month I continue
sharing my occasional tip related finds with you. As the occasion warrants,
some of the Tips I share come from Paul Taylor's Hints & Tips column http://www.mac-hints-tips.com/, and are used with his permission. Where I use any
one else’s tips for this column, I acknowledge both their source and their
contributors. Yes, I do write some of the tips I’ve discovered while Macin’
around.
Oh, I almost forgot!
Unless otherwise noted, all the tips and tidbits I share, where appropriate,
work on my computer. If I don't own the software but if the tip sounds
interesting, I'll so note that information at the end of that specific
write-up.
- - - - - - - - - - - - - - - - - -- - - - - - - - -
Tips I’ve provided this
month, as always in a semi-random order, include:
- Leopard Finder Look Tip - Menu Bar Opacity
- The
Unsanity Haxies Are {Mostly} Back
- How
to Burn Data on a Single CD Multiple Times
- OnyX — A Disk
Cleaner for Cache & Cookie Files
- A
Word 2007 Document Format Converter
- Changing
Text Alignment in a Microsoft Word Table Cell
# ◊ # ◊ # ◊ # ◊ # ◊ # ◊ # ◊ # ◊ # ◊ # ◊ # ◊ # ◊
Leopard
Finder Look Tip - Menu Bar Opacity
An issue people many
people including g I had with the new Finder look was
the transparent men bar and menus. The menu opacity is now a lot less
translucent than before. If you enter the “Desktop and Screen Saver” preference
pane, you will see a button to click that says; “Translucent Menu Bar”. Click
this off to make the menu bar opaque.
Views from the Ivory Tower March 2008
Following up with Leopard 10.5.2
By Ted Bade macCompanion
# ◊ # ◊ # ◊ # ◊ # ◊ # ◊ # ◊ # ◊ # ◊ # ◊ # ◊ # ◊
 The
Unsanity Haxies Are {Mostly} Back
The
Unsanity Haxies Are {Mostly} Back
As I’ve noted over the last
quarter, I was wounded deeply when I found out that my favorite Unsanity
Haxies.com [did not yet work on Leopard. Although promised early in 2008, the
folks at Unsanity [http://unsanity.com/] wisely waited until Apple’s Leopard OS defacto came
out of beta with the OS X 5.2 update. Well the haxies I routinely use I use
are back, and all work just as they did for Tiger I’ve provided a table that
shares the item name, function and version number.

According to Wikipedia, a Haxie is a term, which was coined by developer Unsanity to describe their
products. It is a blend of "hack" and "Mac OS X". Unsanity
uses it to refer to "hacks" that are specifically designed for use
with its Application Enhancer (APE)
software.
These are typically small interface and functionality tweaks to the
system or existing applications by injecting code into programs as they load.
Today, many people call such system enhancement products for Mac OS X
"haxies", even though not all use APE.
Note: Although the new
Unsanity releases are beta versions, Unsanity has said they’re a being cautions, but expect the final
versions to be extremely close in behavior to the present beta’s. I’ve
highlighted the haxies I use on my Leopard based system by Menu Master their titles — All perform as flawlessly and
are invisible until I need them.
There are other items on this
list that I’ve neither tested or use so Caveat
Lector! These are posted on MacUpdate site but weren’t acknowledged
in the Unsanity site the last time I checked a few weeks ago.
Haxie Name |
Function |
Leopard Ready |
Version |
Application Enhancer
Version [APE] |
Application Enhancer (APE)
is a system used in our and third-party products that helps them to enhance
and redefine various applications behavior running on your system. |
Beta |
2.5b1 |
Chat Transcript Manager |
Chat Transcript Manager
will index all of your iChat and Adium X chat transcripts and allow you to
find what you need in a snap. |
Not Yet |
1.1.1 |
FontCard |
FontCard is a haxie that
modifies the Font menu and the font panel in Carbon and Cocoa applications.
It can add an icon that displays the format of a font next to the font menu
item or font panel list, display the font name in the font face, group fonts
into submenus, and add third party font collections to the font menu and font
panel. |
Beta |
1.5.1b2 |
FruitMenu |
FruitMenu is a haxie that
gives you the ability to customize the Apple Menu and contextual menus. Using
a visual editor you can edit the contents of the menus to suit your needs and
taste. FruitMenu will also display the contents of the FruitMenu Items folder
inside of your Library folder, launch applications and shell scripts from the
Apple Menu and contextual menus, to allow easy file navigation and launching. |
Beta |
3.7b1 |
Labels X |
Labels X enhances Apple's
file labeling features in Mac OS X. This means that, not only can you apply
various color tints to file or folder icons, and sort the files by label, but
also you have an option of applying color tints to either an icon or its name
or both. This gives you more freedom and options in organizing your files. |
Beta |
|
Menu Master |
Menu Master is a haxie that
allows you to change or remove menu shortcut keys in any application with
ease. It takes about 15 seconds to learn how to use Menu Master, and saves
you lots of time later because you can use the shortcuts you defined and do
not bother remembering which ones the developer of the software invented for
you. Additionally, you can set shortcuts to any menu item that had no
shortcuts, or remove shortcuts from menu items. |
Beta |
1.43.b2 |
Mighty Mouse |
Mighty Mouse allows you to
customize your cursors with style - and it does so on the fly, without
modifying any system files! Moreover, it allows you to customize all kinds of
cursors available in the system - Arrow, I-Beam, Alias, Copy, Move and the
Wait cursor. You can animate any cursor and import pre-made ones available at
our website. Edit the cursors with the simplicity of copy-paste and
drag-and-drop, then hit Apply, and you got it! |
Not Yet |
1.3 |
ShapeShifter |
ShapeShifter is a
revolutionary new product that lets you change the overall appearance of your
Mac using 'themes'. We're not talking about just desktop backgrounds and
icons here; we're talking about everything - the look of windows, menus,
apps, and buttons, absolutely everything. |
Not Yet |
2.5 |
Silk |
Silk
enables the Quartz text rendering and smoothing introduced in Mac OS X 10.1.5
in all Carbon applications. This means antialiased text in Netscape, Mozilla,
and many others. Why wait for developers to update their Carbon applications
when you can get the silky smooth text everywhere, right now? |
Beta |
2.1.4b1 |
Smart Crash Reports |
Smart Crash Reports is an
enhancement for the Apple's CrashReporter application. It allows 3rd party
developers to register their products in manner so if the eligible
application crashes, the crash log is sent to the developer as well as Apple.
This greatly enhances the user experience of the OS, and allows developers to
receive crashes and improve their software in a timely manner. |
Beta |
1.5b2 |
WindowShade X |
WindowShade X provides an
exciting and useful way of organizing your work on Mac OS X. With this handy
tool, you can assign the many useful actions to the minimize button and a
double-click on the window title. |
Beta |
4.2b1 |
Xounds |
Xounds is a haxie that
brings back Appearance Sounds to Mac OS X. |
Not Yet |
2.4 |
Harry {doc} Babad
macCompanion.com
# ◊ # ◊ # ◊ # ◊ # ◊ # ◊ # ◊ # ◊ # ◊ # ◊ # ◊ # ◊

How
to Burn Data on a Single CD Multiple Times
Many people have asked us how
to “reuse” a regular blank CDR, so they can burn data to it multiple times.
This is typically called session burning. You can purchase dedicated
applications do this (such as Toast or Disco), but you can also use Disk
Utility which is built into OS 10.4. It takes a little planning to make this
work, but it can help you cut down on the number of CDs you have to burn (and
buy).
This great tip comes from
Apple: First create a new folder and give it a descriptive name. Now put the
files you want to burn into that folder. Go to your Applications folder and
open the Utilities folder. Double-click on the Disk Utility application.
After it launches, in the
menu bar at the top of the screen choose File > New > Disk Image from
Folder. When the “Open” dialog box appears, find the folder you created earlier
with the data you want to burn, and click “Image.” A “Save” dialog appears.
You can leave the name as is
or choose a new name (ignore the other options in this dialog box). Click Save.
In a few moments, a disk image of your folder’s contents will appear in the
list on the left side of the Disk Utility dialog. Click on that icon, and then
click the burn button at the top left of the Disk Utility application. When you
click the Burn button, a dialog will appear asking to insert a disc. Do so,
then click once the blue downward-facing triangle on the right side of this
dialog to show more options. Click on the checkbox for “Leave disc appendable.”
Now click the “Burn” button.
Your data will now be written
to that CD. To add more files later, just insert that same CD and use this same
process all over again. Note that when you get to that final burn dialog, the
button won’t say “Burn” this time, instead it will say “Append” because you’re
adding these files to the same disc.
Don’t forget to remove the
files you already burned to this disc from the folder you created above (and
the DMG file it creates) before you make your next disc image.
Note that this is different
than using a CDRW (compact disk re-writable). A CDRW can be erased and
re-burned multiple times (however it’s not recommended to do this more than 10
times per disk). However, CDRWs don’t work in all drives, and are expensive.
This tip is designed for cheaper {more expensive – doc?} and more durable CDR’s. ~ Ed
PS:
Toast Titanium allows you to
burn sessions in advanced disk mode {Recorder > Recorder Settings >
Advanced Mode > Write Sessions]. I find this simpler than using Apple’s
software, but Toasty is not an inexpensive product to those of you who do not
burn disks of data. [doc] Note that this setting does not work for Audio files
and I’ve never needed it with data DVDs.
Small Dog Electronics
Paul Taylor’s Hints & Tips January/February 2008
Used With Permission
# ◊ # ◊ # ◊ # ◊ # ◊ # ◊ # ◊ # ◊ # ◊ # ◊ # ◊ # ◊
OnyX — A Disk Cleaner for Cache & Cookie Files
Q: I
recently found a program called Disk Cleaner (for PCs) and was wondering if
there was something similar for Macs. ~ Gordon Werb
A: Disk
Cleaner is a free, open source utility that deletes temporary, cache, and
cookie files, as well as stray items in the Recycle Bin, from a Windows PC.

There are loads of similar utilities for the Mac, but my
favorite is Titanium Software’s OnyX (payment requested). It allows you to
easily muck with parts of the operating system that are usually accessible only
through Terminal. But unlike many tools of this sort, OnyX helps you stay out
of trouble while you do so — it clearly explains what its features do and
warns of potential problems.
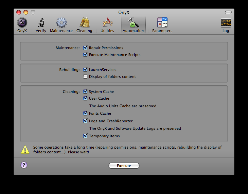
For example, in the Cleaning tab, where it seems that you’ll
be spending the bulk of your time, you’ll discover that you can delete a wide
variety of cache files, as well as form values and cookies (see “Empty the
Cache”). OnyX warns you that deleting these things may mean that you have to
reenter user names and passwords when you revisit favorite sites (this could
cause trouble if you’ve neglected to make a note of any passwords). www.titanium.free.fr/pgs/english.html
PS.
OnyX
1.9.4b2 - OS X
maintenance & optimization tool, Leopard only and OnyX 1.8.5 for Mac OS X 10.4 Tiger.
Versions for earlier systems are available as is an installer.
Christopher Breen
– Mac 911 via
The Finder, Mid-Columbia MUG, Kennewick, WA
Paul Taylor’s Hints & Tips January/February 2008
Used With Permission
# ◊ # ◊ # ◊ # ◊ # ◊ # ◊ # ◊ # ◊ # ◊ # ◊ # ◊
# ◊
A Word 2007 Document
Format Converter
MS Word 2007 formatting
breaks the ability for users to send files to earlier versioned Word users on
the Macintosh or Windows (version 2004 on the Mac, and 2003 on Windows). Some
third-party converters have become available to assist with this, but for most
people, simply saving Word 2007 files with the 'Save As' command and selecting
Word 2003 format re-creates a compatible file. Office 2008 for the Mac has
restored the cross-platform capability with the .docx format, but older version
users on either platform will remain at a disadvantage. [Wikipedia]
 Microsoft Word 2007
for Windows uses a new file format that cannot be read, by the current versions
of Word for Mac OS. Panergy’s DocXConverter, now version 2.0.1 (Shareware $20)
converts Word 2007 documents to Rich Text Format (RTF), which can be read by
many different software applications, including the current version of
Microsoft Word for Mac. www.panergy-software.com
Microsoft Word 2007
for Windows uses a new file format that cannot be read, by the current versions
of Word for Mac OS. Panergy’s DocXConverter, now version 2.0.1 (Shareware $20)
converts Word 2007 documents to Rich Text Format (RTF), which can be read by
many different software applications, including the current version of
Microsoft Word for Mac. www.panergy-software.com
Design Tools Monthly
Paul
Taylor’s Hints & Tips January/February 2008
Used With Permission
# ◊ # ◊ # ◊ # ◊ # ◊ # ◊ # ◊ # ◊ # ◊ # ◊ # ◊ # ◊
Changing Text
Alignment in a Microsoft Word Table Cell
If you desire, you can independently
specify the alignment of the text in every cell in a Word table. Originally,
the cell alignment matches the alignment of the paragraphs from which the table
was created. You can override this, however.
The easiest way to override cell alignment is to use the
paragraph alignment buttons on the Formatting toolbar. Simply position the
insertion point in the cell whose alignment you want to adjust, and then select
one of the buttons — Align Left, Align Center, Align Right, or Justify.
If you prefer, you could also use the Paragraph dialog box
to set the alignment. Again, make sure the insertion point is in the cell you
want to affect, and then choose Paragraph from the Format menu or press
Option/Command/M to display the Paragraph dialog box.
You can use the Alignment drop-down list (on the Indents and
Spacing tab) to specify how the text in the cell should be aligned. When you
make your choice and click OK, the text is adjusted as you directed.
Regardless of how you choose to align the text, only the
text in the cell is affected; the rest of the text in the table stays aligned
as it was.
MacWordTips.com
Paul
Taylor’s Hints & Tips January/February 2008
Used With Permission
That’s all folks…
Harry {doc} Babad
