doc_Babad's Macintosh Tips - A Macintosh Tip or ThreeÉ
August 2008 Edition
By
Harry {doc} Babad © 2008
|

|
|
Product
and company names and logos in this review may be registered trademarks of
their respective companies.
The
software related tips were tested on a 2.8 GHz Intel Core 2 Duo iMac with 2
GB 667 MHz DDR2 SDRAM; running under Macintosh OS X OS X 10.5.2
|
|
Disclaimer: When briefly reviewing
share-freeware I will often use the developersÕ product, functions and
features descriptions. All other comments are strictly my own and based on
testing. Why need I rewrite
the developersÕ narratives, if they are clearly written?
|
This
month I continue sharing my occasional tip related finds with you. As the
occasion warrants, some of the Tips I share come from Paul
Taylor's Hints & Tips column http://www.mac-hints-tips.com,
and are used with his permission. Where I use any one elseÕs tips for this
column, I acknowledge both their source and their contributors. Yes, I do write
some of the tips IÕve discovered while MacinÕ around.
Oh, I
almost forgot! Unless otherwise noted, all the tips and tidbits I share, where
appropriate, work on my computer. If I don't own the software but if the tip
sounds interesting, I'll so note that information at the end of that specific
write-up.
- - - - - - - - - - - - - - - - - -- - - - - - - -
-
Tips
IÕve provided this month, as always in a random order, include:
- PrinterÕs and Uninterruptible
Power Supplies (Battery Backup) Systems — No, No
- Opening Old MS Word Files
- Placing/Replacing Desktop
Pictures in Your OS
á Rebirth Of the {named} Command Key
- View Files From Open dialog
in Finder
- DonÕt Touch Your Mac During
Software Updates
- Get More Clacks From Your
Clicks
- Finding Where the © and ª
Symbols Live
- Internet Web Searches –
An authors tale
 PrinterÕs and Uninterruptible
Power Supplies (Battery Backup) Systems — No, No
PrinterÕs and Uninterruptible
Power Supplies (Battery Backup) Systems — No, No
Do
not plug your printer into an outlet that provides battery backup power.
Printers draw a very large amount of power and it is not advised that they be
provided with UPS backup power because it is not economical. Many UPS for
desktop use have additional surge protected outlets that do not provide backup
power. This is where laser printers should be plugged in. Since laser printers
are plugged into outlets that do not use the UPS battery, the presence of the
laser printer does not affect UPS wattage or run time. If you do plug the Ink
Jet Printer into the outlets with battery backup power, the UPS backup time
during an outage will be reduced.
APC Site. http://www.apc.com/tools/ups_selector/index.cfm
and Harry (doc) Babad
Opening Old MS Word Files
Reader
Jim Harper feels like Word 2008 has severed his ties with the past. He writes:
"I'm running Tiger and when I upgraded to Microsoft Office 2008 from
Office 2004 I cannot open Word files created with my 90s Microsoft Word
versions. Any solution available?"
Yes.
Start by updating your copy of Office to the very recently released Microsoft
Office for Mac 12.1.1 Update. This update is supposed to address an issue where
older Word files won't open when you double-click them.
http://www.macworld.com/article/134138/2008/06/officeupdates.html?lsrc=mwweek
More
on the update
I
use the phrase "supposed to" in this context because it may not work.
Microsoft has issued contradictory information on this subject. In a support
note, Microsoft states that the 12.1.1 Update "fixes an issue that
prevents Microsoft Word 2008 for Mac Service Pack 1 (SP1) from opening Word
documents when you double-click the document or when you download the document
from a Web site."
Yet,
Knowledge Base document 953266 states that "The Office 2008 for Mac 12.1.1
Update blocks users from opening older Word for Mac documents by using the
methods that are mentioned in the 'Symptoms' section." And those symptoms
include double-clicking on a document, dragging a document to the Word 2008 for
Mac program icon, dragging a document to the Word 2008 for Mac program icon
that is in the Dock, and executing an AppleScript that uses the Finder to open
a Microsoft Word document.
And
the reasonÉ Apparently these older documents may pose a security threat and
opening them in such ways puts you at risk. Of course Microsoft is happy to let
you open them by choosing Open from the File menu, which is somehow more secure
because... uh, it's more inconvenient? Beats me.
Mac
911 Tip of the Week Macworld Weekly By Christopher Breen Mon, 30 Jun 2008
Placing/Replacing Desktop Pictures in Your OS
Q: How do you place/replace desktop pictures on your
Macintosh?
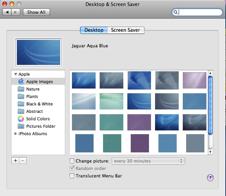 A: Mac OS X 10.3.x through 10.5.x
Choose
ÒSystem Preferences. . .Ó from the Apple menu, click the ÒDesktop & Screen
SaverÓ button, then choose the Desktop tab. In the left-side menu, select the
desktop pictures folder you want to use. You can also use the pictures with Mac
OS XÕs built-in screen saver. Select the Screen Saver tab. which is also in the
ÒDesktop & Screen SaverÓ System Preferences pane. If you put the ATPM
pictures in your Pictures folder, click on the Pictures Folder in the list of
screen savers. Otherwise, click Choose Folder to tell the screen saver, which
pictures to use.
Mac
OS X 10.1.x and 10.2.x
Choose
ÒSystem Preferences. . .Ó from the Apple menu and click the Desktop button. With
the pop-up menu, select the desktop pictures folder you want to use. You can
also use the pictures with Mac OS XÕs built-in screen saver. Choose ÒSystem
Preferences. . .Ó
from the Apple menu. Click the Screen Saver (10.1.x) or Screen Effects (10.2.x)
button. Then click on Custom Slide Show in the list of screen savers. If you
put the ATPM pictures in your Pictures folder, youÕre all set. Otherwise, click
Configure to tell the screen saver which pictures to use.
Mac
OS X 10.0.x
Switch
to the Finder. Choose ÒPreferences. . .Ó from the ÒFinderÓ menu. Click on
the ÒSelect Picture. . .Ó button on the right. In the Open Panel, select the
desktop picture you want to use. The panel defaults to your ~/Library/Desktop
Pictures folder. Close the ÒFinder PreferencesÓ window when you are done.
ATPM Volume 1406, June 2008, unnamed author
http://www.atpm.com/14.06/index.shtml
Rebirth Of the {named} Command Key

Possibly
the greatest new feature of the redesigned iMacs is their new keyboard-no, not
because of its sexy thin design, but because the Command key is now labeled
ÒCommandÓ and the Apple symbol has gone from it. Hooray!
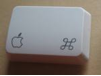 For those without the benefit of
the history, the Mac has had a Command key since the very first model, and it
has carried the little Òclover leafÓ Command symbol for all that time. At some
stage during Steve JobsÕ absence in the wilderness, some bright spark thought
it would be a really good idea to put an Apple II-style Apple logo on the
key—well, Windows PCs had a ÒWindows key,Ó so why not?
For those without the benefit of
the history, the Mac has had a Command key since the very first model, and it
has carried the little Òclover leafÓ Command symbol for all that time. At some
stage during Steve JobsÕ absence in the wilderness, some bright spark thought
it would be a really good idea to put an Apple II-style Apple logo on the
key—well, Windows PCs had a ÒWindows key,Ó so why not?
A
few folks no doubt trying to ÒsimplifyÓ the issue for beginners started calling
it the Apple key, which wasnÕt actually a heck of a lot of help, given that
every technical book writer went right on calling it the Command key, and at no
stage has any Apple documentation ever referred to it as anything but the
Command key. As many of you will have noticed, IÕve spent a lot of ink writing
ÒCommand (⌘) in these articles, in an
endeavor to rub the point in and lessen the confusion. Still, some instructors
have occasionally succumbed to the temptation to call it the Apple key simply
because beginners could see an Apple logo there.
ThatÕs
why I reckon the adoption of the word ÒcommandÓ together with the (⌘) symbol and without any further
embellishment is arguably the best possible news for Mac beginners today.
Steve Cooper —AUSOM News, Melbourne, Australia
From Paul Taylor's May/June 2008
Hints & Tips column
http://www.mac-hints-tips.com/.
View Files From Open Dialog in
Finder
HereÕs a simple trick you can use in OS X 10.5Õs Open dialog box.
Say youÕve decided to open a saved file in a given application. You press
Command-O (or select File -> Open if youÕre menu inclined)
and the standard file open dialog appears. You then navigate to
your desired file,
which is buried a few levels deep in your userÕs folder. Once
youÕve found the file, though, you realize you want do make a copy of it
first—just in case something goes wrong with your planned edit.
You can switch to the Finder, of course, and navigate to the same
folderÉ but thatÕs time consuming, and seems redundant given youÕre already
looking at the folder you want in the Open dialog. So hereÕs the trick. Select
the file in question (one mouse click), then press Command-R from within the
Open dialog. The Finder will spring to the foreground, open a new window, and
automatically select that same file in the new window.
This seems to work because the Open dialog responds to a number of
the FinderÕs keyboard shortcuts—Command-R is the shortcut for Show
Original, which is used to show the parent file of an alias. However, in an
Open dialog, it doesnÕt seem to matter if the file youÕve selected is an alias
or not; Command-R works fine on both.
There are some other Finder shortcuts that work in Open (and Save
As) dialogs in 10.5. For one, you can use Command-I to look at a fileÕs Get
Info window, as we discussed in my blog entry. You can also
press Command-F to place the cursor in the Spotlight search box. Finally, most
of the shortcuts in the FinderÕs Go menu work (and I believe they also work in
pre-10.5 systems)—so you can jump to your home folder with
Shift-Command-H, or to the top level of your machine with Shift-Command-C.
Being able to use these keyboard shortcuts in Open dialogs can
save a bit of time when youÕre working with files in both an application and the Finder.
Macworld
| Mac OS X Hints, Bob Griffiths, May 27, 2008
http://www.macworld.com/article/133615/2008/05/viewopen.html?lsrc=mwhints

DonÕt Touch Your Mac During Software Updates
This
tipÕs headline is a bit alarmist—so let us clarify. When you are running
software updates, or installing new security patches, you shouldnÕt do anything
with your Mac while itÕs running through the last Optimizing System Performance
phase of a software update. Launching applications while your Mac is performing
this last phase of a software update can potentially damage system library
files. In the worst case, there is a chance your Mac wonÕt be able to start up
again without significant troubleshooting.
So
how should you run software updates? — We recommend you run security
updates at the end of the day. Ideally, after restarting the computer with no
other software running at that time. While AppleÕs software update feature does
not make it easy to tell when a particular update was released, we generally
recommend waiting about a week after a major update is released before you
install on your Mac. For our clients who schedule regular monthly maintenance
visits, we generally run all software updates on each Mac once a month after a
fresh reboot.
Doc
sez, that for they hyper cautious belt and suspender types, use safe boot up mode for all systems software and security updates. IÕve tried it
— it works flawlesslyÉ but the folks at LIMac form have it right for the
rest of us including me most of the time.
According to Apple, to start up in safe mode:
¤
Shut
down your computer and wait 10 seconds.
¤
Press
the power button.
¤
Immediately
after you hear the startup tone, hold down the Shift key.
¤
You
should press the Shift key as soon as possible after your hear the startup
tone, but not before.
¤
Release
the Shift key when you see the gray Apple logo and progress indicator (spinning
gear).
For
more information checkout http://support.apple.com/kb/HT1564?viewlocale=en_US/.
Creative Techs LIMac
Forum, Long Island, NY
Amplified by Harry (doc) Babad macCompanion
From Paul Taylor's May/June 2008 Hints & Tips column
http://www.mac-hints-tips.com/.
Get More Clacks From Your Clicks
DonÕt
Forget Contextual Menus — They give you more mouse for your click
Before
I pass on Steve CooperÕs tip, I need to confess that IÕm a contextual menu
freak. Over the many years, since switching to a two button mouse I have at
least seriously read about, if not tried most of the contextual menu CM]
min-application I find on MacUpdate, and have worked particularly hard to learn
about the CMs hidden in my most used applications such as MS Word, FileMaker
Pro, DEVONthink Pro, Safari, or Acrobat Pro. Using CMÕs is a faster and richer
way to mouse around in situations where IÕve neither memorized a keyboard short
cut nor created one.
Many
times we use the term Òcontextual menu.Ó Beginners and some others may well
wonder what one of those is, anyway.
A
contextual menu is one that offers commands or functions that are particularly
appropriate to what you are doing at a given moment. Unlike the normal
top-of-the-screen menus that remain unchanged as you use a particular
application, a contextual menu will contain different items depending on where
you are in your document and what you are doing at that moment.
Further,
contextual menus donÕt appear in the top-of-the-screen menu bar, but rather
Òpop upÓ under your mouse cursor (arrow or other) so that you can select
commands from them without having to travel to the top of the screen.
So
how are such menus invoked? Well, for a start you need to understand that a
contextual menu may or may not be available to you at any given moment. The
author of the application youÕre working with decides when itÕs appropriate to
provide one and when not.
Given
that, there are usually two ways to invoke an available contextual menu. The
first is to hold down the Control key while clicking the mouse button. As you
press the control key, you may see a tiny ÒmenuÓ icon appear alongside your
mouse cursor. This doesnÕt always happen but if it does, itÕs a sure indication
that a contextual menu is available in that particular situation. If you donÕt
see the telltale menu mini-icon, try clicking anyway there may still be a
contextual menu available.
For
those of you who have a two-button mouse (including AppleÕs Mighty Mouse) there
is another way — simply click the right button rather than the left one,
and if thereÕs a contextual menu available it will pop up under the mouse
cursor (arrow or other).
If
youÕre new to AppleÕs Mighty Mouse (the one with a small grey button in its
upper surface), you may not have realized that itÕs a two-button mouse. ThatÕs
most likely because it is set by default to act in single-button mode to avoid
confusing those who have migrated from a standard Apple mouse.
Steve
Coopers tip, to activate the right button, go to the Apple menu (at top left of
your screen) and from that menu choose System Preferences; then in the window
that opens click the Keyboard & Mouse icon. In that panel click the Mouse
tab and you will see the options available for the Mighty MouseÕs operation.
Click on the label pointing to the right side of the mouse, and change the
label from Primary Button to Secondary Button.
Close
the window and youÕll find that your right button has been activated. To try it
out, click anywhere on your desktop, pressing the area on the mouse that lies
to the left of the grey button. Nothing special happens. Now click the same
spot on the desktop, this time pressing the area on the mouse that lies to the
right of the grey button. YouÕll see a contextual menu pop up under the cursor.
Note
that the Mighty Mouse knows which side of the mouse youÕve pressed by sensing
the presence of your finger on its surface. This means that if you want to
register a right-click, using your middle finger, you need also to lift your
index finger from the left side of the mouse. If you donÕt, your click will be
registered as a left-click (the default).
Some
folks love the two-button function; others donÕt. It depends on your prior
experience and perhaps on your manual dexterity. If you like the concept but
find the Mighty Mouse difficult to use, you can easily buy a third party
two-button mouse, virtually anyone of which will work with your Mac without the
need to install new software. For a start, keep things simple and buy one that
has just two buttons and a central scroll wheel; avoid those with a
multiplicity of buttons.
With
a Mighty Mouse or other two-button rodent (or by simply using the Control key
with a single-button one) you may be surprised by the number of situations in
which you can activate a contextual menu.
Steve Cooper — AUSOM News, Melbourne, Australia
From Paul Taylor's May/June 2008 Hints & Tips column
http://www.mac-hints-tips.com/.
Finding Where the © and ª Symbols Live
Since
nearly the beginning of Mac-dom, when you wanted to find out which key
combination produced a fontÕs special characters (stuff like ©, ª,£, ¢, %, Ä,
etc.), you used a utility called KeyCaps. More than a decade later, KeyCaps is
still a part of Mac OS, but a better way to access these special characters is
through the Character Palette.
You
can access it two ways:
(1)
From
within Mac OS X business apps (like Mail, TextEdit, Stickies, etc.), just go
under Edit and choose ÒSpecial CharactersÓ or click on the ÒActionsÓ pop-up
menu at the bottom of the Font Panel and choose ÒCharacters;Ó
(2)
Add
Character Palette access to your menu bar so you can access it when youÕre
working in other applications (like Microsoft Word or Adobe InDesign). You do
this by going to the System Preferences in the Apple menu, under International,
and clicking on the Input Menu tab. Turn on the checkbox for Character Palette
and it will appear in the menu bar along the right side.
Either
way you open it, hereÕs how you use it: When you open the Character Palette,
choose ÒAll CharactersÓ from the View menu, then click on the ÒBy CategoryÓ
tab. The left column shows a list of special character categories and the right
column shows the individual characters in each category. To get one of these
characters into your text document, just click on the character and click the
ÒInsertÓ button in the bottom right-hand corner of the dialog.
If
you find yourself using the same special characters over and over (like ©, ª,
etc.), you can add these to your Favorites list, and access them from the
Favorites tab in the Character Palette.
To
see which fonts contain certain characters, expand the Character Palette by
clicking on the down-facing arrow next to Font Variation on the bottom-left
side of the palette. This brings up another panel where you can choose
different fonts. You can also ask that this list show only fonts that support
the character you have highlighted.
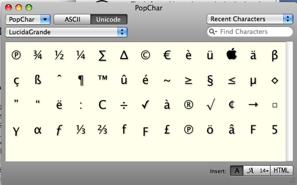
 Now Doc sez, not to belittle
Apples free tools, but I prefer,
since I first discovered it as classic version 1.0.x, the $45 shareware tool by
Ergonis Software called PopChar, now version X 4.0.1. < http://www.ergonis.com/products/popcharx/> PopChar X creates a
floating window where you can click on a little "P" box to display a
table of available characters for a particular font. Select the desired
character and it instantly appears in your document. No more Key Caps, no more
memorizing keystrokes. Not only does it let me find both ASCII and Unicode
characters hidden in my fonts but also it remembers all the character IÕve used
within that font. Voil, one-click access to all special
characters, in all applications lets you pick your character. All this convenience from an itty-bitty
icon found in the upper left hand corner of my menubar.
Now Doc sez, not to belittle
Apples free tools, but I prefer,
since I first discovered it as classic version 1.0.x, the $45 shareware tool by
Ergonis Software called PopChar, now version X 4.0.1. < http://www.ergonis.com/products/popcharx/> PopChar X creates a
floating window where you can click on a little "P" box to display a
table of available characters for a particular font. Select the desired
character and it instantly appears in your document. No more Key Caps, no more
memorizing keystrokes. Not only does it let me find both ASCII and Unicode
characters hidden in my fonts but also it remembers all the character IÕve used
within that font. Voil, one-click access to all special
characters, in all applications lets you pick your character. All this convenience from an itty-bitty
icon found in the upper left hand corner of my menubar.
TMUG Insider, Pleasanton, CA
From Paul Taylor's May/June 2008 Hints & Tips column
http://www.mac-hints-tips.com/.
|
|
|
Recent Characters –
PopChar
|
Internet Web Searches – An authors tale
 Both as an individual seeking
information, or a writer who packages that information for others, the Internet
is both a friend and my enemy.
Both as an individual seeking
information, or a writer who packages that information for others, the Internet
is both a friend and my enemy.
When
youÕve leaned to tell the difference, site-by-site, article-by-article,
citation-by-citation, you can be confident that you are both still learning and
also gaining expertise about the subjects you search.
There
is only one paradigm you need to remember, believes are not necessarily
provable facts and facts can be misinterpreted or denied by ones beliefs. ItÕs
a human failing – live with it.
Is Wikipedia Reliable?
The creators of Wikipedia are the first to admit that not every
entry is accurate and that it might not be the best source of material for
research papers. Here are some points to consider:
¤
Look for a slant. Some articles are
fair and balanced, but others look more like the Leaning Tower of Pisa. If an
article has only one source, beware.
¤
Consider the source. Even if an article
cites external sources, check out those sources to see whether they are being
cited fairly and accurately — and do, in fact, reinforce the article's
points.
¤
Look who's talking. If you research the
contributors themselves and find that they are experts in their fields, you can
be more confident in the entry.
¤
Start here, but keep going. Wikipedia should be a
starting point for research but not your primary source for research material.
In December 2005, the scientific journal Nature published the
results of a study comparing the accuracy of Wikipedia and the printed
Encyclopedia Britannica. The researchers found that the number of "factual
errors, omissions or misleading statements" in each reference work was not
so different — Wikipedia contained 162, and Britannica had 123. The
makers of Britannica have since called on Nature to retract the study, which it
claims is "completely without merit." [No errors per what
number of articles but I'd not yet fully chased the Nature article.]
When visiting controversial entries, look out for edit wars. Edit
wars occur when two contributors (or groups of contributors) repeatedly edit
one another's work based on a particular bias. In early 2004, Wikipedia's
founders organized an Arbitration Committee to settle such disputes.
Wikipedia does have some weaknesses that more traditional
encyclopedias do not. For example
- There is no guarantee that
important subjects are included or given the treatment that they deserve.
- Entries can be incomplete or
in the middle of being updated at any given time.
- The writers of entries often
fail to cite their original sources, thus making it hard to determine the
credibility of the material.
These issues should not deter you from using Wikipedia. Just weigh
the limitations of Wikipedia — and, for that matter, reference works in
general.
From my perspective, at least Wikipedia admits to errors, and
contributors correct them. Therefore the reliability of information on Wikipedia evolvesÉ can you say the same
for the other sources of Internet information you use?
One more hint — If you reference and use information from a
Wikipedia article, always provide both the link and the date you captured the
information.
PS:
I donÕt remember whether I wrote this or found and modified it. If
I grabbed your stuff — mia culpa, as this column shows I always reference
source material. Let me know your name and I'll give you full credit next
month!
doc_Babad macCompanion.com
ThatÕs
all folks. Tune in next month for moreÉ
Harry
{doc} Babad