|
|

|
|
Acknowledgements — As the occasion warrants, some of the Tips I share come from Paul Taylor's Hints & Tips column http://www.mac-hints-tips.com, and are used with his permission. If you have tips to share send them to Paul — paul@mac-hints-tips.com. I also use user group published tips with their consent if I can make the contact with the appropriate officer. Where I use any one elses tips for this column, I acknowledge both their source and their contributors. Yes, I do write down and share some of the tips Ive discovered while Macin around. If a tip or hint comes from a more traditional commercial source, I both acknowledged that fact and almost always modify the tip to personalize it for our readers.
Where a sentence or paragraph is italicized, its my contribution unless other wise noted. Oh, I almost forgot! Unless otherwise noted, all the tips and tidbits I share, where appropriate, work on my computer. If I don't own the software but if the tip sounds interesting, I'll so note that information at the end of that specific write-up.
- - - - - - - - - - - - - - - - - -- - - - - - - - - Tips Ive provided this month, as always in a random order, include:
§ A Missing Partition Western Digital 500GB external hard drive § Organize your Folders via Keep Arranged by shortcut in OSX § Problems Backing Up, Cloning with Super Duper, my iMacs Hard Drive on Partitioned Western Digital External Drives § Choosing a Good Password § Keyboard Cleaning Tip § Make 'paste and match style' the default behavior § How to Make the Sidebar Work Like the Dock § Spelling Help in Cocoa Applications § Neatly Arranged Icons § Knowing at a Glance If Your File Changes Have Been Saved § Copy and Delete at the Same Time and Other Related Tricks § Working With Duplicated Files/Folders or Conveniently Placed Alias § Sneak a Peek at a Deleted File - - - - - - - - - - - - - - - - - -- - - - - - - - - And the Tips - - - - - - - - - - - - - - - - - -- - - - - - - - -
A Missing Partition Western Digital 500GB external hard drive
A: There may actually be some hardware problem with the drive itself, but before replacing it I would suggest trying the following:
Backup any important data on the drive immediately.
You could first try using the Disk Utility (in /Applications/Utilities) to examine the drive to see if it can see both partitions, even if one of them is not mounting.
Id then use Disk Utility to repair the partitions. If that doesnt work Id suggest reformatting the entire drive using Disk Utility and re-merging the partitions.
I use a WD My Book drive myself, and I have found it to be more reliable since installing the (WD Drive Manager), though be sure to get the correct one for your particular drive). The Unofficial Apple Weblog - TUAW.com Courtesy: Paul Taylor Hints & Tips — July 2009 - - - - - - - - - - - - - - - - - - - - - - - - - - - - - - - - - -
Organize your Folders via Keep Arranged by shortcut in OSX
Arkit Agarwal MacTips.org - - - - - - - - - - - - - - - - - - - - - - - - - - - - - - - - - -
Problems Backing Up, Cloning with Super Duper, my iMacs Hard Drive on Partitioned Western Digital External Drives
In addition to the problem described in the previous tip, doc sez, Ive at times had problems completing a backup (a full clone} using either a FW WD 500 GB and 1 TB drive portioned respectively into three and five parts. The software I use is Shirt Pocket Softwares SuperDuper 2.5 http://www.macupdate.com/info.php/id/13803/superduper%21. The backup gets frozen three-fourth of the way to completion. My solution, is to stop the backup, ignore the warning message and then start the backup anew. This action pretends that Id not just previously started the incomplete backup. The software breezed through the material already backed up, and then completes the cloning at its usual speed. Harry {doc} Babad macCompanion.com - - - - - - - - - - - - - - - - - - - - - - - - - - - - - - - - - -
Choosing a Good Password
Besides finding a perfect spouse, I think that one of the more difficult things in life is choosing a password. When I first began using computers, having only a small list of passwords was pretty simple. However as your responsibilities grow and as more and more websites demand password protection, I find it a struggle to keep up. I have already run the gamut of family names and birth dates and now struggle to find the meaning of life, or at least the current passwords, so that I do not forget them in the weeks to come. I believe a coworker has the perfect answers to these password questions. He searches his room for interesting objects and then changes the spelling of them and uses them as his passwords. The Apple Knowledge Base has a helpful article on how to choose a good password. In this article are hints on how to develop good passwords and where to use them.
Good passwords are over 8 characters long and contain a mix of many different character types. Avoid using city names, street names, names of people (real or fictional), pet names, words found in a dictionary or popular book, phone numbers, birthdays, anniversaries, or simple combinations of these. Avoid using a recognizable spatial pattern of keyboard characters, such as a couple diagonal lines of keyboard keys, such as njimko.
However, creating a good password is only half the battle. You then have to figure out if this is a password that you are going to use forever, or if it is something that you are going to change often. A good password for your user account on your own machine is something that you may never have to change, so it can be something pretty complex. However there are a lot of websites out there that require you to change your password often.
On Apples Service Provider website, for example, you are forced to change your password every three to four months. In addition to that, if your web browser is idle for more than several minutes, you have to log back in. Needless to say, having a good secure password that is easy to use is essential.
In the above mentioned Apple Knowledge Base Article, you will also see some great links on how to change passwords in multiple venues such as Keychains, Open Firmware, Safari, and your System Preferences. However, if you use Apples Filevault feature of OS 10.3 and you lose its password, you are out of luck and will lose all of your data. Be especially careful with that password! Resetting a user account password in OS X is one of the most common phone calls we get here at Small Dog, and it is a fairly simple procedure. An excellent article from the Apple Knowledge Base that will tell you how to do this: http://support.apple.com/kb/HT1274 Troy K. - Small Dog Electronics Courtesy: Paul Taylor Hints & Tips — July 2009 - - - - - - - - - - - - - - - - - - - - - - - - - - - - - - - - - -
Keyboard Cleaning Tip
would unplug it from the computer, shake it, spray air into it and use an old, clean mascara brush to run along the keys. The mascara brush really picks up the lint and gets under the keys.
Doc sez, some years ago, I actually bought a DataVac Electric Duster, a reverse dust buster sized device for cleaning electronics. The price, under $50 [USD], a tool that Ive used for 10 years. It is a noisy but powerful blower, with a variety of tips that focus air where you need to clean. Since a six-pack of 10 oz cans of compressed air costs about $30, {Costco, Amazon} I figure on a life-cycle cost basis, Im ahead. Linda Cameron The Finder, Mid-Columbia MUG, Kennewick, WA Harry {doc} Babad macCompanion.com - - - - - - - - - - - - - - - - - - - - - - - - - - - - - - - - - -
Make 'paste and match style' the default behaviorr
If you copy information from styled pages -- web sites, documents, etc. -- you're aware that if you then paste that information (Command-V) in a style-aware application, the style gets pasted, too. Most of the time this is just annoying. The workaround is to use Paste and Match Style (Shift-Command-Option-V) instead. However, it's a pain to do this every time.
Yesterday on Twitter, a solution made the rounds: just use the Keyboard Shortcuts tab of the System Preferences panel to set Paste and Match Style to Command-V. Open that panel, click the plus sign, leave the first pop-up set to All Applications, enter Paste and Match Style in the Menu Title box, type Command-V in the Keyboard Shortcut box, then click Add.
An anonymous tipster submitted a command-line version of this modification, in case you want/need to run it remotely or push it out via Apple Remote Desktop:
defaults write .GlobalPreferences -dict-add NSUserKeyEquivalents "Paste and Match Style" -string "@v"
After changing the shortcut via either method, Command-V will do a Paste and Match Style in any application where it's possible; in others (such as Excel), Command-V will still paste as usual. There is, however, a downside.
If you're trying to paste copied images (such as into iChat), Command-V won't work at all. So as cool as this solution is, I don't use it myself, as I do this quite a bit. Instead, I simplified the Paste and Match Style shortcut (in 10.5) to Command-Option-V. This requires much less in the way of finger gymnastics, making it nearly as easy to use as Command-V. As an alternative, you could add a second shortcut for Paste as Command-Option-V (or whatever you like). Then, when you need to paste an image somewhere, use Command-Option-V instead of Command-V. Mac OS X Hints – Macworld Wed, Jul 8 2009 Submitted by robg - - - - - - - - - - - - - - - - - - - - - - - - - - - - - - - - - -
You can customize the sidebar of the Finder window by adding other icons that make it even more powerful. For example, if you use Photoshop a lot, just open the window where your Photoshop application resides, drag the Photoshop icon right over to the sidebar, and the other icons in the sidebar will slide out of the way.
Now you can use this window kind of like you would the dock — to launch Photoshop, just click on its icon in the sidebar, plus like the dock, you can even drag-and-drop images you want to open right onto the sidebars Photoshop icon. Reference: Scott Kelbys Mac OS X Tiger Killer Tips.
Ive done that with MS Word and FileMaker Pro sez doc. However, I prefer accessing such often used applications and or folders using a combination of:
§ Unsanitys shareware haxie Fruit Menu, and § DEVONtechnologies free X-Menu.
These are more easily accessible to me, one under the apple in my Macintoshs main menu bar, the other as a menu item that is available from every application, document of folder. Why, I usually hide the sidebar, despite the fact that I am a devotee of using windows in list view. –Doc! Apple Pro Tips Courtesy: Paul Taylor Hints & Tips — July 2009 - - - - - - - - - - - - - - - - - - - - - - - - - - - - - - - - - -
Spelling Help in Cocoa Applications
If you do not know how to spell a word, Cocoa applications will help. Start to spell the word. Now hold down the F5 key and you get a list of words starting with what you have typed. This works only in applications written in Cocoa. So forget using it in AppleWorks or MS Word or other Carbon-based applications.
And just in case you want to stretch a bit more, my favorite tool for checking spelling, especially when working with recipes is Google. Yes, I said Google. Just type the word you want to check, into Googles search field, and more often then not you get the correct spelling as a did you mean hint. Doc. Phil Russell - Mouse Droppings, Corvallis, OR Courtesy: Paul Taylor Hints & Tips — July 2009 - - - - - - - - - - - - - - - - - - - - - - - - - - - - - - - - - -
Neatly Arranged Icons
Do you like your icons neatly arranged?
Once in a while would you like an icon out of that neat order? Or on the other hand are your icons in disarray (and you like it that way)? Once in a while you might like an icon in a neat position alongside another icon? It is so easy. All you do is hold the Command key down. If the icons are set to appear in neat rows, the Command key will let you place an icon out of sequence. On the other hand, if your icons are in disarray, the Command key lets you place one in sequence next to another icon.
You might ask, how do you set the icons appearance? Command/J is Snap to Grid. The same keystroke undoes Snap to Grid.
You can also do this en-mass, by choosing the Finders > View Menu > Show View Options [Command-I and set you ordering and window appearances preferences there. Doc. Phil Russell - Mouse Droppings, Corvallis, OR Courtesy: Paul Taylor Hints & Tips — July 2009 - - - - - - - - - - - - - - - - - - - - - - - - - - - - - - - - - -
Knowing at a Glance If Your File Changes Have Been Saved
This is one of my favorite Mac tips. Im a frantic file saver. It comes from my old advertising days and using OS 9. In OS 9 you didnt have to remember to restart your machine once a week as it would crash several times a day. Sick of losing hours worth of work I started hitting Command/S like a manic person.
With this tip I have settled down and can know at a glance if it has been saved or not. How you ask? The little icon at the top of the file. If it has been saved the icon is full color, if it has had changes it will be washed out. Nice, huh?
And just in case you forgot, you tell if a file has been saved by also checking the red close button to the left hand side of your documents menu bar. If the red button is clear, its been saved. If not the red button will contain a nice easy to see black spot, one that looks like a bullet. Doc. Marilyn Halpin — Mac-Fusion.com Courtesy: Paul Taylor Hints & Tips — July 2009 - - - - - - - - - - - - - - - - - - - - - - - - - - - - - - - - - -
Copy and Delete at the Same Time and Other Related Tricks If youre archiving a file to disk (lets say to an external FireWire drive for example), you can drag the icon of the file you want to archive directly to that drive and the Mac will write a copy to that drive.
However, your original file still lives on your current hard drive. If you want to have that file deleted from your drive as soon as its copied to another drive, just hold the Command key as you drag your icon, and the Mac will do two tasks for you: copy the file to the new drive and delete the original from your original drive. Reference: Scott Kelbys Mac OS X Tiger Killer Tips Apple Pro Tips Courtesy: Paul Taylor Hints & Tips — July 2009 - - - - - - - - - - - - - - - - - - - - - - - - - - - - - - - - - -
Working With Duplicated Files/Folders or Conveniently Placed Alias
Put a Duplicate Copy Elsewhere — In a similar vein, if for some reason you want a duplicate copy of a folder filed document, on your desktop, the use the Option key and drag the file from its home to the desktop. Youll see the arrow icon turn into a plus sign. I use this method to create extra copy of old files I want to completely reedit and update. When done, you change the file name to reflect its current status. For example TMF Fundraiser Letter 2008 can be transformed to TM F Fundraiser letter 2009.
Put an Alias Elsewhere — I tend to be relatively well organized, and have created and maintained a folder structure for all my usual projects and tasks. Therefore, when I want to work on a project, like this column, I create an icon of my stored, often nested, folder and place it on my desktop. That too is simple. Select the folder for which you want to create an alias. No dont use the Finder keyboard shortcut Command-L. That creates an alias but leaves it in the folder where you created it. Instead, select the icon {folder, document – it doesnt matter} and start to drag it while pressing the Command Option Keys. Actually you drag a little first, otherwise youre simply moving the folder to a new location. When done correctly, the icon transformed to an alias which has a curved arrow in the lower left hand corner. Put the alias where you need it to be. And do your thing with the document or folder. Harry {doc} Babad macCompanion.com - - - - - - - - - - - - - - - - - - - - - - - - - - - - - - - - - -
If you've done a Spotlight search in Time Machine to find a lost or deleted file, you could end up trawling through dozens of Finder windows to find what you need. To get a quick look at a file before taking the time to restore and open it, make sure that the item listing is highlighted in the Finder window, and then tap the spacebar to show a magnified Quick Look. To close the Quick Look preview, tap the spacebar again, or click the Close button in the upper-left corner of the Quick Look window. Peachpit Mac Tip of the Week #233 Mac OS X 10.5 Leopard: Peachpit Learning Series by Robin Williams - - - - - - - - - - - - - - - - - - - - - - - - - - - - - - - - - - |

 Q: I have a Western Digital
500GB external hard drive. Both FireWire (FW) and USB. I partitioned the
drive into two partitions. But now when I connect the hard drive, only one
partition shows up. I tried both the USB and FireWire and its the same. When I
connect the hard drive to a Windows computer, sometimes both partitions show up
and sometimes only the one. Whats going on and how can I fix this problem? Im
so frustrated that Im about to buy a new hard drive! ~ Crazy J
Q: I have a Western Digital
500GB external hard drive. Both FireWire (FW) and USB. I partitioned the
drive into two partitions. But now when I connect the hard drive, only one
partition shows up. I tried both the USB and FireWire and its the same. When I
connect the hard drive to a Windows computer, sometimes both partitions show up
and sometimes only the one. Whats going on and how can I fix this problem? Im
so frustrated that Im about to buy a new hard drive! ~ Crazy J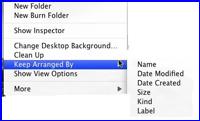 We
often like to have our folders arranged either by name or by kind or by date,
but Macs right click(two-finger click) allows you only to arrange the files
once. After that any new files you add just keep piling up at the end. Theres
a neat trick to keep your folder arranged in a particular way. After the right
click, just hold the OPTION key. It changes the Arrange by to Keep Arranged
by and then you can choose how you want to keep your folder organized
We
often like to have our folders arranged either by name or by kind or by date,
but Macs right click(two-finger click) allows you only to arrange the files
once. After that any new files you add just keep piling up at the end. Theres
a neat trick to keep your folder arranged in a particular way. After the right
click, just hold the OPTION key. It changes the Arrange by to Keep Arranged
by and then you can choose how you want to keep your folder organized My 4-year old G5 came with a
white keyboard that shows all the crud that falls into it. In the past, I
My 4-year old G5 came with a
white keyboard that shows all the crud that falls into it. In the past, I 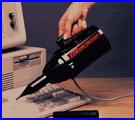 For even better cleaning, the key caps can be pried off, but I
have had trouble with the keys sticking after I put them back on. The clean
mascara brush is great, but use it frequently.
For even better cleaning, the key caps can be pried off, but I
have had trouble with the keys sticking after I put them back on. The clean
mascara brush is great, but use it frequently.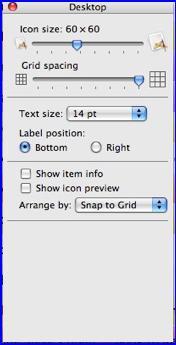 How to Make the Sidebar Work Like the Dock
 It works in TextEdit, Pages,
and Safari. In Safari it does another bit of magic in the Search box. While
you are typing a search term, Safari suggests longer search terms (one or more
keywords) without you doing anything but type. When you hold down the F5 key,
Safari helps with your spelling.
It works in TextEdit, Pages,
and Safari. In Safari it does another bit of magic in the Search box. While
you are typing a search term, Safari suggests longer search terms (one or more
keywords) without you doing anything but type. When you hold down the F5 key,
Safari helps with your spelling.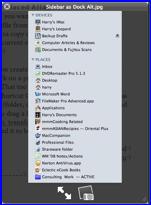 Sneak a Peek at a Deleted File