Toon Boom Studio - Animation Software for your Mac
Reviewed by Michael Potter

Toon Boom
Studio
Current
Version: 5.0
(Version
Reviewed: 4.5)
Pricing:
Standard
Version: $399.99
Upgrade from
Studio 4 or 4.5: $99.99
System
Requirements:
Mac OS X
10.4.7 or later; G5 or Intel processor; 512 MB RAM; 1280x1024 or higher
display resolution; Internet connection required for product activation.
Tutorials
|

|
Introduction
For as long as I can remember, one of my lifes goals
has been to write, direct and produce my own animated short. No doubt countless
hours plopped in front of the television every Saturday morning as a young boy
watching cartoons directed by the all time greats in animation such as Ollie
Johnston, Chuck Jones, Friz Freleng, Walter Lantz, William Hanna and Joseph
Barbara, and Tex Avery contributed in no small way to my dreams. These men could
take an ordinary pencil sketch and make you believe its a living, breathing,
creature by painstakingly creating anywhere from 12-24 individual drawings for
every second of animation the audience would see on screen. And, at each step
along the way, these drawings would be further brought to life by teams of
in-betweeners, inkers, painters, background artists, editors . . . to say it
was painstaking work would be an understatement.
But theres a lot more to producing an animated short than
simply understanding the physical challenges in doing so. Theres also this
little thing called talent that comes into play, and Im afraid without it,
the best most of us can do is a stick-figure flip book. Now Talent is one of
those umbrella words that encompasses a wide range of aptitudes such as an
innate sense of comic timing, a natural artistic bent, an eye for staging and
choreography and, of course, years of schooling. And while a package such as
Toon Boom Studio cant help foster the Super
Genius within you, it can take away the need to worry about the
technical side of things as you work to hone your other skills.
Before I go on with the review, Ill need to come clean
about something: this look at Toon Boom Studio took me forever to write. The result of my dawdling is that this review is terribly,
horribly, late. Why? Well, the simple truth is that, initially, I found the
software to be somewhat intimidating to review with all the power it brought to
my hands for creating animation. By that, I mean to say that Toon Boom Studio
is an awesome tool looking for someone with all the traits mentioned above such
as talent and artistic skill to really make it sing. And while I may have grandiose
dreams of producing my own animated short some day, Im handicapped by one important
fact: Im not an artist and I openly admit that I lack an eye for the finer
detail needed to make ordinary animation, great animation.
But that disclaimer out of the way, I do feel the tools
found in this package are no different than the rich feature sets found in
Adobes InDesign and Photoshop, Apples Final Cut, or Autodesks Maya and that,
as with these apps, the results achieved through Toon Boom Studio will only be
as good as the input you give it, no matter how much hand-holding the
developers might do.
So I say all that to make clear that this review will be
written from the perspective of someone new to animation and to Toon Boom
Studio itself. My presumption while writing this is that experienced animators
will already be using this software — or software very similar to it,
such as Toon Booms own professional level application, Animate.
Learning to Draw
So how does Toon Boom make its Studio product more
accessible for folks like you and I? By creating a library of seemingly boundless
documentation, training and examples for us to work with and learn from as we
use their product.
In a world where documentation no longer means a book
included in the box, but a pamphlet stuffed in a CD case highlighting whats
new, its refreshing to find a User Guide that actually takes us through the
process of learning to use the software. And while Toon Booms documentation is
provided in PDF format, its very easy to navigate and is written in a clear,
concise, manner with plenty of illustrations to help reinforce our learning.
Unless youre the type to just dive in and stumble about
until you come up with something that looks vaguely like an animated short, I
strongly recommend taking the time to work through the User Guide, because it includes
everything from the Toon Boom Studio basics, to drawing, to inking and
painting, to exporting your content to various media. And it teaches us these
skills in chapters that are organized in a way to make it easy to build your
knowledge of the app from the ground up.
A quick glance at the User Guide tells us that the folks
at Toon Boom know their animation, because anyone familiar with the tools used
for more traditional cartooning, will recognize immediately terms such as onion
skinning, pegs, inking and painting, camera positioning and even the creation
multiplane scenes for adding dimension to your cartoons the way Walt Disney did
in his groundbreaking short, The Old Mill. Theres even a feature where you
can rotate the drawing space while working — just like traditional
animation tables. In other words, similar to the use of terms such as
pasteboard and cut, copy and paste found in layout programs before it, Toon
Boom Studio adopts a familiar approach to applying old skills to the new technologies.
But the learning with Toon Boom doesnt stop with its
comprehensive User Guide. Other learning materials available for the novice
animator via their web site consist of several tutorials on topics covering
cut-out video, advanced multiplane scene planning, creating web games and
animated greeting cards. Most include PDF documentation as well as sample
material to use while working through the lessons. I found the QuickStart tutorial
particularly helpful as it went more in depth with topics from drawing and
painting, to lip syncing, creating clipping masks and more and it was useful to
work with objects and characters already created. Additional resources found at
Toon Booms site are a good collection of Tips and Tricks plus links to more advanced
training material that can be purchased separately.
I found the wealth of documentation and training very
welcoming to a beginning animator and I like that, with the exception of their
official Workout and Video Training series, most of the material is available
for free to anyone who clicks through to their eLearning page and wants to find
out more about the software before purchase.
So What Can You Do With Toon Boom Studio?
I would guess that, like me, most folks looking to get
into animation have a particular style theyd like to emulate and, in that
regard, Toon Boom Studio doesnt disappoint. If youre a fan of cut-out animation
like the characters found in South Park, looking to make the next Wallace and
Gromit using Stop-Motion techniques, interested in exploring Rotoscope
animation as was used to create scenes in Walt Disneys classic, Snow White
and the Seven Dwarfs, or prefer to create and animate from scratch on screen,
its all possible with Toon Boom Studio. A nice bonus for those seeking to stick
to more traditional methods, Toon Boom Studio can talk to TWAIN supported
scanners so you can import your original pencil on paper drawings directly. (disclaimer:
The version of Toon Boom Studio available to me for this article was 4.5, so I
did not play with the Stop-Motion feature which wasnt part of the application
until the current 5.0 release.)
No matter which discipline of animation you choose, Toon
Boom Studio has the capability to follow the workflow necessary to carry your
project through from drawing the first cell to the final export. This might be
done with management of your cut-out characters components, cleaning up hand
drawn figures, coloring your cells, setting up cameras for the scene, and
capturing images for stop-motion films. And getting those characters into their
scenes when the animation is complete is just as easy. Once your masterpiece is
finished, the new version 5 now includes easy publishing to Facebook and YouTube
in addition to previously available formats of Flash and QuickTime.
Toon Boom Studio In Use
Ill admit that I started out with a distinct
disadvantage, and its one Id like to highlight at the outset: creating
original animations from scratch within Toon Boom Studio using only a mouse, as
I was trying to do, is akin to attempting to tie your shoes with boxing gloves
on. Sure, it can be done, but unless youve got the mousing skills of a modern
day DaVinci, the results will be less than satisfactory. Instead, serious users
will want to consider picking up a tablet to help create your illustrations so,
for most folks, something like the Bamboo Fun from Wacom is essential to get
the most from this application. For other animation techniques, such as cut-out
and stop-motion, a mouse should be just fine.
When you first fire up Toon Boom Studio, youre presented
with a window to set the parameters for your project such as format, frame rate
and camera size. There are also a number of buttons that will hot-link you to
the various sections of Toon Booms website for tutorials, eLearning, their
forums and support. A nice touch, but I cant help thinking that space could be
better utilized for other purposes. Or left off altogether.
Once youve created your project — or opened an
existing one — youre presented with a screen that will feel very
familiar and comfortable to anyone who regularly uses an application like Adobe
Flash. And, in fact, the most recent release has made several interface changes
that make it even more like the most recent Adobe Creative Suite such as the
ability to tear toolbars away so they float freely in the work area or combine
them in a tabbed window at the side of the screen. Theyve also enhanced the
older button-set found in version 4.5 with a new look and feel. In all, the
most recent updates are nice, but it still doesnt feel 100% like a Mac app to
me, and thats no doubt due to its multi-platform roots. Still, the interface
appears to be leaps and bounds ahead with version 5, so I can no longer
complain about how ugly Toon Boom Studio 4.5 was.
The rest of the interface is divided into three basic
components: Menus; Toolbars; and Views. Menus and Toolbars I think everyone has
a handle on, but lets talk about the various views available to you for a
moment.
Each of these views (and they refer to tool palettes as
views too), will be used during the course of working on your animation
project. Of course there are the palette views that expose tools like colors,
pens, libraries, properties, etc. and theres also a Timeline view where your
animation layers and the timing of the objects on those layers are managed. But
the meat of the interface is right in the middle of the screen and thats
where you can switch between the Camera view and the Drawing view as well as
side and top views of your animation. All of the views can be tweaked to suit
your preferences. You can swap them around, resize them and hide the ones you
dont need. The same can be said for the Toolbars.
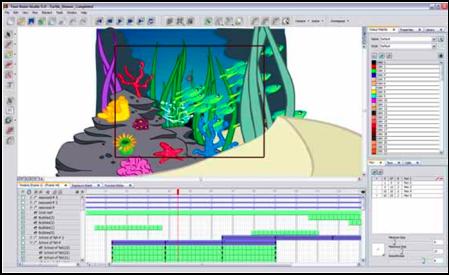
Toon Boom Studio 5 Interface – Image © 2009, Toon Boom Animation, Inc.
While Im talking about the interface, I should also
mention that Toon Boom Studio makes use of several Workspaces such as a
Drawing workspace and a Scene Planning workspace. Each is designed to make
working on that aspect of your animated short easier. And if the default Workspaces
dont meet your needs, youre free to create new ones that do.
Of course, there would be no point in having an
application like this unless it helped make some of the more difficult and
time-consuming aspects of animating your short easier, and since every cartoon
begins with a drawing, lets talk about the tools for doing that. Drawing in
Toon Boom Studio is accomplished with little more than two basic tools; the
pen, and the brush. The primary difference between the two is that the pen is
used for creating vector based lines that are center based while the brush
can be used to create lines (shapes) that have variable thickness and take into
account pressure sensitivity when using a tablet.
Shapes created with the brush
are also vector drawings, but instead of being center based, the contours
follow the edges of your lines instead. Much of my initial trouble with drawing
within Toon Boom Studio came from not fully understanding the fundamental
differences between these two tools, so I had difficulty editing contours and
was perplexed by the need to Extract Center Line before I could reshape more
than just the edges of strokes created with the brush. In other words, I failed
to follow my own advice and work through the examples in the manual first! Although, when I did turn to one of the
available online tutorials, I had trouble getting it to work the same as the
lesson suggested.
Perhaps Ill have the opportunity to take another crack at it
in the future with the recently released Toon Boom Studio 5 to see if things
have improved.
In addition to the brush and pen tools, other drawing and
design tools at your disposal include an eraser, shape and polyline tools,
powerful text tools, invisible lines, contour editor, plus a cutter and
scissors. All of these combined allow you to approach your project much like a
traditional animator would, from creating initial sketches of your characters,
to tracing those sketches (inking) and, naturally, scaling, rotating and
repositioning your drawings within the scene.
Painting your creations is made incredibly easy thanks to
Toon Boom Studios color palettes. The idea is to create a unique color palette
for each character as well as for the other objects within your scene. Then, as
your drawings are completed, you can simply select paints (swatches) from the
palette appropriate to that object while applying color and, in doing so, your
final animation will have consistent coloration from start to finish. What
makes the color palettes particularly powerful is that your swatches of color
— as theyre called in Toon Boom Studio — can consist of not only
solid colors, but gradients and textures too. And Toon Boom Studio also offers
the creation of palette styles to accommodate different lighting conditions
your character may find themselves in.
As you might expect, coloring characters and objects using
these palettes is incredibly easy and familiar to anyone who has ever picked up
a virtual paint bucket to fill an area in MacPaint, but one feature of Toon
Boom Studio related to coloring I wanted to mention is its ability to recognize
and fill areas with gaps in them. Granted this Automatic Close Gap feature only
works with smallish gaps, but what a time saver this is! And, lets face it, sometimes
theres supposed to be a gap
and artificially closing it so you can paint the area may adversely affect the
final output, so this is a welcome feature to have. The Automatic Close Gap
tool can be set to recognize small, medium or large gaps and if the application
comes across a gap it feels is too big, itll not paint the area. For all other
gaps that fall outside the abilities of the automated gap detection feature,
Toon Boom provides a Close Gap tool you can use to draw invisible lines to seal
off these gaps so an area can then be filled.
With characters created, the next step is to bring life to
those characters, and the heart of doing that within Toon Boom Studio can be
found in the Timeline and Exposure sheet views. Its here the elements of your
short are placed and the movement of your characters is created as you manage
the layers of your project. These layers could consist of drawings, imported
images, camera positioning, effects, peg elements such as motion path layers,
sound, annotations and other media. To be honest, Im still learning how the timeline and exposure sheets
interact with each other and the best way to use them to create more complex
animations, but when I approached the animation using traditional methods, I
found the timeline to be much easier to work with than that found in
applications like Flash, because there was no need to create keyframes just to
create a simple flip-style animated short using my quickly sketched stick
figures. Although, admittedly, as you advance your skills with the program and
tackle other types of animation, things like keyframes and Toon Booms advanced
Lip-sync tools will very much come into play.
When you project is complete or youd like to share its
progress with others during creation, Toon Boom Studio provides an impressive
array of export tools to choose from that includes PDFs for still frames of
your characters or scenes, to snapshots for promotional material, to print for
storyboarding and proofing to, of course, movies or individual scenes from your
production. Theres even an Export to HTML option to ensure your movie is set
up properly for distribution on the web.
Its a Wrap
As I mentioned at the start of this review, Toon Boom
Studio is an amazingly advanced tool for a product thats intended to be used
by folks at home and there is so much more to cover than what space allows in a
small review such as this one, but its safe to say that for anyone who is seriously
looking to dip their toes in the inkwell of animation, youre not going to go
wrong by adding a few clams to your budget to pick up this package.
Again, I want to emphasize for budding animators and folks
new to Toon Booms products how important it is to work through the tutorials
provided to get the most from this application, because how you interact with
all the available tools found in Toon Boom Studio will vary widely depending on
whether youre creating traditional animation, working with cut-out puppets, or
creating a stop-motion feature to rival the likes of Tim Burton.
Toon Boom Studio really is a complete animation studio in a box and the techniques it covers are broad
enough — and complex enough — to make any budding animator happy.
Mikes
Suggested Add-ons:
A Wacom or other Mac compatible drawing tablet is strongly
recommended; A Web Cam or Digital Camera for Stop-motion projects; A Scanner
with TWAIN support to import your paper drawings.
