doc_Babad's Macintosh Tips - A Macintosh Tip or
Three
December
2008 Edition
By Harry {doc} Babad ©
2008 |

|
Product and company names
and logos in this review may be registered trademarks of their respective
companies.
Reviews were carried out on
my iMac 2.8 GHz Intel Core 2 Duo with 2 GB 667 MHz DDR2 SDRAM running Mac OS
X version 10.5.5.
|
Disclaimer: When briefly reviewing share-freeware I will often
use the developers product, functions and features descriptions. All other
comments are strictly my own and based on testing. Why need I rewrite the developers narratives, if they
are clearly written?
|
Acknowledgements
— As the occasion warrants, some of the Tips I share come from Paul
Taylor's Hints & Tips column, and are used with his permission. This is a great column, worthy of a small donation.
I also use user group published tips their consent. Where I use any one elses tips for this column, I
acknowledge both their source and their contributors. Yes, I do write down and
share some of the tips Ive discovered while Macin around. If a tip or hint
comes from a more traditional commercial source, I both acknowledged that and
often modify the tip to personalize for our readers.
Oh, I almost forgot!
Unless otherwise noted, all the tips and tidbits I share, where appropriate,
work on my computer. If I don't own the software but if the tip sounds
interesting, I'll so note that information at the end of that specific
write-up.
- - - - - - - - - - -
- - - - - - -- - - - - - - - -
Tips Ive provided this
month, as always in a random order, include:
Sometimes the Simplest Things Elude Us
Inconsistent Behavior of the Home and End Keys
Drag-and-Drop Conversion to a PDF
How to Change Font
Characteristics in Adobe Acrobat Pro 9
Put Program Icons to Work
Killing All Links in a MS
Word 2004 Document — All at Once.
# ? # ? # ? # ? # ? # ? # ? # ? # ? # ? # ? # ?
Sometimes
the Simplest Things Elude Us
Do you know the difference
between:
Its all a part of the
finders function.
Yep, its the I saved it
or didnt indicator in the upper left hand corner of almost every document
window. Probably all of them but who has time to check.
Harry (doc) Babad – MacCompanion.com
# ? # ? # ? # ? # ? # ? # ? # ? # ? # ? # ? # ?
Inconsistent
Behavior of the Home and End Keys
Question: On
a Windows PC, if you place your cursor in the middle of a sentence and press
the end key, the cursor jumps to the end of that line. Conversely, if you press
the home key, the cursor jumps to the beginning of the line. But when I try
either on my iMac G5, the cursor remains where it is. What are the end and home
keys supposed to do on the Mac? ~ Steve Sawula
Answer: On the Mac, the home and end keys dont always do the same things across
applications. For example, these keys work as you describe in Microsoft Office
applications but not in TextEdit.
In Web browsers, youll
discover that the home and end keys take you to the beginning and end of a
page, respectively. [This is also true in a PDF.
HB]
The consistent keyboard
shortcuts for placing the cursor at the beginning and end of a line are
Command/left arrow and Command/right arrow, respectively. (Again, browsers are
the exception here. Use these keys to go to the previous and next pages,
respectively.)
If youd like your
cursor to jump to the beginning and end of your document, try Command/home and
Command/end.
Chris
Breens Mac 911 via TMUG Insider, Pleasanton, CA
From
Paul Taylor's October 2008 Hints & Tips Column
# ? # ? # ? # ? # ? # ? # ? # ? # ? # ? # ? # ?
Drag-and-Drop
Conversion to a PDF
Any file you could normally convert to PDF through Acrobats
File > Create PDF > From File menu item can also be converted by simply
dragging it onto Acrobats icon on the Desktop or Dock. It doesnt matter
whether Acrobat is running or not — it will launch if necessary. One
advantage to this approach is that you can drag multiple files onto Acrobat at
the same time and each will convert to PDF and open into a new window.
You can also obviously print
the document to PDF by using the options in the print menus of most
applications. There may be a file size difference depending on the setting
youve established in Acrobat, but Ive no difference in the performance of the
PDF file, when I needed to edit it.
Design Tools Monthly and doc_Babad
From Paul Taylors October 2007 Hints & Tips Column
# ? # ? # ? # ? # ? # ? # ? # ? # ? # ? # ? # ?
How
to Change Font Characteristics in Adobe Acrobat Pro 9
Recently as I was working
on reformatting some PDF formatted recipes with Adobe key descriptors Acrobat
Pro I got very frustrated. First,
key descriptors - words like ingredients and preparation were displayed in
grayish or pinkish colored type while the details were in very readable black type. Second, the site
name was twice or four times the size of the name of the recipe. It was also
garish colored. The are other annoyance but these often can be fixed by using a
combination of Acrobats Touch Up Objects tool or its Touchup Text tool. Ive been using them for years as part of reformatting and spiffing up my
recipes or taking side bar stuff out of references documents I want to keep for
future use. However, despite having read and reviewed a number of Acrobat
books, I discover an oversight. I keep gripping about lack of font control in
Acrobat Pro 9. But there are some controls available to deal with font styles
in PDFs. They are not as complete
as in a simple word processor, but you can tweak fonts, by point size, weight
witch serves for creating bold fonts, and overall display size. I recently discovered
that buried in the contextual menus when using Acrobats advanced editing
tools
.
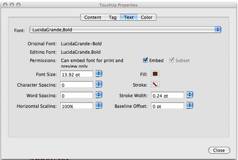

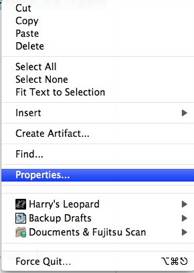
With either the contextual
menu associated with items highlighted with the touchup objects or touchup text
tool their lies a choice called properties. Ive illustrated them for your
convenience. As you can see you can work with the font size, character spacing,
word spacing, fill color (e.g., turn pink to grey).
In addition you can also
work with a fonts stroke color, which, although not obvious, I use to create a bolder look and
stroke width that I have not yet mastered.
|
|
TouchUp
Text Tools Properties |
TouchUp Object Tools
Properties |
Not all of the obvious
moves give the results you want to its a matter of trial and error, in part
based on how the original webpage or PDF was coded. But trial and error in this case is simple. First highlight
the text you want to change with either touchup tool. Play around, if you dont
get what you want either switch tools or try making smaller and more
incremental changes to the settings. Also if you only wan to change the size of
a phrase or line, you can do this with the touchup object tools anchor points.

|

|
Its all a matter of
dragging the anchor point — slowly. Sometimes on my computer this
action locks up the applications, so I start again —then it works.
Making smaller works too! |
Play, youve nothing to
lose but a few minutes and think of the new effects you can create to spiffy up
your downloaded PDF file.
Harry (doc) Babad – MacCompanion.com
# ? # ? # ? # ? # ? # ? # ? # ? # ? # ? # ? # ?
Put Program Icons to
Work
If youre ever in a
situation where you need a high-quality version of an OS X program icon —
say, for use in a presentation — it can be a bit of a chore to get it.
The usual method, which I call the find-the-icon-file-in-the-haystack game
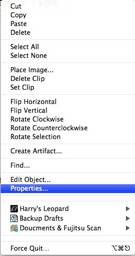
goes like this: Control/click on the program in question, select Show Package
Contents from the contextual menu, and then navigate to the Contents/Resources
folder. Somewhere inside, you should find a file with a name ending in .icns.
Open that file in Preview, and youll find the icons.
The
problem with this approach is that there can be hundreds of files in the
Resources folder, and the naming of the .icns file isnt necessarily logical,
so it can take a bit of digging — or help from Spotlight — to find
the right file. Luckily, theres a much simpler — although completely
non-obvious — way to get all of a programs icons, at least if youre
running Tiger or Leopard.
In the Finder, select
the program in question, and press Command/C. Youve now got a full copy of the
program on your clipboard. (Dont believe me? Press Command/V after switching
to another folder in the Finder. (If youre going to do this, I suggest copying
a small program and not something like the 337MB iWeb.)
Now launch Preview, and
press Command/N (File: New From Clipboard, for you menu users).
You may be surprised at
the result: a full copy of the chosen programs icons, in every available size
including the gorgeous new 512-by-512 pixel versions available in many
programs.
Click on the desired
icon size in Previews sidebar and select File: Save As to save it in the file
format of your choice. (If you want to retain the transparency, youll need to
use PNG or TIFF as the file type.) This trick worked with every program I
tested it with. You can also use it to get document icons for things like Excel
spreadsheets, Word documents, and so on. If you try this with a PDF, though,
youll find that Preview will actually paste in the entire PDF, not its icon.
Actually, Im lazier then the folks at Macworld. I
usually do either a search on the products web site or in Google images. If
the program icon is a common one, it can be found. Sometime I luck out.
Otherwise I just learned this new super, why search, hint. — Doc
Macworld Magazine
From
Paul Taylor's October 2008 Hints & Tips Column
# ? # ? # ? # ? # ? # ? # ? # ? # ? # ? # ? # ?
Killing All Links in a MS Word 2004 Document
— All at Once.
During my primary work, as a technical author, I often find myself
importing a paragraph of information or a table or image. Such material may
come from sites like Wikipedia or other Internet sites.
[Crass Commercial: I so
appreciate the usefulness of Wikipedia that I support them with donations,
albeit small ones.] Why? Check out my 3Rs macC column from April 2008. http://www.maccompanion.com/macc/archives/April2008/Columns/Rants.htm
As well referenced contributions to Wikipedia, the posted articles
I use, after checking for accuracy and factuality, are chock full of active
links. Such links serve to connect the reader to other applicable references
and sites, or serve as hot links within the document. I do comply with the fair use doctrine, referencing all such
sources I use. Furthermore, I take very small bytes. This is material I want adapt to my articles.
Originally, the only way I knew to disconnect the active links
that were imported when I paste the paragraph is to (1) highlight each item,
which are fortunately colored blue, by using the links command in MSW. Click [⌘-K]
to kill them one at a time. As an alternative, I tried pasting my paragraph
into a text processor such as TextEdit or ClipEdit. I saved the document, and
repasted the saved material into MS Word hoping make the links go away. No such
luck.
In nuclear physics and nuclear chemistry, nuclear fission is a nuclear reaction in which the nucleus of an atom
splits into smaller parts, often producing free neutrons and lighter nuclei, which may
eventually produce photons (in the form of gamma rays). Fission of
heavy elements is an exothermic reaction which can release large amounts of energy both as electromagnetic radiation and as kinetic energy of the fragments (heating the bulk
material where fission takes place). — Wikipedia on Nuclear Fission
|
In nuclear physics and
nuclear chemistry, nuclear fission is a nuclear reaction in which the nucleus
of an atom splits into smaller parts, often producing free neutrons and
lighter nuclei, which may eventually produce photons (in the form of gamma
rays). Fission of heavy elements is an exothermic reaction, which can release
large amounts of energy both as electromagnetic radiation and as kinetic
energy of the fragments (heating the bulk material where fission takes
place). - Wikipedia on Nuclear Fission
|
Okay, perhaps MSW can help me
out using a save to text option. A small miracle – It worked.
- Paste the paragraph into a new MSW document.
- Save As to text only.
- Quit the document, other wise this tip will not
work!
- Open the newly saved text document and paste the
unformatted text into your original.
The method keeps
capitalization, and your paragraphs but removes bold – italic and other font style characteristics. It takes me back to
my old Smith Corona typewriter.
Harry (doc) Babad – MacCompanion.com
# ? # ? # ? # ? # ? # ? # ? # ? # ? # ? # ? # ?
Thats all folks
Harry {doc}
Babad
