Babad's Macintosh Tips
- A Macintosh Tip or Three
February 2008
Edition
By Harry {doc} Babad ©
2008 |

|
Product and company names and logos in this review
may be registered trademarks of their respective companies.
The software related
tips were tested on a 1 GHz dual processor PowerPC G4 Macintosh with 2 GB DDR
SDRAM; running under Macintosh OS X OS X 10.4.11.
|
This month I continue
sharing my occasional tip related finds with you. As the occasion warrants,
some of the Tips I share come from — Paul Taylor's Hints & Tips
column http://www.mac-hints-tips.com and are used with his permission. Where I use any one
elses tips for this column, I acknowledge both their source and their
contributors. Yes, I do write some of the tips Ive discovered while Macin
around.
Oh, I almost forgot!
Unless otherwise noted, all the tips and tidbits I share, where appropriate,
work on my computer. If I don't own the software but if the tip sounds
interesting, I'll so note at the end of that specific write-up.
Tips Ive provided this
month, as always in a random order, include:
- Your
Home Folder is Special
- Will PandoCalendar be compatible When I Switch to
Leopard?
- A Strangeness in PandoCalendar
- Dont Despair, Deal with Corrupted Documents
- Experiment
With Smart Folders
- A MS Word Extra Paragraph Breaks Removal Tip
- Changing the Master Password for your Computer
- Leopard
Users Dont Give Up on Eudora 6.2.4
- Use New Screen Region Capture Options in 10.5 and One Capture Hint for the
Tiger
- Change icon view
options in open and save dialogs in Leopard
- What
is Identity Theft? How to Prevent it.
~ * ~ * ~ * ~ * ~ * ~ * ~ * ~ * ~ *
~ * ~
Your
Home Folder is Special
Your home folder (or home directory) is indicated by the
little house icon, and its a very special folder indeed. It must be located
within the Users folder, which is at the root level of your hard disk. (At the
root level means that you can see it as soon as you open the hard disk.)
If you succeed in moving your home folder out of this
location or renaming it, the Mac will be confused to the extent that next time
you start it up, it will create a brand new (essentially empty) home folder for
you, and ignore the original one entirely. You will have the impression that
all your personal documents, music, photos, settings, and whatever have gone
west. They havent, but its surely a shock to the system (yours, not the
Macs).
But does the Mac OS even allow you to move your home folder
to another place or to rename it? Insanely yes, as long as youre an
Administrator user, which most of us are. Correcting the situation after a
restart is not so easy!
Unless you want to pay someone to sort out the consequences, do not move or rename your home folder.
AUSOM News, Melbourne, Australia
From Paul Taylors Hints and
Tips Newsletter – October 2007
~ * ~ * ~ * ~ * ~ * ~ * ~ * ~ * ~ *
~ * ~
Will PandoCalendar be compatible When I Switch to
Leopard?
I wrote reviewed PandoCalendar
X 7.0.3 — A minimalist KISS Calendar
for keeping dates] and notes [4.5 macCs] in the October 2007 macCompanion It simplicity, compared to Apples iCal is so welcoming that Ive never abandoned it.
Therefore, I checked its developer on whether it would be Leopard ready.
As long as you're running
PandoCalendar 7.0.5, you should be fine on Mac OS X 10.5. Among the bugs it
contained fixes for, was the only Leopard specific bug I've found.
Panda Systems http://www.PandaCorner.com/
~ * ~ * ~ * ~ * ~ * ~ * ~ * ~ * ~ *
~ * ~
Strangeness in PandoCalendar
 I noted, several weeks after Id published my review, a strangeness PandoCalendar that I'd love fixed in a future version.
Yes I know this PandoCalendar a labor of love for you... but feedback is my
calling.
I noted, several weeks after Id published my review, a strangeness PandoCalendar that I'd love fixed in a future version.
Yes I know this PandoCalendar a labor of love for you... but feedback is my
calling.
Discomfort — I often
need to enter repetitively scheduled meetings, such as those related to the
organizations I volunteer for. Therefore I use the PandoCalendar advanced rule
feature of the new appointment support function.
Okay here's the glitch.
Although I my have a meeting for the men's club of my church every third
Wednesday evening, the subjects (focus) for that meeting differs each month.
I've tried to use the details window to show the differences, but as you know
that doesn't work. A similar problem occurs when listing events for our
community concert series, every 1st and 3rd Saturday evening through the school
year. But of course the focus of the concerts changes each month.
Developer Reply — Not being able to change the edit the
title/details for individual occurrences of a recurring event isn't a bug. It's
more of a catch 22. I've been aware of the limitation since I started working
on the implementation of the recurrence system. When you set an event to recur,
your causing THAT event to occur again on days in the future. All the
occurrences are just aliases of the same event. Right now, I'm not sure when
I'll be able to address this.
Doc sez, Ill be awaiting
any solution you can implement; the programs value to me is with the wait.
Panda Systems
~ * ~ * ~ * ~ * ~ * ~ * ~ * ~ * ~ *
~ * ~
Dont Despair, Deal with
Corrupted Documents
Not infrequently, Steve
Cooper is asked to fix an apparent problem in an application, which turns out
instead to be a problem with an individual document.
If you have a persistent
problem in working on a document (such as odd formatting that you cant change,
or strange characters that you cant delete), one thing you should try early in
the process of troubleshooting is to see if the same problem appears in other
similar documents. Open a new document; enter text, graphics or whatever of
exactly the same kind as caused the problem originally. If the problem does not
appear in the new document, you can be pretty sure the original document is
corrupted. If the document represents a lot of work, the question will be how
to rescue it.
As a first step, try
cutting and pasting the content to a new, empty document; that is, select the
content of the problem document, copy it (Edit > Copy), switch to the new
empty document, and paste (Edit > Paste). If the document contains both text
and graphics you will probably have to copy and paste these separately.
If the problem persists in
the new document, it is very likely that the problem is related to the
invisible formatting commands embedded in the document. What you now have to do
is to save the documents visible content in a way that involves simpler
formatting commands, or none at all, in the hope that the cause of the problem
will be left behind.
Do this via the File >
Save As.. Menu command. In the Save As dialog you will very likely see a
pop-up menu enabling you to select file formats other than the normal one.
First, try saving in the
format of an earlier version of your application. For instance, if youre
working in a recent version of Microsoft Word, try saving in Word 6/95 format.
If this doesnt produce
the desired result, save in a simpler generic format. For word processing
documents this would be RTF or, as a last resort, Plain Text (also called ASCII
Text or just Text). RTF has the advantage that it will often retain embedded
graphics, while plain text is just that — all graphics and almost all
formatting are lost.
In each case you will
probably lose some of your formatting, but trying the alternatives in the above
order will minimize such loss. Having finally found a format that eliminates
the problem, resave your new document in the original format to continue work
on it.
Sometimes, the problem
will be so severe that you cant open the document at all, or that your
application crashes soon after opening it. In this case, look for a feature of
your application that enables you to open any document at all — not just
those created by that application. There may be a pop-up menu in the Open dialog
that allows you to choose Any File, or there may be a menu command Open
Any. In some applications, holding down the Option key while choosing the
Open menu command will enable you to open any document.
If you succeed in opening
a foreign or badly damaged file in this way, youre likely to see the text
you recognize interspersed with nonsense text, which is actually the formatting
command. A single section of text may appear several times, depending on how
many alterations you made to it during editing. It may therefore be something
of a chore to eliminate the rubbish and reconstruct the original document, but
sometimes there is sadly no alternative.
Steve Cooper — AUSOM News, Melbourne, Australia
From Paul Taylors Hints and Tips Newsletter –
October 2007
~ * ~ * ~ * ~ * ~ * ~ * ~ * ~ * ~ *
~ * ~
Experiment
With Smart Folders
Ive just begun using Smart Folders,
and already I cant live without them. Smart Folders are a great way to find
files, and keep them organized. Apple says With Smart Folders, you can
organize files by what they have in common, instead of by their location on
your disk. Because they use Spotlight, Smart Folders can organize files by
their contents, as well by attributes that describe those contents and how they
were created. For example, you can create one Smart Folder with all your
spreadsheets, another with the documents you modified today, and another with
the presentations that mention a specific project.
Pretty cool! To begin
experimenting with Smart Folders:
In the Finder, choose File > New Smart Folder.
Choose your search criteria. To search your files names, contents, and
attributes for text, type in the search field. To limit where the Smart
Folder searches, click one of the listed locations, or click others to
choose another location. To search on a specific metadata attribute, use
the pop-up menus.
Click
Save, and choose the name and location for your Smart Folder. You can
place a smart folder anywhere you can place a folder. If you do not want
your Smart Folder to be in the sidebar, deselect Add To Sidebar.
From
Apple: To view the items that match your Smart Folders criteria, click
it in the sidebar or double-click it in the Finder. The folder is updated
automatically as you change, add, and remove files.
To
edit a Smart Folder, locate it in the Finder or in the sidebar and open
it. When you are done changing the search criteria, clicks save.
To
change the name of a Smart Folder, Control-click it in the sidebar and
choose Rename, or select the folder in the Finder and type a new name.
If youre like me, Ed, and
you have lots and lots of files, or lots and lots of versions of files, Smart
Folders are for you.
Ed Shepard — LIMac
Forum, Long Island, NY
From Paul Taylors Hints and Tips Newsletter – October
2007
~ * ~ * ~ * ~ * ~ * ~ * ~ * ~ * ~ *
~ * ~
A MS Word Extra Paragraph Breaks Removal Tip
For some reason, some
features of my MS Word 2004, installation dont behave as they used to. Im too
lazy to figure out why, and since I keep MS Office updated and have extensively
customized MS Word to meet my needs, I don/t want to reinstall and update the
product.
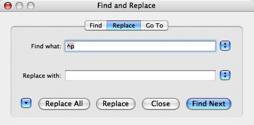 Heres the problem. If often copy test, either from a website or a PDF
for either reference materials or to use as quoted materials in my writing. Of
course that results, when pasted into a word document in a line break
(paragraph mark) at the end of each line of text. MS Word has a Find and
Replace feature in its edit menu that when, in the past, I selected the text section
that needed to be consolidated into a single paragraph, would do so. That no
longer works. Initially I used the replace/next function manually, skipping
over legitimate paragraph breaks. But that quickly got OLD.
Heres the problem. If often copy test, either from a website or a PDF
for either reference materials or to use as quoted materials in my writing. Of
course that results, when pasted into a word document in a line break
(paragraph mark) at the end of each line of text. MS Word has a Find and
Replace feature in its edit menu that when, in the past, I selected the text section
that needed to be consolidated into a single paragraph, would do so. That no
longer works. Initially I used the replace/next function manually, skipping
over legitimate paragraph breaks. But that quickly got OLD.
Now many of you would
either go to the Microsoft Mactopia site
<http://www.microsoft.com/mac/comingsoon.htm > or Google or even MSW
Help. But Ive never been comfortable cashing my tail on the Microsoft site and
most of the Help info doesnt solve my problems. Therefore, I decided to
brew my own solution. Its simplicity amazed me. Here are the instructions.
Copy your selected text
into a new MS Word document. (Why not just paste it into the document you need
it in; later
? Make sure that show paragraph [¶]is on or youll not see the formatting.
Enter a Section Break
[Menu > Insert > Section Break] where you need the real paragraph break.
Paste paragraph symbol
into the Find What text field. It will look like this [p]. Tab to the next, replace with field, and add a space;
its not obvious but the cursor has moved in the text field. If you dont add
the space the ext will run together
what a mess.
Press replace
all. Each paragraph is now separated by a section break. Add a paragraph
break or tow, depending on the formatting you want, before each continuous section
break. Disappear the section break by selecting its line (the ¶ symbol that
precedes it and backspace. Alternatively, select the continuous section break
with you cursor and hit the enter key once or twice, Voila, a new paragraph. That all there is to
it.
Note — You likely find that the pasted
text has other spelling or extra spacing artifacts, an easy fix which I do each
error at a time.
Oh, lest I
forget. With the replace in selected text glitch in my MSW copy broken, Id
have more work to do to make such extra paragraph corrections in my working
document
Harry doc_Babad, macCompanion.com
~ * ~ * ~ * ~ * ~ * ~ * ~ * ~ * ~ *
~ * ~
 Changing the Master
Password for your Computer
Changing the Master
Password for your Computer
If you have an install
disc for the operating system that your computer is running you can change the
master password. (Any Macintosh OS X version works for this tip.) You may want
to do this either for security reasons or because you forgot that password and
are cut off from administrator privileges.
Here is how.
Put your Mac OS X Install CD or DVD in your optical
drive and restart with the C key held down (to boot from the optical disc).
Click through the language selection screen. Then
choose Utilities > Reset Password.
Select your usual startup disk. Then, from the pop-up
menu below the volume list, choose the user whose password you want to reset. (Do
not choose "System Administrator (root)," which represents an
entirely different account!)
Enter (and repeat) a new password, and optionally
enter a hint. Click Save, and then click OK.
Choose Reset Password > Quit, and then Installer
> Quit Installer. Click the Reset button to restart from the hard disk.
Once you've done this,
you'll still be prompted to enter a password for your login keychain. If that
password was the same as your login password - meaning it too is forgotten -
you'll have to delete that keychain, make a new one, and set that keychain as
the default.
Paul Didzerekis
Mid-Columbia Macintosh Users Group
Also
CreativeTechs.com from Paul Taylors Hints and Tips Newsletter –
October 2007
~ * ~ * ~ * ~ * ~ * ~ * ~ * ~ * ~ *
~ * ~
Leopard
Users Dont Give Up on Eudora 6.2.4
Since I was not ready to give
up on Eudora Ive kept checking the web for a way to keep my favorite email
client. There was nothing new about Odysseus on the http://www.infinitydatasystems.com/products/odysseus/index.html or http://www.ugnn.com/2007/10/new_eudora.html/sites/

But I found a notice from
Qualcomm about Eudora 6.2.4 OS X for 10.5 'Leopard' users — In order for
Macintosh Eudora to work well under OS X 10.5.x 'Leopard', you need to turn off
the use of specific sounds in Eudora. These are the sounds Eudora plays when
you get new mail or Eudora needs your attention, or are played by Filters. The
sounds that are problematic are the ones that contain 'Eudora' in their name as
they were created using a sound synthesizer that Leopard does not support. To
disable or change the sounds used in Eudora, do the following:
Turn off or change the
'New Mail' and "Attention" sounds:
Open Eudora->Preferences
and select the 'Getting Attention' panel
In the 'Sounds' section, for
both 'New mail sound' and 'Attention sound', select a sound OTHER than one that
has 'Eudora' in its name (i.e. NOT 'Eudora Attention', 'Eudora New Mail' nor
'Eudora Short Warning')
Click OK to the close the
Preferences
- Turn
off sounds triggered by filters:
- Open
Window->Filters
- Look
through all your filters for filters that have a 'Play Sound' action.
- Select
a sound that does NOT have 'Eudora' in its name, or disable sounds all
together by selecting 'None' from the action popup menu.
Qualcomm Information Source — http://www.eudora.com/download/
~ * ~ * ~ * ~ * ~ * ~ * ~ * ~ * ~ *
~ * ~
Use New Screen Region Capture Options
In 10.5 and One Capture Hint for the Tiger
In 10.5, the
region capture screenshot tool -- that's Shift-Command-4, which turns your
cursor into a draggable crosshair -- has learned quite a few new tricks. Since
the days of 10.2, if you added the Control key into the mix, the capture would
go to your clipboard, instead of to a file. (This is a great way to grab a
quick screenshot for an iChat session, by the way. Just
Shift-Control-Command-4, drag around the area to capture, release the drag,
then switch back to iChat and hit Command-V to paste.)
But with 10.5,
Apple has found uses for the Shift, Space, and Option keys as well. This gets a
bit complicated, but I'll try to explain it clearly, and then demonstrate with
a short movie. If you start a region capture, either with or without the
Control key, you can then change how the region selection area changes by using
the following keys -- note that you can release the original keys once the
crosshairs appears, as long as you've started dragging your mouse, and you keep
the mouse button down.
Space Bar: Press and hold the Space
Bar, and the size of the current region is then locked and can be dragged
around the screen. As long as you hold the Space Bar down, the regions
size is locked and it can be dragged about.
Shift: Press and hold the Shift key,
and one side of the region will be locked, based on which way you then
move the mouse. For instance, if you press and hold Shift, and then move
your mouse down, youll only be able to resize the region vertically; the
horizontal size will be fixed. Move the mouse left or right, and you can
resize the region horizontally while holding the vertical size fixed.
Option: Press and hold Option while dragging your region, and
youll change the way the region grows as you drag. By default, your region is
anchored at the upper left corner; when you press Option, the anchor point is
moved to the center of the current region, and it expands in all directions
from that point.
To make
things even a bit more confusing, you can combine some of these keystrokes.
Shift and the Space Bar together will allow a fixed-size region to be dragged
in either a vertical or horizontal direction, depending on which direction you
first move the mouse after pressing the keys. If you combine Shift and Option,
then you can grow your region from the center, restricting either the vertical
or horizontal size. As I said, its a bit confusing, so theres a movie of the
options in action on the Mac Hints website.
Check Robs the movie at: http://www.macworld.com/article/131404/2008/01/screencapopts.html?lsrc=mwhints
For Tiger
Too
Doc Sez, if you are using
Tiger, you can change the default output for screen captures by using one of
several shareware/freeware applications. I do prefer that all my captures be in
jpeg format at high resolution so I can better customize the images.
Of course
you also get more options with Apples Grab tool
By Rob
Griffith MacWorld OS X Hints Jan 4, 2008
And Harry
doc_Babad
~ * ~ * ~ * ~ * ~ * ~ * ~ * ~ * ~ *
~ * ~
Change icon view options in open and save dialogs in Leopard
Doc Sez, Im not much of an icon view
fan. Relying mostly on list view for my Finder meanderings. However this sweet
tip by Rob Griffiths caught my eye and I couldnt resist passing it on.
 Heres a new feature for
those who prefer working in icon view. When you see an open or save dialog in
OS X, you can now change the displayed icon size—as well as the position
of the text labels—through a convenient though oh-so-hidden menu. As seen
in the image at right, youll find this hidden menu hiding behind the icon-view
icon in the save or open dialogs toolbar. To make the menu appear, you must
click-and-hold on this button; control-clicking will not work. In addition to
the icon sizes, you can move the icon labels from the bottom to the right using
the Label Position menu item.
Heres a new feature for
those who prefer working in icon view. When you see an open or save dialog in
OS X, you can now change the displayed icon size—as well as the position
of the text labels—through a convenient though oh-so-hidden menu. As seen
in the image at right, youll find this hidden menu hiding behind the icon-view
icon in the save or open dialogs toolbar. To make the menu appear, you must
click-and-hold on this button; control-clicking will not work. In addition to
the icon sizes, you can move the icon labels from the bottom to the right using
the Label Position menu item.
Keep in mind
that changes made in this dialog apply to all applications, not just the one youre changing them
from within. The settings are also permanent, and will stay as you set them
across logouts and restarts.
By Rob Griffiths MacWorld OS X Hints Nov 28, 2007
~ * ~ * ~ * ~ * ~ * ~ * ~ * ~ * ~ *
~ * ~
What is Identity Theft? How to Prevent it.
 DocBabad sez that this article I reviewed as a AmEx cardholder contains
much of the information found in Consumer Reports, the AARP magazine and other
sources Ive read. But it was shorter and more to the point, so I am reprinting
here, w/o permission since the information appears in other public sources
including Federal sites such as that of the Federal Trade Commission [http://www.ftc.gov/bcp/edu/microsites/idtheft/].
DocBabad sez that this article I reviewed as a AmEx cardholder contains
much of the information found in Consumer Reports, the AARP magazine and other
sources Ive read. But it was shorter and more to the point, so I am reprinting
here, w/o permission since the information appears in other public sources
including Federal sites such as that of the Federal Trade Commission [http://www.ftc.gov/bcp/edu/microsites/idtheft/].
Identity theft
occurs when someone uses your personal information without your permission to
take over your existing accounts or to open new accounts. Identity theft can
result in damage to your credit rating and denials of credit.
Identity theft
commonly begins with the loss or theft of a wallet or purse. But there are many
other ways that criminals can obtain and use your personal information,
including "dumpster-diving" (stealing records from your trash) and
phishing (sending fraudulent e-mails requesting your personal information).
Since identity
theft is of concern, it's important to remember that there are steps you can
take to minimize the risk and help protect your privacy and identity. Doc sez,
Ive added an item to this list based on safe practices Ive read.
Shred documents containing your personal
information before discarding them.
Secure your personal information at home and at
work.
Before disclosing any personal information, make
sure you know why it is required and how it will be used.
Obtain your credit report from each of the three
major credit bureaus once every 6-12 months and review them for accuracy.
(You can get a free copy of your credit report each year at http://email.americanexpress.com/a/hBGfAA6AQB6AABNVsQSAGG2jabP/axp5 or http://www.annualcreditreport.com.
Use caution when responding to e-mails requesting
personal information. When in doubt, contact the sender of the request
through a known, secure channel (phone number on back of credit card or a
known website address).
Make copies with you Social Security number
blackened out on any ID you carry in your wallet.
If its too good to be true, its not true. As
Robert Heinlein noted in several of his novels, there is no free lunch.
A Bakers Half
Dozen Sites with more information:
http://www.privacyrights.org/fs/fs17-it.htm
http://militaryfinance.umuc.edu/id_theft/id_prevent.html
http://sbinfocanada.about.com/od/insurancelegalissues/a/identitytheft.htm
http://www.ftc.gov/bcp/conline/pubs/credit/idtheftmini.shtm
http://www.ehow.com/how_6856_prevent-identity-theft.html
http://www.schoolcio.com/showArticle.php?articleID=192501201
Thats all for February
folks
Harry {doc} Babad
