Doc_Babads
Macintosh Tips – A Macintosh Tip or Three
February
2009 Edition
By Harry {doc} Babad ©
2009 |

|
Product and company names
and logos in this review may be registered trademarks of their respective
companies.
Reviews were
carried out on my iMac 2.8 GHz Intel Core 2 Duo with 2 GB 667 MHz DDR2 SDRAM
running Mac OS X version 10.5.6. |
Disclaimer: When briefly reviewing share-freeware I will often
use the developers product, functions and features descriptions. All other
comments are strictly my own and based on testing. Why need I rewrite the developers narratives, if they
are clearly written? |
Acknowledgements
— As the occasion warrants, some of the Tips I share come from Paul
Taylor's Hints & Tips column http://www.mac-hints-tips.com, and are used with his
permission. If you have tips to share send them to Paul — paul@mac-hints-tips.com.
I also use user group
published tips their consent if I can make the contact with the appropriate
officer. Where I use any one
elses tips for this column, I acknowledge both their source and their
contributors. Yes, I do write down and share some of the tips Ive discovered
while Macin around. If a tip or hint comes from a more traditional commercial
source, I both acknowledged that fact and almost always modify the tip to
personalize it for our readers.
Oh, I almost forgot!
Unless otherwise noted, all the tips and tidbits I share, where appropriate,
work on my computer. If I don't own the software but if the tip sounds
interesting, I'll so note that information at the end of that specific
write-up.
# ? # ? # ? # ? # ? # ? # ? # ? # ? # ? # ? # ?
Tips Ive provided this
month, as always in a random order, include:
- Drag-and-Drop Your Documents to Create a PDF
- So You Cannot delete Locked Files on External
Volumes
- An
Audio Cable Conundrum
- Changing
{Customizing} Your Icons
- OS X 10.5 Diagnostics Are Available Without a
Leopard DVD
- Desktops Disappearing After Installing
Programs/Updates
- My Cursor is Freezing at Random
- Entered Text in Preview Accessed PDFs Does Not
Save
- Printing
Selected Text
# ? # ? # ? # ? # ? # ? # ? # ? # ? # ? # ? # ?
Drag-and-Drop Your
Documents to Create a PDF
Any file you could normally convert to PDF
through Acrobats File > Create PDF > From File menu item can also be
converted by simply dragging it onto Acrobats icon on the Desktop or Dock. It
doesnt matter whether Acrobat is running or not — it will launch if
necessary. One advantage to this approach is that you can drag multiple files
onto Acrobat at the same time and each will convert to PDF and open into a new
window. Thats another reason why Acrobat Pro, in this instance, lives in my
dock.
Design
Tools Monthly
Paul Taylors Tips and Hints — October 2007
# ? # ? # ? # ? # ? # ? # ? # ? # ? # ? # ? # ?
So You Cannot
Delete Locked Files on External Volumes
Users with external hard drives or other
storage devices may occasionally run into problems accessing files on these
devices, especially when attempting to delete files that are reported by Mac OS
X to be "locked".
Apple Discussions poster wholemilk writes: "I'm trying to delete some
files and I get the following message, 'Emptying the Trash cannot be completed
because yourfilename.mpeg' is locked. To empty everything in the Trash,
including locked items, press the Option key while selecting Empty Trash.' I've
tried this a dozen different ways and it won't work. I get the same error
message. I've tried the Option key (on either side and together), the command
key, delete and various combinations therein -- it's still in the trash."
Doc sez this is an important issues because many of us format our thumb dives
or portable hard drive to FAT to allow compatibility with our PC using
colleagues and friends.
MacFixit Response — This problem seems to be
associated with drives that are formatted to the Windows associated FAT instead
of Mac OS Extended (HFS+). While FAT supports files being set to "read
only" or "hidden", the methods used for setting these files are
not supported by OS X. As such, if a file that is "read only" in
Windows or another operating system, users will not be able to edit or delete
the file in OS X, even with administrative privileges. This is the result of an
incompatibility between the OS and the FAT file system. FAT does not support
individual file permissions and instead relies on FAT-specific file attributes
for features that OSX even in terminal mode cannot handle. Therefore, file
handling utilities such as
to force the file to be deleted and will
not work for files on FAT-formatted drives since they all rely on permissions
support for file access, so Macintosh users are stuck with those files not
being editable in OS X.
Fixes —
Access the files in another operating
system — Windows
fully supports the FAT format and its file attributes, so if users have access
to a Windows PC or have BootCamp running on their Macs, they can access the
drive in Windows to delete the locked files or unlock them so they can be
edited in OS X. With the drive mounted in Windows, right-click the file and get
properties on it. Then in the "General" tab uncheck the attributes
checkboxes, including those listed after clicking the "Advanced"
button. Alternatively users should be able to delete the file in Windows if it
is unneeded.
Format the drive to another format
type — If the drives are going to be used with
other computers then it may be necessary to keep the drive as FAT, but if it is
only going to be used with Macintoshes, then formatting it to Mac OS Extended
is the most compatible format to use. Back up the files on the disk, and then use
Disk Utility to format the drive to Mac OS Extended.
MacFixit Daily Newsletter, Thursday, August 18 2008
# ? # ? # ? # ? # ? # ? # ? # ? #
? # ? # ? # ?
An Audio Cable Conundrum
Question:Im trying to import
audio from an old tape deck to my iBook G4. That iBook doesnt have a mic/line-in> port, so Ill need to use some sort of USB device. Assuming I can buy an
external device — such as Griffins $40 iMic — to serve as an
interface between my Mac and the tape deck, what kind of cables will I need to
connect the tape deck to that external device and from that device to my Mac?
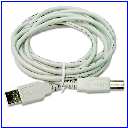 Answer:Every device of this
type that Ive encountered — including the iMic — comes with the
USB cable you need to connect it to your iBook. If whatever device you end up
buying doesnt come with one, youll need to find a standard A-to-B USB cable. The A side, which goes into your
computer, has a rectangular male connector; the B connector is squares and
connects to the USB audio interface.
Answer:Every device of this
type that Ive encountered — including the iMic — comes with the
USB cable you need to connect it to your iBook. If whatever device you end up
buying doesnt come with one, youll need to find a standard A-to-B USB cable. The A side, which goes into your
computer, has a rectangular male connector; the B connector is squares and
connects to the USB audio interface.
The cable you need for
the other leg of the connection depends on your output device and the audio
interface. Typical cassette players include RCA output ports — those red
and white plugs that populate the typical home stereo. USB audio interfaces
sometimes have RCA inputs as well. If so, just get a standard RCA-to-RCA cable
and youre in business.
The 1/8-inch mini-jack is increasingly popular on audio interface hardware. (The
iMic, for example, includes mini-jack in and out.) This is the same kind of
connector that your iBooks headphone port uses. If you have a standard
cassette player with RCA outputs, youll need an RCA-to-stereo mini-plug Y
cable. A quick trip to Radio Shack should secure one for less than $10
(assuming you look elsewhere in the store after the clerk directs you to the
nicely made, but really expensive, Monster cables).
Christopher Breen
MacCHUG Line, Macintosh Chico UG,
Oroville CA
Paul Taylor's November 2008 Hints & Tips Column
# ? # ? # ? # ? # ? # ? # ? # ? # ? # ? # ? # ?
Changing {Customizing}
Your Icons
Every volume, application, file, and folder on your Mac is
represented by an icon. Volume icons tend to look like the item that they
represent, for example, your hard disk looks like a hard drive, CDs and DVDs
look like discs, and removable drives look like removable drives.
My Icon: ACTIVE Technical
PROJECTS
Application icons are all generally unique, so they stand
out from one another. Folder icons may flaunt a plain blue folder facade or
display a little extra decor on the folder icons to help you identify whats
inside of them. File icons generally display a document with an application
logo that lets you know what application created it or can open it. But you can
change these mini works of art to ones of your own choosing or creation.
To change an items icon to another one:
- Select the volume,
application, folder, or file whose icon you want to stamp onto another, just
click the icon to select it.
- From the File menu,
choose Get Info or press Command/I to open the Info window.
- Click the icon in the
upper-left corner of the Info window to select it.
- From the Edit menu,
choose Copy or press Command/C.
- Select the volume,
application, folder, or file whose icon you want to replace.
- Your own photo file
icons, such as those from a TIFF or JPEG image, are great sources to use if you
want totally unique icons.
- Select the volume,
application, folder, or file whose icon you want to replace.
- From the File menu,
choose Get Info or press Command/I.
- Click the icon in the
upper-left corner.
- From the Edit menu,
choose Paste or press Command/V to replace the icon.
Just paste your source
icon onto the original in the Info window to give it a more unique look.
Change Your User Icon — Your user account
bears an image icon that appears when you log in, (if your Mac isnt set to
automatically log you in), as your default icon in iChat and in your Address
Book card. When you first set up your Mac, you had the opportunity to select a
picture to use as your icon. If youre looking for a change, heres how to
select a different image;
- Make sure that youre
logged in to the user account whose picture you want to change. From the Apple
menu, choose System Preferences.
- Click Accounts.
- Click the Picture tab.
- Click Edit.
- Drag any image file from
your Desktop or a Finder window onto the resulting Images window.
- Use the slider at the
bottom of the window to zoom in to your picture. You can also drag the image
around in the window to adjust the framing.
- When satisfied, click
Set to make the change.
 Get Icons—
If youre interested in finding more icons than what is currently in your Mac,
you can find plenty of third-party Mac icon creators on the web who make their
designs available for download. If one suits your fancy, just copy and paste
the icon as we showed you above.
Get Icons—
If youre interested in finding more icons than what is currently in your Mac,
you can find plenty of third-party Mac icon creators on the web who make their
designs available for download. If one suits your fancy, just copy and paste
the icon as we showed you above.
You can check out the icon collections on
these sites:
- Pixelgirl
Presents This site
houses over 350 Mac OS X icon sets that cover the graphics gamut from your
basic designer looks to far-out funky. If youre looking for something unique,
check out their designs.
- The
Iconfactory This site contains one
of the largest Mac icon archives, plus it features IconBuilder, which lets you
create your own icons, and CandyBar, which changes icons anywhere on your Mac,
including the Trash and toolbar items.
- InterfaceLIFT This site offers over
775 icon sets in a wide range of subjects. Youre bound to find something you
like here.
- IconArchive http://www.iconarchive.com The site hosts 22,300
icons that can be used for either your Macintosh, Windows or Linux.
- Leos
Icon Archive contains over
12,000 high quality icons for Windows, Macintosh and Linux systems. Last, but not
least
- ICONS.OX
Why Be Limited in Your Creativity
You can also create your own icons with
software such as FolderBrander and iconCompo. Both tools are intuitive, effective and can create fine icons from Internet
images. If these dont meet your needs, there are other fine icon creation
tools out there, but Ive not needed to test them.
(Thanks
Mac 101 at http://apple.com) ~ Phil Russell/p>
Mouse Droppings, Corvallis OR
As Annotated by doc_Babad
Paul
Taylor's November 2008 Hints & Tips Column
# ? # ? # ? # ? # ? # ? # ? # ? # ? #
? # ? # ?
 OS X 10.5 Diagnostics Are
Available Without a Leopard DVD
OS X 10.5 Diagnostics Are
Available Without a Leopard DVD
With newer Mac models, the
Leopard DVD is no longer needed to run the Apple Hardware Test for diagnosing
hardware problems. Users can simply boot the computers startup while holding
the "D" key down to boot into diagnostic mode -- the utilities are
stored somewhere on the hard drive.
One Apple Discussion board
user experimented with his setup, and found the system does not boot into
diagnostic mode if the hard drive is disconnected. Additionally, it seems this
feature is only available on original factory-installed operating systems (or
reinstalls from the Apple-provided restore DVDs), so users who have upgraded
from Tiger or who have reinstalled their operating systems from retail boxes
may not have this feature. Speculation holds that Apple enabled this feature to
facilitate diagnostics with the drive-less MacBook Air.
MacFixit Daily Newsletter
Thursday, August
25 2008
#
? # ? # ? # ? # ? # ? # ? # ? # ? # ? # ? # ?
Desktops
Disappearing After Installing Programs/Updates
 There have been various cases in which users have
either updated their systems or installed third-party applications and have
experienced problems with their Desktops disappearing.
There have been various cases in which users have
either updated their systems or installed third-party applications and have
experienced problems with their Desktops disappearing.
Apple Discussions poster xtine1217 writes: "I downloaded a photo-editing program
called Gimp the other day, and ever since then, all of the icons, files, and
folders have disappeared from my desktop. They are listed in the Finder menu
under "Desktop," but even dragging will not allow anything to appear
on the desktop itself." Discussions.apple.com
When users install various
programs and updates it is possible that permissions can be changed on
resources that should otherwise not be touched. While most developers ensure
such problems do not occur, there are always overlooked situations in which
resources can get renamed or have their permissions altered, and if this
happens, the system can show odd behavior similar to that experienced by this
user. Similar issues have occurred in the past for users who installed the Dark
Knight movie screensaver, which ended up packing the desktop contents into a
separate file.
MacFixIt Troubleshooting Steps
Does the Desktop folder
exist? — The first thing user
should do is check whether the Desktop folder is present. If the folder has
been either renamed or deleted from the user's home directory then it will not
"Exist" to the finder and will result in an inaccessible desktop that
will not hold any items. Navigate to the home folder in the Finder and ensure
the folder is there, is named "Desktop", and has a unique folder
icon, which indicates the Finder is properly recognizing it as the desktop.
Are the Desktop
permissions correct? — If the
Desktop folder exists, right-click it and get information on the folder. Then
at the bottom of the information window ensure the first name listed is the
name of the current user account. If it is not listed, click the lock and
authenticate, then click the "+" sign and add the current user from
the list of users. Next ensure the user has both read and write permissions on
the folder.
Remove Finder and Desktop
Preferences Files — Navigate to
the user's preferences folder /username/Library/Preferences/ and remove the
following:
- files:com.apple.finder.plist
- com.apple.desktop.plist
When these files are removed,
relaunch the finder by pressing options-command-esc to bring up the "force
quit" window. Then click the finder and click "Relaunch".
Use Tinkertool to disable and
Re-Enable Desktop Features — Using TinkerTool's "Disable Desktop
Features" option, users can attempt to toggle the Desktop into behaving
properly. This feature in TinkerTool just edits the Finder preferences file so
the suggestion in #3 above should work instead, but users are welcome to try
this option as well. Download a copy of TinkerTool at MacUpdate.com, then check the "Disable Desktop Features"
option, relaunch the Finder using the "Force Quit" window, and then
enable the features again by unchecking the option in TinkerTool, then
relaunching the Finder again when finished.
Is the Home directory
renamed? — If users have somehow renamed their home directories to
something other than their short login name, upon next login the system will
have trouble loading preferences and other items associated with the user
account. If the user is an administrator, a new account will be created for the
user, which will make it appear as though desktop items and other account
settings have been reset. To reset a new home folder and use the old one, open
the boot drive in the Finder and go to the "Users" folder. From
there, rename the current home folder to something different, such as
"wrong one". Then locate the folder of the user account that was
renamed (should be in the same "Users" directory) and change the name
back. Then logout and log back in to properly load the user's home directory
and recover settings and desktop items.
MacFixit Daily Newsletter
Thursday, September 17 2008
# ? # ? # ? # ? # ? # ? # ? # ? # ? #
? # ? # ?
 Why Use AnriVirus Software
Just a note on Antivirus software. Do we need it? I do know
that we dont get many viruses Virginia boasts. . Since 1984, when I got my
first Macintosh until now, I have gotten a total of — ready for this
— just two. So, you have to answer that for yourself.
>It is good insurance and for a small price it probably will
give you peace of mind. Antivirus software is not very expensive. Doc would
like to remind you that with the ever-increasing popularity of the Macintosh
even to the point of two OS families were certainly on someone hit list. Check
out the MacUser-UK article by Kenny Hemphic or Mac Security:
Antiviru by Scott McNulty, October 7, 2008, Macworld.
The Following are three of the best-rated applications on
todays market:
- Norton
AntiVirus by Symantec is $49 for one user and is easy to use.
- Virus Barrier X by Intego, $60 for one user and does very fast scans and the warnings are
very clear.
- Virex
by McAfee is included with the $100 .Mac membership by Apple. The latter seems easy to use and configure. Just
make sure all other antivirus software is not still installed. If you have a
.Mac account, just go to your account and download it. If not, check out its
website.
Of all the above listed, Virginia noted, I like VirusBarrier
X the best.
Doc sez, I used the Norton tools for years and have seen no
reason to change my protection. However, Im still POd that Symantec dropped
their fine disk management and repair suite. {Doc.}
~Virginia Chilcote
MouseBytes, Bay Area MUG, St. Petersburg FL
As
Annotated by doc_Babad
Paul
Taylor's November 2008 Hints & Tips Column
# ? # ? # ? # ? # ? # ? # ? # ? # ? # ? # ? # ?
My
Cursor is Freezing at Random
Some users have experienced a
longstanding issue in which the cursor freezes on the screen, seemingly at
random intervals. The problem generally forces a system restart.
Apple Discussions poster arthurms writes: "Quite often my mouse cursor freezes up
on the screen and my only remedy seems to be to shut down and reboot."
This problem has persisted since Mac OS X 10.5.2 for some users, and while
recent updates have reduced the prevalence of this problem, it still occurs. It
seems this issue is not necessarily system-wide; it occurs in certain
applications, such as older Firefox version, and the login window more than
others. As such, the relevant fixes for this problem can be hard to pinpoint,
but the following may help affected users.
MacFixIt Fixes and
Workarounds
Unplug and re-plug the
mouse — Unplugging all
peripheral devices including the mouse and then plugging the mouse back in
(trying different USB ports if necessary), may help restore the mouse
functionality; however, if not then users will have to restart. While users
have resorted to restarting the computer by holding the power button down, this
is not a recommended way to restart, since it has the potential to harm the
system. Instead, users can bring up the shutdown menu by pressing
"ctrl-eject" on their keyboards. When the shutdown options display,
users can press spacebar to restart or enter to shut down.
Alternately, users
can send the shutdown command to the computer via the Terminal. To do this,
press command-spacebar to open Spotlight, and then enter "Terminal"
to search for the terminal application. Upon opening this application users
should enter "shutdown -r now" to immediately reboot the system.
While this command does not allow the whole system to properly shut down and as
such should be used sparingly and only when necessary, it is still better than
holding the power key.
Update driver software — For users with third-party mice, updating the
driver software may help the situation. If there are no updates from the manufacturer,
users can try other driver software such asUSBOverdrive.
Update affected
applications — Some users had
this problem with version 2 of the Firefox browser, and upon updating to
version 3 found that the problem's frequency was greatly reduced. As such, if
any application has this problem, we recommended that users update the
application, or reinstall it if there are no updates available.
Reset the PRAM — The PRAM on the computer stores some
mouse-related parameters that load before the user-specific settings are
loaded. If there are conflicts or faults in these settings, it is possible this
could lead to problematic mouse behavior. To reset the PRAM, reboot the computer
and hold the options-command-P-R keys all at once. The computer will reset and make the boot chimes continually
as long as these keys are held. After a few resets, release the keys and allow
the computer to boot normally. The mouse settings should be set to their
defaults, along with some other system settings such as audio volume.
Reduce Mouse Tracking
Speed — Some users have found
this problem seems to be lessened if the tracking speeds in the computer are
reduced. While this indicates problems with the mouse driver, it could be a
matter of problematic hardware as well that leads to the freezes when sampled
at certain rates by the computer. In the "Keyboard and Mouse" system
preferences, reduce the mouse speed a little and see if it helps the situation.
MacFixit Daily Newsletter
Wednesday, October 08 2008
# ? # ? # ? # ? # ? # ? # ? # ? # ? #
? # ? # ?
Entered
Text in Preview Accessed PDFs Does Not Save
 The application "Preview", which is used for
viewing images as well as PDF files, has support for entering text into
editable fields in PDF documents. This is convenient for entering data into
forms, but users are experiencing problems when trying to save the PDF with the
entered text.
The application "Preview", which is used for
viewing images as well as PDF files, has support for entering text into
editable fields in PDF documents. This is convenient for entering data into
forms, but users are experiencing problems when trying to save the PDF with the
entered text.
Apple Discussions poster syra writes: "I'm filling out some PDF forms but when
I press save all of my input text disappears."
MacFixIt Response
While Preview supports
inputting text in these fields, the program does not support saving the file as
the original document. This is supposedly to preserve the original, since
saving it would get rid of the ability to make further edits in the same field.
Additionally, when users choose "Save As..." to save the edits to a
new document, the program will not preserve the inputted text and instead
essentially duplicates the original to the new location, leaving users with the
same problem with not being able to save the document.
It appears this may be a
small bug with how Preview handles the "Save As..." feature,
especially since this is the recommended route for saving documents; however,
it's possible this restriction is intentional since it is present in both
Preview as well as Adobe Reader. Despite this, however, there is a way to save
PDF forms with all the fields filled out.
Workarounds
Print the form to PDF
— When users choose to print a document, the system will convert it as-is
to postscript and from there send it to printers. Since OS X has PDF rendering
and creation built-in, these functions are available in many places, including
the print dialogue. To save a filled PDF form, users should choose the print
option from the "File" menu, and in the resulting print dialogue box
select "Save as PDF" from the "PDF" menu. This will keep the
entered text as is desired, but it will remove the ability to further edit the
form. As such, users will not be able to enter text and save it, and then go
back and change the document again. Instead users would have to start from
scratch.
Use an authoring program PDF — Authoring programs such as
Adobe Acrobat Professional should be able to enter items into text fields and
save the document for further editing, but basic reader programs, including
Adobe Reader, to not support this feature.
MacFixit Daily Newsletter
Wednesday,
October 01 2008
# ? # ? # ? # ? # ? # ? # ? # ? # ? #
? # ? # ?
Printing
Selected Text
Reader Michael Laurence would like more
flexibility in his printing. He writes: "Is there some way to select
specific text for printing rather than an entire article? When I used Mac OS 9
I used a program called Net-Print for this but it is not available for OS X. I
realize one can take a screen snapshot of selected text and then print it but
this is a rather cumbersome way to do things."
MacEase's Steve Becker offers a variety
of solutions that expand the Mac's printing capabilities. The one I'd suggest
to you is the $15 iPrint for OS X.
http://www.macease.com/iprint_main_page.html It's a straightforward utility that
runs in the background. Once installed, just select some text, press
Control-Option-P, and the selected text in the active window prints. You'll
lose some formatting along the way, but it gets the job done.
Though both MacEase's Web site and the
application icon look like they were designed in the late '90s, iPrint works
with the latest version of Leopard. If you're a do-it-yourselfer, you could
create an AppleScript that copies the selected text, pastes it into a TextEdit
document, and then prints that document.
Macworld Mac 911 Tip of the Week
By Christopher Breen
September 22, 2008
# ? # ? # ? # ? # ? # ? # ? # ? # ? #
? # ? # ?
Thats all folks
But Im
gathering tips faster then my space allows allows, so stay tipped, err tuned.
Harry {doc}
Babad
