Doc_Babad's Macintosh Tips – A Macintosh Tip or
Three...
January 2009 Edition
By
Harry {doc} Babad © 2008
|

|
|
Product
and company names and logos in this review may be registered trademarks of
their respective companies.
Reviews were carried out on my iMac 2.8 GHz Intel Core 2 Duo
with 2 GB 667 MHz DDR2 SDRAM running Mac OS X version 10.5.6.
|
|
Disclaimer: When briefly reviewing
share-freeware I will often use the developersÕ product, functions and
features descriptions. All other comments are strictly my own and based on
testing. Why need I rewrite
the developersÕ narratives, if they are clearly written?
|
Acknowledgements — As the
occasion warrants, some of the Tips I share come from Paul Taylor's Hints &
Tips column http://www.mac-hints-tips.com/, and are used with his
permission. I also use user group published tips with their consent if I can
make the contact. Where I use any
one elseÕs tips for this column, I acknowledge both their source and their
contributors. Yes, I do write down and share some of the tips IÕve discovered
while MacinÕ around. If a tip or hint comes from a more traditional commercial
source, I both acknowledged that fact and almost always modify the tip to
personalize it for our readers
Oh, I almost forgot! Unless
otherwise noted, all the tips and tidbits I share, where appropriate, work on
my computer. If I don't own the software but if the tip sounds interesting,
I'll so note that information at the end of that specific write-up.
- - - - - - - - - - - - - - - - - -- - - - - - - -
-
The
new year is coming up so I decided not to wait for Spring and did some
ÒMac-related house cleaning" anyway. I worked my way through all of the
tips related items in my in my email box (Eudora) plus rechecked all the PostIt
Tabs IÕd marked my Macworld and Mac|Life magazines {almost a years worth}. The
following tips are what I gleaned. IÕll catch up with Paul TaylorÕs Hints in
February.
Tips
IÕve provided this month, as always in a random order, include:
- Quickly reset a
Finder view to defaults
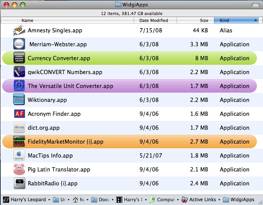
- Removing Widgets
- Set the Office 2008
default font to Times New Roman
- Printing from AppleÕs
Quick Look
- View Inline PDFs in
Firefox — The Long and Short of it!
- Deleting ZIP Files
- Office 2008
File-Compatibility Trouble
- The Many Ways to Quit
Mac Programs
- Remove Misspelled
Words from MSW Custom Dictionaries
- Two Ways Extract a
Single Page from a PDF
Quickly
reset a Finder view to defaults
As
youÕre probably well aware, the FinderÕs View Options dialog (View -> Show
View Options, or Command-J) in OS X 10.5 is the key to customizing your folder
views. Using this dialog, you can enable and disable a number of features for
each folder on your system. The options available (and what they do) vary based
on your view—in column view mode, for instance, there arenÕt a lot of
options you can set, and whatever changes you make are reflected in all column
view windows. In list, icon, and Cover Flow view modes, however, you have a
plethora of options, and those settings can vary by window.
So what
do you do when youÕve gone and customized a folder with the view you think
youÕd like to useÉand then decide that, really, you donÕt like that particular
setup at all? You could, of course, go through and reverse each change youÕd
made, but thatÕs time consuming. For all but column view windows (because every
change you make to their view options is global), hereÕs an easier
solutionÉjust hold down the Option key with the View Options window open. When
you do, youÕll see the button labeled Use as Defaults change to Restore to
Defaults. (Rob says, as best as I can recall, this only works in 10.5.)
Click the
button, and marvel at the instantaneous return of your folder to your default
settings for that view type. Sometimes the simple tricks really are the best!
By Rob Griffiths,
Macworld.com
http://www.macworld.com/article/135450/2008/09/finderdefault.html
Sep 9, 2008
Removing Widgets
Set the Office 2008 default font to Times New Roman
Office
2008's new default font (Cambria) may be cooler than Times New Roman, but for a
lot of people (especially students like myself), Times New Roman is required,
and changing it every time you create a new document is a hassle.
To change
the default font:
- Open a new document. Don't
type anything in it.
- Click the Toolbox item in the
menu to bring up the Formatting Palette (if you don't already see it).
- Expand the Styles menu if it
isn't already open.
- Hover your cursor over the
box that says Normal. A blue down-arrow shows up on the right side of the
box. Click the arrow, and in the menu that opens, click Modify Style.
- Click the box that says
Cambria and change it to Times New Roman.
- Checks the ÔAdd to TemplateÕ
box towards the bottom of the box, then click OK.
Voila!
The "Normal" style now has Times New Roman as its default font.
Doc sez:
I like Lucida Grande better but itÕs the same hint.
MacWorld Feb 5 2008 ¥ Submitted by Anonymous
http://www.macosxhints.com/article.php?story=2008012918250630&query=Office%2B2008%2Bdefault%2Bfont
Printing from AppleÕs Quick Look
Reader Brian Gall wants to do more than look at a Quick-Looked
file. He writes: I love LeopardÕs Quick Look feature. Is there any way that we
can do a Quick Look at a file, without opening it, and print it from the
Finder?
Sort of, but thereÕs a bump along the way. You can select an
item in the Finder, press the Space Bar, and get your quick look. But pressing
Command-P does nothing. However, if you mouse over to the FinderÕs File menu,
youÕll find that you can invoke the Print command for printable files.
The bump is that when you do this, the fileÕs host application
launches and then the file prints from your MacÕs default printer. So
technically, you are opening it. But, youÕre doing so and printing it without a
nagging Print dialog box getting in the way. WeÕll count that as a time saver
and therefore put it in the win column.
You can do the same kind of thing by creating a Desktop Printer.
Just open the Print & Fax system preference, select a printer youÕd like to
print from, and drag it to the Desktop. This is LeopardÕs scheme for creating a
Desktop Printer. When you want to quickly print a file in the Finder, just drop
a document on top of it. As with the previous technique, the host application
opens and the file prints.
Update: Astute feline and forum visitor, MorrisTheCat, points
out that dragging a PDF to a Desktop Printer causes the file to be printed
without opening Preview or Acrobat Reader (though the printing application does
open). The same is not true when printing a PDF file from Quick Look. As
described, the host application opens and then the document prints.
By Christopher
Breen, Macworld.com
http://www.macworld.com/article/133554/2008/05/printquicklook.html
May 21, 2008
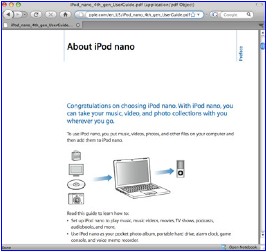
View Inline PDFs in Firefox — The Long and Short of it!
I
just switched from Safari to Firefox as my default Web browser, but the one
thing that I miss is the ability to view PDFs right within the browser itself.
Can I make this happen within Firefox?
The
short answer is the firefox-mac-pdf add-on lets you view PDF files right within
Firefox.
Unlike
Safari, Firefox makes you download PDFs to your hard drive in order to open
them. This can be a nuisance after youÕve become accustomed to SafariÕs
convenient method of displaying PDFs directly in your browser window.
 But, fortunately, Firefox has an
active developer community that creates handy add-ons you can use to
personalize your browsing experience. Some can be found on MozillaÕs list of
Firefox Add-ons (addons.mozilla.org/en-US/firefox),
and many more are strewn about the Internet, found by searching. But, fortunately, Firefox has an
active developer community that creates handy add-ons you can use to
personalize your browsing experience. Some can be found on MozillaÕs list of
Firefox Add-ons (addons.mozilla.org/en-US/firefox),
and many more are strewn about the Internet, found by searching.
One
add-on, called firefox-mac-pdf (free, code.google.com/p/firefox-mac-pdf/),
makes Firefox act more like Safari. It takes advantage of the native PDF tools
built into Mac OS X to display your PDFs in FirefoxÕs browser window, just like
youÕre used to.
PS: A
shorter summary of this hint was published by Kirk
McElhearn in recent Macworld.
If you're
using Firefox 3 to browse the Web, you may have noticed that it's missing one
essential feature (for many) that you can find in Safari: you can't
view PDFs in a browser window. When you click a link for a PDF file, Firefox 3
downloads the file, forcing you to then open it in Preview or Adobe Acrobat
Reader.
Well,
thereÕs now a Firefox extension named firefox-mac-pdf, available
for Firefox 3 that utilizes the built-in PDF support in OS X to display PDFs in
the browser.
This
extension doesn't have the nifty fading bezel that the Safari PDF viewer does,
but it supports all the same keyboard shortcuts and you get the standard Mac OS
X PDF contextual menu when you control-click on a displayed PDF.
Posted 11/03/2008 by Scott Rose ASK Column
http://www.maclife.com/article/tip_day/inline_pdfs_firefox
And by Kirk McElhearn, Macworld.com
http://www.macworld.com/article/135090/2008/08/inlinepdf.html
Aug 19, 2008
Deleting {dead}
ZIP Files
Back
when everything on the Internet was compressed in SIT format, I could set my
Stuffit Expander preferences to automatically delete the compressed file after
expanding. But now, there doesnÕt seem to be a way to do the same thing with
ZIP files—is there?
You
actually have a surprising amount of control over how your Mac handles ZIP
files with a hidden application called Archive Utility, located at
/System/Library/CoreServices/Archive Utility. Archive Utility lets you set a
variety of preferences for working with ZIP files on your Mac.
 Launch this program and then
choose Archive Utility > Preferences to reveal a variety of choices for
working with ZIP files (aka archives). You can choose the default locations for
expanding and creating archives and to define the action that should happen
afterwards. After expanding an archive, for example, you can move the ZIP file
to the trash; delete the file, or
leave the ZIP file alone. Launch this program and then
choose Archive Utility > Preferences to reveal a variety of choices for
working with ZIP files (aka archives). You can choose the default locations for
expanding and creating archives and to define the action that should happen
afterwards. After expanding an archive, for example, you can move the ZIP file
to the trash; delete the file, or
leave the ZIP file alone.
By Scott Rose ASK Column
http://www.maclife.com/article/tip_day/deleting_zip_files
Posted 10/30/2008
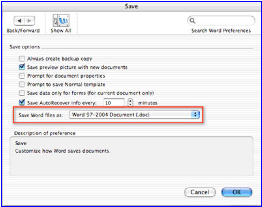
Office 2008 File-Compatibility Trouble
You can modify your Word 2008 preferences so that your documents
are always saved in the older format.
I
just installed Microsoft Office 2008, but now when I create Word and Excel files
on my computer, none of my colleagues can open up these files on their
computers. Please help!
Microsoft
changed the format of Word, Excel, and PowerPoint files in Office 2008 for Mac
(and Office 2007 for Windows), and this new format canÕt be natively read by
older versions of Microsoft Office. You can tell if a file is in the new format
because its file extension ends in the letter x—the new extensions are
.docx for Word files, .xlsx for Excel files, and .pptx for PowerPoint files.
However,
the people that youÕre sharing your files with donÕt need to run out and buy
the new version of Microsoft Office just to read your newer files. When you
save a document in Office 2008, the Save dialog box gives you an option to save
your files in 97-2004 format, which should ensure the greatest compatibility
for your files because itÕs the same file format that has been used on Mac and
Windows for the last 11 years, producing DOC, XLS, and PPT files.
If you
find yourself changing your Save dialog options a lot, you can set the 97-2004
format as the default. In Word or PowerPoint, this option is located in the
Save panel of the programÕs preferences, and in Excel, itÕs in the
Compatibility panel of the preferences.
Alternatively,
anybody using Office 2004 can open up Office 2008 files by installing the Open
XML File Format Converter (free, www
.microsoft.com/mac/downloads.mspx).
And AppleÕs TextEdit (free, included with Mac OS X) can read and write DOCX
files, while AppleÕs iWork ($79, www.apple.com) can recognize DOCX,
XLSX, and PPTX files. So your colleagues may already have a solution
preinstalled on their computers.
Doc sez
as an aside, I prefer to have all MSW document open in .doc format regardless
of which version they were created in. IÕve not switched to Word 2008 because I
have so customized Word 2994 it would take more time than its worth. In
addition reading the product review left me under-motivated.
By Scott Rose ASK Column
http://www.maclife.com/article/tip_day/office_2008_filecompatibility_trouble
Posted 11/12/2008
The Many Ways to Quit Mac
Programs
There are
several ways to quit Mac programs. Some of them are not obvious-especially if
you're accustomed to using Windows.
Menus and
Shortcuts — Nearly every Mac program offers a Quit command under its
application menu-for instance, Safari: Quit safari. (Some background-only
programs and certain Java applications don't.) From the keyboard, ~-Q is a
near-universal shortcut for quitting. If the program demands attention before
it can quit (for example. the document contains unsaved changes), it will first
ask if you're sure you want to quit.
Closing
Versus Quitting — If you're switching from a PC, you may be used to
quitting programs by clicking on a window's dose box; the Mac equivalent is the
small red dot in the upper left corner of the window. But on a Mac, closing all
open windows usually won't quit that program-OS X applications can continue to
run even if there aren't any open windows. There are exceptions: usually, if
the program can have only one window open at a time (as is the case with System
Preferences, Dictionary, and Calculator), closing it will quit the program. But
there are exceptions to the exceptions-Address Book and iCal continue to run
even if you close their single windows.
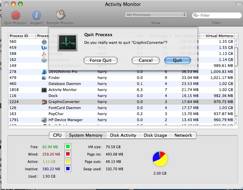 Emergency Quitting — If nothing
happens when you
try to quit a program, you can force-quit it: switch to a program that's still
responsive, and press ~-option-escape. This brings up the Force Quit dialog
box. Select the stuck program on the list, and then click on Force Quit. You
can also force-quit programs via the Dock. Click and hold on the problem
program's Dock icon to bring up its menu. Assuming that the system knows the
program is stuck, you should see a Force Quit option at the bottom. Emergency Quitting — If nothing
happens when you
try to quit a program, you can force-quit it: switch to a program that's still
responsive, and press ~-option-escape. This brings up the Force Quit dialog
box. Select the stuck program on the list, and then click on Force Quit. You
can also force-quit programs via the Dock. Click and hold on the problem
program's Dock icon to bring up its menu. Assuming that the system knows the
program is stuck, you should see a Force Quit option at the bottom.
One other
avenue is to launch Activity Monitor (in the /Applications/Utilities folder), select a
program, and click on Quit Process, then Force Quit (see "Forceful
Quitting").
Mac OS X 101 – Bob Griffiths
Macworld – October 2008
Remove Misspelled Words from
MSW Custom Dictionaries
Accidentally
adding misspelled words to a custom dictionary can lead to trouble: misspelled
words in important documents. But not to worry—fixing them is probably
easier than you think.
In
Microsoft Word, select Preferences from the Word menu and click on the Spelling
And Grammar button. Under the Spelling section of that preference pane, click
on the Dictionaries button. In the window that appears, select Custom
Dictionary and then click on the Edit button. A new Word document that contains
all the words in your custom dictionary will open. Correct the misspelled
words; then save and close the document.
To
correct PagesÕ dictionary, youÕll need Two AM SoftwareÕs free Dictionary Cleaner.
Dictionary Cleaner is a preference pane that lets you make changes to the
custom user dictionary that many applications use to check spelling. Once
youÕve installed the pane, open System Preferences and click on Dictionary
Cleaner. A new preference pane in which you can delete words from or add words
to your custom dictionary will open. You may need to log out of and back in to
your user account in order for the changes to take effect. — JB (Sorry I could not find out who JB is! —
doc.)
Doc Sez,
IÕve been using this technique for years since I too often click on a
misspelled word, adding it to the dictionary w/o thinking. There really is
nothing that looks quite as unprofessional than a misspelled word in a
document, and if you spell checker doesnÕt recognize this, a reader will. I
have at times, out of sheer desperation rechecked my custom MSW dictionary
using Spell Catcher X by Rainmaker Research and Google, but its not my favorite
way to spend an afternoon. http://www.macupdate.com/info.php/id/10590/spell-catcher-x
ÒConquer the OfficeÓ – Work
Smarter Column
Macworld November
2008
Two Ways Extract a Single Page from a PDF
Need
someoneÕs feedback on just one or two pages of a 24-page PDF document? Rather
than wasting time—and network bandwidth—by sending the whole thing,
simply send the pages you need. First, open the PDF file in Preview 4. If the
sidebar isnÕt visible, then click on the Sidebar button in the toolbar. (Or
press command-shift-D).
Select
the thumbnail of the page you want, and press command-C to copy it. In PreviewÕs
File menu, choose New From Clipboard, or simply press command-N. YouÕll get a
new Preview document with just the selected page. If you want to add other
pages, just drag their thumbnails from the full documentÕs sidebar into the new
documentÕs sidebar. Press command-S to save the document, and youÕre all set.
— Kirk McElhearn and doc_Babad
ÒConquer the OfficeÓ – Work Smarter Column
Macworld November 2008
ThatÕs all folksÉ
Harry
{doc} Babad
|