

Geek Speak: Random Mac Stuff You Need to Know
http://www.macfanatic.net/blog/ Copyright © 2007
Creating A Dashboard Widget
By Matt Brewer
Today we’re going to take a dive into a technology that debuted over two years ago with the release of Tiger: Dashboard. I personally have a love/hate relationship with Dashboard. Sometimes developers try to make a widget do too much, when it would have been better as an application. At other times, the widget is just useless. All that aside, Dashboard can be useful for some simple tasks.
Introduction
If you have any web development experience behind you, then you are well on your way to becoming an awesome widget developer. A widget is essentially a complete webpage, with HTML, Javascript, CSS and all that. A widget can take it a few steps farther than just a webpage however, as Apple has given us developers a “widget” Javascript object that lets us perform system calls for executing Perl, AppleScript, or even Shell scripts.
Because widgets are essentially webpages, you can develop
a widget in a standard text editor and refer to documentation and go through a
whole bunch of work. Or, you can download a beta copy of Apple’s Dashcode that
will make an official appearance in Leopard. Right now the beta is available
for Tiger, you will just need an ADC account to login and download. This
download only requires a basic subscription, so you can sign up for free. Go ahead
and download a copy of dashcode here < http://developer.apple.com/tools/dashcode/ >. This isn’t an
introduction to using Dashcode either, I’ll assume that you can figure out the
basic functionality of it on your own.
Mission Statement
Now that we have a bit of ideology behind us, let’s talk business. You have just started a job as a server at a local restaurant and you want to easily be able to calculate how much you made per hour. The math is fairly simple, you’ll figure up your actual wages for the hours worked, add in your tips, and then divide by the hours. However, that is a lot of work to do after working a shift and you want to make it easier, so you decide to make yourself a widget!
Creating the Front Interface
 Fire up Dashcode and
choose the “Custom” widget when creating a new document. Dashcode provides you
with an easy, drag-n-drop way to add objects to your widget. Take the time now
to open up the “Library” from the toolbar and explore. Notice that there is an
Inspector as well. Take a look through all the options there. Now, let’s get
started.
Fire up Dashcode and
choose the “Custom” widget when creating a new document. Dashcode provides you
with an easy, drag-n-drop way to add objects to your widget. Take the time now
to open up the “Library” from the toolbar and explore. Notice that there is an
Inspector as well. Take a look through all the options there. Now, let’s get
started.
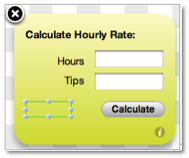
First off, drop a couple basic “Text” objects onto the front of your widget. As you place objects, they appear in the source list on the left. If you wish to rename them (which I highly recommend), you’ll need to open the Inspector and set the “ID” field. Drag two “Text Fields” onto the face and arrange as shown in the screenshot. Also add a button for calculating the hourly rate. And, even though you can’t see it, there is one more “Text” object on the face of the widget. Just drag a regular text object and in the Inspector, delete the text in under “Localization - Key”. Then your object appears invisible, with no text. We’re going to use this one as the output area for the user.
Creating the Back Interface
Now to create the interface for the back of the widget.
In the source list on the left, you should see a black icon that says “back”.
This is the other side of your widget. We’re going to be cheap and just delete
the handy “Made with Dashcode” image and add a few things to the back of ours.
Two “Text” objects, used as labels go on the back. You can change the color of
the text in the Inspector. We’ll add a button that will fire up the user’s
default web browser and take them to my website, and also add a quick “Text
Field” where the user must enter an hourly wage. Notice the “Done” button and
“i” button were already configured.
Adding Code
At this point, I recommend you download the completed project
< http://www.macfanatic.net/downloads/software/samplecode/mcJuly2007-make-a-widget.zip >
and follow along. The main reason is that all those text objects were given specific names and the code references those names. You might not have changed the IDs (names) via the Inspector and therefore your source list will have a lot of “Text1” and “Text2” and so forth. If the IDs don’t match, the code won’t work. Basic HTML element accessing.
First, we’re going to add the main code that crunches the numbers. I have called this function “calcTips(event)”. The basic design of this function is to grab number values from the three Text Fields we put on the widget (one is on the back remember), error check those variables, do the math, and place that number in the output area on the front of the widget. Most of the code is related to error checking and rounding the number off to two decimal places, since we’re working with money.
function calcTips(event) {
// Grab the decimal values from the input fields
var hours = parseFloat(document.getElementById("hours").value);
var tips = parseFloat(document.getElementById("tips").value);
var wageRate = parseFloat(document.getElementById("wageRate").value);
// If user hasn't entered any info, just return
// The isNaN(variable) is like checking for NULL
if ( isNaN(tips) || isNaN(hours) ) {
alert("User didn't enter enough info");
return;
}
// If user hasn't filled in the prefs on back, let them know
if ( isNaN(wageRate) || wageRate < 0 ) {
alert("User hasn't entered hourly wage");
document.getElementById("output").innerText = "Set Wage on Back!";
return;
}
// Calculate the actual rate
var out = ((hours * wageRate) + tips) / hours;
// Do the rounding to get to two decimal places
out = Math.round(out*100)/100;
var outString = out+''; // Converts out to a string by adding a empty space
if ( outString.indexOf('.') < 0 ) {
outString = outString + '.00'; // Add the decimal places for money :)
}
outString = outString + '/hr'; // Just add this for formality
// Set the result in the field
document.getElementById('output').innerText = outString;
}
A few quick things to note from the code above.
The parseFloat() function is a nice one to use to convert a string to a number. If something goes wrong, it returns “NaN”, which is why we check for that in the lines following the first couple statements.
The alert() function is similar to NSLog() or printf(), except you can’t use placeholders as far as I can tell. You just pass the variable or string in, and it prints it to the console. The user won’t ever see these when using the widget, but these messages pop up in the Run Log in Dashcode, so it will help you debug.
Notice when grabbing text from a TextField, you use the “.value” call. However, when grabbing text from just a regular Text object, you use the “.innerText”. Play around with those until you’re comfortable. It makes a difference.
Preferences
Now that we have the code in place to crunch the numbers, let’s hook up our preferences. Preferences for a widget are very similar to the NSUserDefaults and such methods that you use in Cocoa. Your widget can read from it’s user defaults (most likely at launch) and then write objects back to the defaults, on a keyed value. You will want to use preferences because this allows your widget to easily save values across system restarts, logins, etc. If you didn’t use this, your widget wouldn’t retain values.
function load()
{
setupParts();
// We're going to retrieve our preferences and fill in the textFields on the back now
var wagesFromPref = widget.preferenceForKey("wageRate");
if ( wagesFromPref && wagesFromPref.length > 0 ) {
wageRate.value = wagesFromPref;
}
}
The load() function is in your JS file by default, and the only code in there is setupParts(), to initialize your widget. However, we need to read our preferences into our widget at startup, so this is where we’ll do it. Notice the call “widget.preferenceForKey(keyAsString); This returns your object, or NULL if it doesn’t exist. If we got something other than NULL and the string wasn’t empty, we set the textField on the back of the widget to that value and move on.
function showFront(event) {
// your widget needs to show the front
// The user might have just flipped from the back to the front,
// so we're going to save the preferences they might have set
var wageRate = document.getElementById("wageRate").value;
if ( wageRate && wageRate.length > 0 ) {
widget.setPreferenceForKey(wageRate, "wageRate");
}
more code here....
}
The showFront() widget is called when the user clicks the glassy Done button on the back of the widget to flip back around to the front. At this point, the user should have entered a value into the textField on the back, and we want to read that in, quickly error check, and then set the preference with “widget.setPreferenceForKey(value, keyAsString); That’s all to that. There is more code below in this function, but it’s stuff setup by Apple.
Making the Connections
We have written the code for our widget, but it still doesn’t do anything because we haven’t hooked up any of the functions to our buttons yet. Select the “Calculate” button on the front of the widget and pull up the Inspector. Click on the blue object-like tab on the far right and you’ll see a full list of Javascript handlers that you can assign functions to. For our button, it’s obvious that we want to assign the “calcTips()” funtion to the “onClick” handler. Just double-click in the table on the right side and you can either type in the function name, or use the pop up menu to select a function.
To make the widget a bit more keyboard friendly, we’ll also add two handlers to the “tips” textField. Assign “calcTips()” to the onBlur and onChange handlers and when the user tabs through the fields and leaves the last field, it will automatically run. It’s the closest thing I could come to assigning Return to a button in a Cocoa app.
One last note on the back of the widget, I have assigned a quick function to a button, to pull up my webpage. The function uses “widget.openURL(urlAsString); to accomplish that. Very handy.
Conclusion
You’ve used the Play button to preview the widget during development. Be sure to play around with Pausing it as well and admire the full Javascript debugger that Apple has provided. There is also a code evaluator that lets you test code in real time on your widget. When you are ready to share your widget, just go to File -> Deploy Widget. That places a regular widget file wherever you choose. You can also use File -> Deploy Widget to Dashboard if you want to use it on your own Mac right away.
There are a few more things you can do to the widget, such as set some info in the attributes area, design a custom widget icon, or make a better background for the front of the widget. All of that is stuff I worked on, but not very much. As a challenge, I encourage you to add a few more features to the widget, such as a list view and a way to store data, so that the user can browse through previous days.
Contact Info
You can always send me an email at mbrewer@maccompanion.com or visit my website at http://www.macfanatic.net for more information about me and my ramblings. I also produce a weekly audio podcast taking an in-depth review of cool and new Mac applications, along with tips, developer interviews, tutorials, and the occasional tutorial.