
Doc_Babad's Macintosh Tips - A Macintosh Tip or Three…July 2007 Edition By Harry {doc} Babad © 2007 |
|
Product and company names and logos in this review may be registered trademarks of their respective companies. The software related tips were tested on a 1 GHz dual processor PowerPC G4 Macintosh with 2 GB DDR SDRAM; running under Macintosh OS X OS X 10.4.9. |
|

This month I continue sharing my occasional tip related finds with you. Most, but not all of the Tips I share come from — Paul Taylor's Hints & Tips column http://www.mac-hints-tips.com and are used with his permission. Where I use any one else’s tips for this column, I acknowledge both their source and their contributors.
Oh, I almost forgot! Unless otherwise noted, all the tips and tidbits I share, where appropriate, work on my computer. If I don't own the software but if the tip sounds interesting, I'll so note at the end of that specific write-up.
NEW: Great Stuff – Tips for you to checkout
As I cruise the i8nternet I run across some great tips, that I’m not likely to get permission to reprints. So I’ve started a new section to this column for do-it yourselfers.
Tips I’ve provided this month include, organized as always in a random order:
- Delete Printer Drivers to Reclaim Space
- Zapping PRAM in OS X
- Deleting Stubborn Files
- Use proxy icons to create Mail attachments and more…
- What You Don’t Know About Optical Media…Could Kill You (Or Your Drive)
- Email Formatting Glitches – Allow all recipients to decode your message (Renamed – the original title by Ilene Strizver was Email Etiquette]
- Mac OS X Keyboard Shortcuts – Compiled by Mike Sivcevic (SilverMac)
- Easily Create Lots of New Folders (An untested by me, Terminal based hint)
- Great Stuff – Tips for you to checkout
# ◊ # ◊ # ◊ # ◊ # ◊ # ◊ # ◊ # ◊ # ◊ # ◊ # ◊ # ◊
Delete Printer Drivers to Reclaim Space
One way to reclaim some hard drive space is to delete drivers for printers you’ll never use. By default, OS X installs 2GB of printer drivers in /Library/Printers.
Just open that folder and drag into the Trash the drivers for individual printers, or the folders containing drivers for an entire brand. It’s not easy to replace these drivers, so be sure to delete only the brands and models you’re confident you’ll never use.
Design Tools Monthly
April 2007 – Taylor’s Hints and Tips Column
# ◊ # ◊ # ◊ # ◊ # ◊ # ◊ # ◊ # ◊ # ◊ # ◊ # ◊ # ◊
Deleting Stubborn Files
Occasionally, Mac OS X will refuse to delete a file from your Trash no matter what you try. You can always use the Terminal application to force empty your Trash, assuming you are comfortable using the UNIX command line, or you can use one of these applications to do the dirty work for you.
Mac HelpMate: www.macworkshops.com/machelpmate
Mac HelpMate can force empty your trash, and it does much more. It also manages routine system maintenance tasks, monitors the health of your hard drive, repairs permissions, remotely controls other Macs, and more. This utility is free.
Cocktail: www.maintain.se/cocktail/index.html
Similar to Mac HelpMate in some ways, Cocktail can delete those stubborn files and also performs many system maintenance tasks for you. Cocktail costs $14.95.
Super Empty Trash: www.faqintosh.com/risorse/en/sys/setrash
Super Empty Trash is a one trick pony, but it performs that trick without any hassle. It is an AppleScript-based application that simply force empties your Trash, and it lets you select which disk’s Trash files should be deleted. Super Empty Trash is free.
iCan: http://www.kanzu.com/index.html
Can is a $10 shareware trashcan for OS X which sits on the desktop or can be limited to the menubar, where I prefer it to live. . It's interactive - it appears empty when it's empty, and full when it's full, just like the one in OS 9. From the menubar you can Empty, Smart Empty, Force Empty or Secure Empty The trash. And of course there is a warning about how big your trashcan is, so if there’s more there than you thing ought to be you can check it out and rescue the accidentally dumped files.
The Mac Observer via Apple Barrel, Ridgecrest, CA
April 2007 – Taylor’s Hints and Tips Column
And Harry (doc) Babad – macC {uses iCan}
# ◊ # ◊ # ◊ # ◊ # ◊ # ◊ # ◊ # ◊ # ◊ # ◊ # ◊ # ◊
Zapping PRAM in OS X
Sometimes you hear Mac technicians say a computer needs its PRAM zapped. For most of us, this sounds very odd, and maybe even a little obscene. But don’t worry; it’s a standard part of the Mac troubleshooting routine.
PRAM stands for “parameter random access memory.” A document in Apple’s knowledge base reads:
PRAM stores certain system and device settings in a location that Mac OS X can access quickly. Exactly which settings are stored in the computers PRAM varies depending on the type of computer as well as the types of devices and drives connected to the computer. Parameter RAM is a small area of non-volatile RAM (NVRAM).
Because PRAM is “Non-volatile RAM,” it will store data even when the computer is turned off. It will also typically store data when the computer automatically shuts off due to severe battery drain.
According to Apple, some of the data stored in PRAM includes:
- Display and video settings such as refresh rate, screen resolution, number of colors
- Time zone setting
- Startup volume choice
- Speaker volume
- Recent kernel panic information, if any exists
- DVD region setting
Many issues can be resolved by “zapping the PRAM.” This includes issues such as Macs that are flashing a question mark when powered on, to missing pictures on the iMac G5’s display, to computers that simply won’t power up at all. PRAM can be corrupted by faulty (typically third party) software, power surges, and electromagnetic interference.
In most Macs you can “zap the pram” by powering the computer on, then immediately holding down the Command, Option, P, and R keys simultaneously. The Command key is the one with the cloverleaf or Apple on it.
According to Apple, OS X does not store network settings in PRAM. If you experience a network issue, resetting PRAM will not help.
If PRAM is reset, you may need to verify your time zone, startup volume, and volume settings using System Preferences. Certain firmware updates may reset PRAM as a normal part of their installation process.”
Note that zapping PRAM is different than resetting the Power Management Unit (PMU,) which you might have to do on certain Apple laptops. Apple says “A PMU reset should not be necessary except as a last resort in cases where a hardware failure of the power management system is suspected. Performing a PMU reset returns the iBook and PowerBook hardware, including NVRAM, to default settings and forces the computer to shut down.” ~ Ed
Small Dog Electronics
April 2007 – Taylor’s Hints and Tips Column
# ◊ # ◊ # ◊ # ◊ # ◊ # ◊ # ◊ # ◊ # ◊ # ◊ # ◊ # ◊
Use Proxy Icons to Create Mail Attachments and to imbed web address into your emails
When checking out, Macworld’s, OS X hints column, I came across Kirk McElhearn hint (blog) and decided to try whether it worked for Eudora, my favorite email client. Yes, Kurt it does!
According to Kirk, if you're working on a document and you want to send it to someone as an e-mail attachment, you probably know that you can drag the actual file icon to the Mail icon in the Dock to create a new message containing that file. But to do this, you have to navigate to the Finder and find the file.
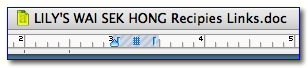 There is another way: Save
your work, click the proxy icon in the title bar (that's the small icon next to
the file's name) and drag it onto the Mail icon in the Dock. This creates a new
message with the working document attached to the message. (This method also
works with Microsoft Entourage.
There is another way: Save
your work, click the proxy icon in the title bar (that's the small icon next to
the file's name) and drag it onto the Mail icon in the Dock. This creates a new
message with the working document attached to the message. (This method also
works with Microsoft Entourage.
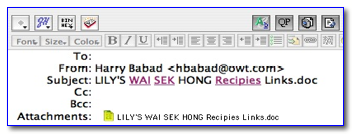
You can do this with Web pages in Safari or Firefox (and perhaps in other browsers) by dragging the icon to the left of the URL in the address bar; in this case, the current URL is pasted in the body of the newly created message.
If, however, you are viewing a local file, the file itself will be added to the message.
Note that different programs deal with attachments in different ways. With Mail, any changes you make to your file after adding it to a new message will not be reflected in that attachment; the file is added to the message in its state at the time you drag it. Entourage, however, only records a link to the file, so you can keep working on your document and making changes. When you save or send the message, the latest version of the document will be attached. Other e-mail programs may have different behavior; so if you use a different program, try it out to see how it works.
Kirk McElhearn — Macworld, May 31, 2007
http://www.macworld.com/weblogs/macosxhints/2007/05/proxyicon/index.php?lsrc=mwhints
# ◊ # ◊ # ◊ # ◊ # ◊ # ◊ # ◊ # ◊ # ◊ # ◊ # ◊ # ◊
Email Formatting Glitches – Allow all recipients to decode your message
It’s tempting to format outgoing email with different fonts, point sizes and colors, and to punch up your text with the use of italics and boldface. Unfortunately, what you send is not necessarily what your recipient gets.
Some email programs don’t read special formatting, including fonts that your reader’s computer doesn’t have. And many allow the user to set preferences for plain text instead of rich text, which includes styling. The result: your carefully formatted email is reduced to plain text, or worse, littered with ‘alien’ characters (more on that below).
What’s the solution?
First, stick to system fonts, such as Arial, Times, Verdana, Trebuchet or Geneva, which virtually all users have. And, unless you’re certain that the recipient can read your formatting, keep it simple and use only keyboard characters and styling that won’t get lost in translation. For emphasis, try surrounding your important text with *asterisks.* All Caps is another option, but one to be used sparingly.
Remember that Caps are considered shouting in the cyberworld! For most people who have access to personal computers, email has rapidly overtaken ‘snail mail’ as the preferred means of sending written communication, both business and personal. The near-immediate delivery and low cost of email are hard to beat, but the technology does have limitations when it comes to typographic finesse. Here are some dos and don’ts to ensure that your electronic communication is received with its message intact.
Safe Characters
One of the most puzzling occurrences in emails is the occasional appearance of strange, unfamiliar characters in the text, often foreign or mathematical in nature. We can usually read around them, but even so, what are they and how did they get there? This can occasionally happen to non-standard keyboard characters when they’re sent from one email program to another. These characters include such typographic niceties as ‘smart’ quotes and apostrophes, en and em dashes, and bullets. These characters and others like them are not always encoded or translated consistently from one email program to another.
The result? Your carefully formatted curly quotes, ligatures and ellipses can turn into something unrecognizable to your recipient’s inbox. The solution is simple: play it safe and stick to the standard keyboard characters. While this means using ‘dumb’ straight quotes and double hyphens instead of correct dashes, at least your message will arrive in a readable form. (But don’t forget: when copying and pasting text from an email into a designed piece for print, reformat these ‘dumb’ characters to adhere to the principles of good typography!)
Signatures and Attachments
Other points of good email etiquette include using a signature and being savvy about attachments. A signature is a short block of copy that identifies you and includes your contact information.
Most email programs allow you to set up one or more signatures to choose from, or to select a default signature that will automatically appear at the bottom of every email you send. Usually used for business, signatures can be a great time-saver if you use them appropriately. Remember to include your signature in each subsequent email to the same recipient so no one has to search for the email with your phone number.
Another tip: don’t include images and logos in your signature. These are often filtered out by spam filters and could result in your addressees not getting your email at all. As for attachments, keep them to a minimum and keep an eye on their size: between 50K and 2MB is best.
In fact, spam filters often screen out emails with attachments that are 50K or less as a means of virus control.
For attachments over 2MB, check with the intended recipient before sending and ask for confirmation afterwards. Sometimes mailboxes have maximums on the size of acceptable attachments; others are too full to accept them at all.
And, a final tip: proofread your email carefully. Once you hit send, there’s no turning back!
~Ilene Strizver, founder of The Type Studio, is a typographic consultant, designer, writer and specializing in all aspects of typographic communication, from the aesthetic to the technical. Ilene conducts Gourmet Typography Training internationally. For more information visit http:??www.thetypestudio.com or contact ilene@thetypestudio.com.
Ilene Strizver, LIMac Forum, Long Island, NY
Paul Taylor’s Hints & Tips March 2007
# ◊ # ◊ # ◊ # ◊ # ◊ # ◊ # ◊ # ◊ # ◊ # ◊ # ◊ # ◊
What You Don’t Know About Optical Media Could Kill You (Or Your Drive)
If we were a local news show, we’d be running teasers saying things like “Could the blank disc you put in your disc drive destroy it? We’ll tell you at 11.” But since we’re out here in the wilds of the blogosphere, we’re just going to go ahead and tell you now. I mean, you’re already here and everything.
ZDNet’s Jason O’Grady went to burn himself a DVD the other week and ran into a bit of a problem. A SuperDrive-killing problem. http://blogs.zdnet.com/Apple/?p=441
When the disc came out of my drive the white thermal printing was mostly de-laminated from the top of the disc surface. About half of the white thermal surface had peeled off inside the SuperDrive mechanism. Note: that is not a label that I installed or some sort of a sticker, it’s the white thermal printable topcoat that ships from the manufacturer on the media.
Pieces of the label were trapped throughout the inside of my SuperDrive and it wouldn’t read any disc, in fact, subsequent discs that were inserted got scratched beyond further use by all the white shards that were distributed throughout the inside of my machine.
Fortunately, Jason’s MacBook Pro was covered under Apple Care, though the Genius who handled it informed him that it wouldn’t have been covered by Apple otherwise, a repair that would have totaled almost $450.
The moral of the story? Stay away from shoddy B-grade media: in this case, Prodisc White Thermal Hub Printable 8x DVD-R. Remember: sometimes it’s worth it to pay a little more for something that will not break your optical drive. Jason recommends Verbatim; I’ve had good luck with Staples’s generic brand. Burn safely, everybody.
Doc Sez – Use the COSTCO TDK medium for all non-essential files but put archival material on Taiyo Yuden media. I’ve only lost one in about 100 CDs when using the TDK data CDRs, both for music and data. Oh the material is not lost since Roxio’s Toast lets me know when I’ve a bum copy and I just burn a new one. I’ve not done much with DVDs other then large data compilations, and the TDK DVD-Rs work fine; I’ve not burned 100 disks so have no statistics. In all cases, I use my internal superdrive as a read source and my LaCie 1394 (Pioneer DVD-RW DVR-107D) or my Sony DRX-820UL-T double density drive (DVD-RW DRU-820-A) as burners. |
http://www.macuser.com/ Posted Feb. 20, ’07, 9:35 AM PT by Dan Moren
http://www.macuser.com/hardware/what_you_dont_know_about_optic.php#more
PS: We’ve written about the penny-wise pound foolish attributes of not using quality media in the 3RS column in the March 2007, Volume 5 Issue 3 of macCompanion. Doc_Babad |
Comment on Dan Moren’s Article by: HawksM February 21, 2007 10:39 AM
I concur that sticking to
quality media is important, I also agree that Verbatim is the way to go. I have
sold all brands of media for years. Among blank DVD-R manufacturers Verbatim by
far has the least amount of complaints. I don't have experience with Super
Drives, but I do know that the physical specs of the disc are important
with Super Drives. With DVD there are 2
substrates glued together as opposed to CDR, which 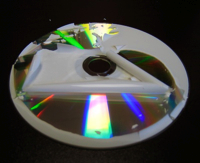 is 1 substrate.
I will also say that store bought media is "outsourced" and branded for companies like Memorex, HP, Staples etc. They do not manufacture their own media. Therefore consistency and quality from batch to batch is a gamble. They will change manufacturers from batch to batch as they see fit.
For DVD-R stick with Verbatim or Taiyo Yuden. For CDR stick to Taiyo Yuden, MAM-A (Mitsui) or verbatim.
One more point about quality manufacturers they will be much more likely to play in DVD players after they are burned. Have you burned a DVD only to have it freeze when you watch it with friends? Stick to the quality manufacturers. The few pennies that you save by using B-grade media will not be worth it in the long run. What ever happened to the saying "You get what you pay for"?
# ◊ # ◊ # ◊ # ◊ # ◊ # ◊ # ◊ # ◊ # ◊ # ◊ # ◊ # ◊
Mac OS X Keyboard Shortcuts – Compiled by Mike Sivcevic (SilverMac)
I know some of you know many of the shortcuts listed below. So skip the ones you know, and join the shortcut of the week virtual club. You’ll be surprised by how much better your wrists feel when doing less mousing around.
Start up hot-keys (press key while booting)
|
Menu Commands
|
|
Clipboard
|
||
Window Management
|
||
Universal Access
|
||
Finder Navigation
|
Expose
|
|
Miscellaneous
|
||
Screen capture
|
||
From: Mike Sivcevic’s SilverMac
From: http://www.silvermac.com/mac-os-x-keyboard-shortcuts/
# ◊ # ◊ # ◊ # ◊ # ◊ # ◊ # ◊ # ◊ # ◊ # ◊ # ◊ # ◊
Easily Create Lots of New Folders (A OS X Terminal Based Hint)
Introduction: I often need almost identical sets of folders for various projects ranging from macC reviews to various tasks for consulting clients. You may know the routine. [macC Software Review… Graphics, Background, Drafts, Developer dialogs – with the generic folder name differing only the product’s name. For example Graphics-MSW ’04.] Therefore when I stumbled across Rob Griffiths’ hint I was eager to try, but alas not terminally so. But I’m passing it on anyway for those who are terminally addicted to such tools.
Rob’s Hint: Have you ever had to create a large series of folders, perhaps for a new project, new client, or just as part of organizing your massively large and massively disorganized hard drive? In the Finder, it’s trivial to create a new folder—just press Shift-Command-N. But if you’ve got 10 or 20 or 30 folders to create, the process can get tedious—create the folder, rename it, create the next, rename it, repeat until done. Ugh. Using Terminal, however, you can greatly simplify this task, as you can easily combine the ‘create’ and ‘rename’ steps into one action.
In Terminal, you use the command mkdir to create new directories (folders). For instance, mkdir “My Folder” will create a folder named My Folder in the current directory. But mkdir is actually more powerful than that, as it will accept multiple new folder names on the input line. For instance, consider this command:
mkdir "My Folder" "My Other Folder" "Not That Folder" |
The above will create three new folders with the ever-so-useful names of My Folder, My Other Folder, and Not That Folder. Note the quote marks around each name—you’ll need those if your folder names contain spaces. Alternatively, you can put a backslash before each space and skip the quotes, but I find it easier (and more visually obvious) to use the quotes. Unless you specify the full path to each folder, mkdir will create them in the current directory—so remember to use cd /path/to/destination before creating your new folders.
So what if you have a lot of folders to create? Start by making a text file containing the name of each folder to be created—one entry per line, and any folder name with spaces must be enclosed in quotes (or use backslashes, as explained above). Once you have this file created, place it in the folder where you’d like all the new folders to go, then cd to that same folder in Terminal. Then type this command (assuming you’ve named your file dirlist.txt):
cat dirlist.txt | xargs mkdir |
Each entry in the file will be created as a folder in the current directory. (For the Unix purists, you can also use <dirlist xargs mkdir instead, but I find the cat version easier to comprehend.)
Finally, what if you’d like to create a selection of folders, all with the same base but a varying suffix? For example, Project A, Project B, Project C, etc. Try this command:
mkdir "Project "{A,B,C,D,E,F} |
You’re not restricted to single letters, of course—anything you want can go within the curly brackets. Just remember that if you want spaces in the suffixes, you’ll need to enclose them in quotes, too:
mkdir "Project "{"New Home","Vacation","To Do" |
And yes, I know there are a bunch of ways to do this stuff using GUI tools—including Automator, among others. However, it’s Geeky Friday, and none of those GUI tools will help you much if you’re trying to do this work over a remote connection.
Mac OS X Hints By Rob Griffiths May 11, 2007 http://www.macworld.com/weblogs/macosxhints/2007/05/foldercreate/index.php?lsrc=mwhints
# ◊ # ◊ # ◊ # ◊ # ◊ # ◊ # ◊ # ◊ # ◊ # ◊ # ◊ # ◊
Great Stuff – Tips for you to checkout
As I cruise the Internet I run across some great tips, that I’m not likely to get permission to reprint. So I’ve started a new section to this column for do-it yourselfers.
Stem E-mail Overload — Strategies for keeping your inbox under control by Joe Kissell http://www.macworld.com/2007/02/features/clutter3/index.php?pf=1
# ◊ # ◊ # ◊ # ◊ # ◊ # ◊ # ◊ # ◊ # ◊ # ◊ # ◊ # ◊
That’s all folks…
Harry {doc} Babad