|
|

|
|
Acknowledgements — As the occasion warrants, some of the Tips I share come from Paul Taylor's Hints & Tips column and are used with his permission. If you have tips to share send them to Paul — paul@mac-hints-tips.com. I also use Macintosh user group published tips with their consent if I can make the contact with the appropriate officer. Where I use any one elses tips for this column, I acknowledge both their source and their contributors. Yes, I even write down and share some of the tips Ive discovered while Macin around. If a tip or hint comes from a more traditional commercial source, I both acknowledged that fact and almost always modify the tip to personalize it for our readers. This month I also dipped back into the tips posted by Mike Sivcevic of SilverMac. Try these tips --- youll like them.
Where a sentence or paragraph is italicized, its my contribution unless other wise noted. Oh, I almost forgot! Unless otherwise noted, all the tips and tidbits I share, where appropriate, work on my computer. If I don't own the software but if the tip sounds interesting, I'll so note that information at the end of that specific write-up. ------------------------------------------------------
Tips Ive provided this month, as always in a random order, include:
- - - - - - - - - - - - - - - - - -- - - - - - - - - And the Tips - - - - - - - - - - - - - - - - - -- - - - - - - - -
Speed Up Your Mac — An Excerpt
Computing power has increased massively over recent years, and for Mac users the switch to Intel processors brought new heights of speed and performance to even the most entry-level Macs. Thanks to the longevity of the average Mac, there are many thousands of older PowerPC machines still in use, dutifully chugging away day after day. And even for newer Macs, applications like working with images, music and video always run more smoothly with more power under the hood.
Upgrading the processor, although technically possible on some newer models and with more difficulty on older Macs, tends to be expensive and complicated. The good news is that other parts of your Mac can be upgraded, and components tend to be cheap and user-accessible. In addition, there are simple steps that you can take in order to optimize your system for better performance. Sometimes this involves a little spring-cleaning, other times a combination of hardware and software upgrading. Whichever you choose, it's easier than you think to speed up your Mac. You could even feel like you've got a brand new machine.
1. Clear the clutter OS X requires around 20% of the space on its boot drive, typically called Macintosh HD, to be empty so that it can write virtual memory and other temporary files to the space. If a boot drive is very full, your Mac will slow down badly, even if it is a high-speed machine, as the system thrashes the drive, overwriting what little free space is available. A good working practice is to keep very large media files like video, image libraries, or iTunes libraries either on a secondary internal drive (in the case of a tower) or on a laptop or iMac, on an external FireWire or USB 2.0 hard drive.
2. Use faster drives Portable Macs come with 5,400-rpm hard drives and towers with 7,200 rpm drives as standard. Faster spin speeds generally mean faster operation since data can be retrieved from the drive in less time. On a tower like a G5 or Mac Pro, replacing the startup drive with a faster model like a 10,000 or even 15,000 rpm drive will have a positive effect on overall performance and should make the system snappier. Using faster secondary internal drives is good but more important for heavy applications like working with video. Fitting a 7,200 rpm drive to a portable Mac will also yield better overall performance at relatively low cost.
3. Add more ports If you find yourself running out of ports, invest in a USB 2.0 or FireWire hub to expand the number available. Make it a powered one and it will supply current to compatible devices as well. On all but tower Macs and MacBook Pros, there's no getting around the bandwidth problem -- even with a hub, you're throttled by the bandwidth available on the internal bus. On a Mac with PCI or PCMCIA capability, you can add a USB 2.0 card internally with more ports, which provides a signal path directly to the motherboard and so gets around the bandwidth issue.
4. Upgrade your RAM RAM is one of the most fundamental things affecting the performance of a computer. OS X really needs about 1GB of memory to itself to run smoothly, and the more RAM you have, the better. Use the "About This Mac" menu to see how much is installed, and the System Profiler to see exactly how many sticks are present. About 2GB is healthy for a normal system, and for heavy work with Photoshop, Final Cut, or GarageBand, you'll need more than that. Different Mac models have differing RAM capacities, with older Macs able to hold less, especially laptops.
5. Manage startup items Some applications, on being installed, place stub or helper programs in your startup items without making it clear that they are doing so. Sometimes this is desirable; say if you always want iChat to open when you log in.
But others, typically scanner- or printer-related applications, aren't always needed and can slow down the login process and hog CPU cycles unnecessarily.
Go to System Preferences > Accounts > Login items. Delete any you don't need. This rarely causes problems. If it does, put it back on the list.
6. Run only what you need Running applications uses resources including CPU cycles, RAM, and disk activity. If you're not using an application, quit it while you run others. Leaving programs open when they're not needed is a resource hog and, especially on older Macs, will slow you down. Some programs can have problems with "memory leakage," meaning when loaded but idle, over time they will consume more and more RAM, eventually slowing you down. Use "Activity Monitor" located in the Utilities folder to see what resources each program is using.
7. Stay lean and mean Keep a handle on what you install. Installing tons of programs and forgetting about them results not only in clutter and wasted space, but can also slow you down. Many programs place library files and startup items into the system, some of which must be loaded on startup whether you use the program or not. Many come with an uninstaller, or you can use AppZapper to completely remove them. Over time, systems invariably get cluttered, so if you are confident in your skills, periodically backing up and reinstalling OS X from scratch will keep it lean and mean.
8. Stay up to date Each new version of OS X is faster than the last, and each point update -- say from 10.5.3 to 10.5.4 -- tends to improve speed and stability. The same goes for applications, so keep your software and drivers up to date using Software Update and the websites for non-Apple programs. Many apps have a check for updates option. Look at the minimum specs for your version of OS X. If your Mac is barely qualified to run 10.5, you'll have a smoother experience sticking with 10.4.11.
9. Install more memory Having bought more RAM for your Mac, checking first that it is the correct type for your model, power down and disconnect all cables, especially the main power. Touch a metal part of the casing to earth yourself. Open the Mac's RAM slot, the location of which will differ depending on the model, and carefully but firmly press the modules into place.
On G5s and Intel Macs, RAM sticks must be installed in pairs. Close up your computer, reconnect the power and check "System Profiler" to see if it's working. If your Mac won't start up, check that the modules are properly fitted.
10. Know your computers limits Computer technology advances quickly, but so do the minimum system requirements of software. For example, a seven-year-old G4 is unlikely to be an ideal Mac to edit HD video on. But older Macs are far from worthless and can be used as servers, Internet and email machines, or even for hosting wireless shared iTunes libraries. Pick up a cheap older Mac, fill it with RAM and big internal or external drives and a wireless card and administer it using Apple's Remote Desktop (http://store.apple.com/). All this can be done quite cheaply.
13. Out and about When running a laptop off its battery, switching off AirPort and Bluetooth will save power if you're not using them.
14. Multiple accounts Try having one user account for things like games and Internet, and another that's more fine-tuned and tweaked for heavier work.
16. Backup schedule Set your backup schedule so it doesn't start to grind away in the middle of your work. A Mac is designed to stay on, so you can set it for the middle of the night.
17. Disk doctor Perform a disk repair and use something like OnyX to regularly clear out caches, log files, and temporary items to keep the system lean.
20. Stay organized Believe it or not, folders with thousands of items in them take a lot longer to work with, as the Mac tries to calculate the sizes of the whole folder. Doc sez, you can also turn off calculate folder sizes by using the Finder Menu Bar > View Menu > Show View Options. Practice good file management.
Check out all MacFormats articles including hints & tips.
Magazine (UK) Courtesy: Paul Taylor Hints & Tips — April 2009
- - - - - - - - - - - - - - - - - - - - - - - - - -- - - - - - - - -
Renaming Files and Folders How you name your files and folders on your computer is important. It is one of the best ways to locate them later. Often times, I will save a file, and give it the wrong name, spell the name wrong, or just want to change it later.
I would guess the reason many people have issues with how to change a file or folder name is that there is no menu item or command in OS X to start the process. I have a feeling many people stumble on the methods by accident; it certainly is not immediately clear. There are two ways to rename a file or folder in OS X. Each of these two methods apply equally well to files, or folders.
Rename with the return key — The method most people seem to have the least trouble with is using the return key. Click on a file or folder once, this will select the item. Press your Return key and the file name or folder name will be highlighted. You can now start typing as usual, when done; press the return key once more, and the changes are locked in.
Rename with a delayed click — The second method is with the mouse exclusively. Click on a file or folder once. Wait a second, and click on the file or folder once more. If you time this just right, the file or folder will become selected, and you can type your new name.
Be careful not to click too fast, or this will actually open the file in its default application. You will not harm anything by doing so, but it can be frustrating. Once you get the timing down, it will become second nature.
A small word of caution — In closing, let me emphasize a word of caution. If for example, you are writing a letter in Word, and have the file saved as my letter.doc. You should not rename the file while you are working on the file. The problem with this is the next time you save the file, it may or may not save to the new name you have given the file.
In a perfect world, this would not matter, as applications would follow the file even after you have renamed it. Not all applications follow these rules. I have never seen this cause data loss, but it will cause you to have a duplicate file. While a duplicate file is not a huge deal, it can be a source of confusion to some.
Scott Haneda on Wednesday March 05th 2008 http://osxhelp.com/renaming-files-and-folders/
- - - - - - - - - - - - - - - - - - - - - - - - - -- - - - - - - - -
Gmail - add multiple attachments Google has finally fixed something I was looking for, for quite some time, adding multiple attachments in one go. Say you want to email 5 photos to someone, you have to click on Attach a file navigate through your file manager to find the file, select it and click OK. And repeat this four more times.
Now when you click on Attach a file you can select multiple files and click OK. The next you will see is a list of files being attached and the upload progress bar for each. It works with both Gmail and Google Apps (GAFYD).
From SilverMac {Used by Permission) Sun, 1 March 2009 http://www.silvermac.com/2009/gmail-add-multiple-attachments/
- - - - - - - - - - - - - - - - - - - - - - - - - -- - - - - - - - -
Customizing Your Menu Bar, Arrange, Remove, and Add Menulets
The items you have, as a default will largely depend on your computer. Laptop users will almost all have an Airport icon, and sometimes a Bluetooth icon. What many people have not learned is that those menulets can be repositioned, deleted, and customized.
Moving a menulet — To move a menulet, just press and hold the command key and drag the menulet from left to right. The other menulets will scurry out of the way. Once you have it where you want, release the mouse and the command key. I find myself frequently adjusting the volume, so I move the volume control off to the right. With it at the right, I find it easier to target quickly.
Written by: Scott Haneda on Thursday March 06th 2008 http://osxhelp.com/customizing-your-menu-bar-arrange-and-remove-menulets/
- - - - - - - - - - - - - - - - - - - - - - - - - -- - - - - - - -
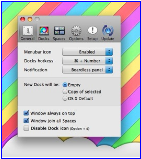
Running multiple Docks on Leopard Dock Spaces is an application that allows you to have up to 10 different docks and swap anytime you want from the menu bar. It will radically improve your productivity, and completely reinvent your user interface experience. What does dock spaces offer?
Up to 10 Different docks having different names all accessible with defined shortcuts. These can be opened at login and the product has Growl support. Spaces integration will offer you a different Dock depending on your hard disk space and available memory. It is a free native Cocoa application for Leopard.
From SilverMac {Used by Permission) 18 October 2008 http://www.silvermac.com/2008/running-multiple-docks-on-leopard/ http://www.apple.com/downloads/macosx/system_disk_utilities/dockspaces_patrickchamelo.html
- - - - - - - - - - - - - - - - - - - - - - - - - - - - - - - - - -
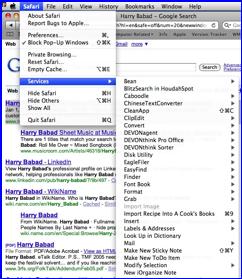
Save Time with OS X Services Services can help you work smarter, faster, and more efficiently As a Mac user, youre primed to look for time-savers that help you be more productive. But you may not be taking advantage of all that OS X has to offer. The Services menu is a case in point. This little known, and even more rarely used, feature deserves more attention than it gets. Services provide system-wide commands that allow you to quickly accomplish a variety of tasks, such as sending Mail messages lickety-split or making a new Stickies note from a selection. If youre not already using the Services menu, youll soon discover how it can boost your productivity.
Locating Services — The Services menu resides in a programs application menu (in Safari, for instance, go to Safari: Services). When you visit the Services menu, youll find both stand-alone commands (such as Spotlight or Search With Google) and the names of certain programs, each with its own submenu of actions. All Apple software works with services. So do many third-party programs. Unfortunately, many major third-party programs shun services, including the Microsoft Office and the Adobe Creative Suite. Although these programs display the Services menu, they dont allow you to select any commands. Alas, unfortunately neither does FileMaker Pro or GraphicConverter.
Programs that dont support services are Carbon, rather than Cocoa, programs. Cocoa is the native OS X application format; Carbon was initially designed to help port Classic programs to OS X. All Cocoa software automatically recognizes and supports services. Carbon programs work with services only if the developer has specifically coded them to do so (as with BBEdit).
Putting Services to Work — OS X comes with a number of built-in services. There are also third-party ones that are worth checking out. Using Apples Services Want to quickly create a Post-it-style note?
From almost any program that supports text (such as Apples TextEdit, Safari, or Preview), highlight some words and select application name: Services: Make New Sticky Note, or press command-shift-Y. This launches Stickies and creates a new note containing your selected text—all in one step! Perhaps youd rather hear a text selection read to you. No problem.
Highlight the desired passage and go to applicationname: Services: Speech: Start Speaking Text. Youll be amazed at how realistic the voices in OS X 10.5 (Leopard) sound.
Need to e-mail text or files quickly? Select what you want and then use the Services menu to create a message in Apple's Mail.
Programs such as Mail and Font Book also include their own sets of services. For instance, if, while reading a document, you encounter an e-mail address thats not hyperlinked and want to send a message to that address, simply highlight the text and select applicationname: Services: Mail: Send To. Mail will automatically launch and create a new e-mail message with the selected address filled in as the recipient (no more cutting and pasting). Suppose you have a document that uses a variety of fonts. To make it easier to access those fonts, create a new Font Book collection that contains them. Press command-A to select all the text in your document, and Save time with OS X services | of 7 collection that contains them. Press command-A to select all the text in your document, and then choose applicationname: Services: Font Book: Create Collection From Text. Done!
There a whole lot more so check out Ted Landaus complete Dec 2, 2008 article at Macworld.com
http://www.macworld.com/article/137001/2008/12/osxservices.html |
 MacTips
 Most Macintosh users have a clock and some
other small icons in the upper right corner of their screen. These items are
generally referred to as menulets. If you are running Mac OS X 10.5 Leopard,
you probably see a clock, a small speaker, a magnifying glass, and perhaps a
few other items.
Most Macintosh users have a clock and some
other small icons in the upper right corner of their screen. These items are
generally referred to as menulets. If you are running Mac OS X 10.5 Leopard,
you probably see a clock, a small speaker, a magnifying glass, and perhaps a
few other items.