
doc_Babad's Macintosh Tips - A Macintosh Tip or Three…June 2006 Edition by Harry {doc} Babad |
|
Product and company names and logos in this review may be registered trademarks of their respective companies |
|

This month I continue sharing my occasional tip related finds with you. Usually, Most, but not all of the Tips I share come from — Paul Taylor’s Hints&Tips column but this month there’s more doc_Babad than Paul Taylor.
Paul [http://www.mac-hints-tips.com] and other’s tips are used with their permission. Where I use any tips for this column, I acknowledge both their source and their contributors.
Oh, I almost forgot! Unless otherwise noted, all the tips and tidbits I share, where appropriate, work on my computer. If I don’t own the software but the tip sounds interesting, I’ll so note.
The software related tips were tested on a 1 GHz dual processor PowerPC G4 Macintosh with 2 GB DDR SDRAM running under Macintosh OS X OS X 10.4.6.
The following is a list of this month’s items
Dealing with Multiple TheRecipeManager Cookbook Databases
Computer Repair Tip for the Absent Minded or Mechanically Impaired – Take pictures as you work – It beats whistling.
Mother I Shrank the Links — Condensing Active Hyperlinks (An MS Word, mostly, based solution)
Different Music Formats — File Size vs. Audio Quality
Enhancing and Using PDF Services
Solving a PhotoShop Elements [PSE] 4 Installation Problem
Big Dock, Little Dock – A dock by any other size
Worthy Web Sites: YouSendIt - a clever service for transferring large files via email
§§§§§§§§§§§§§§§§§§§§§§§§§§§§§§§§
Dealing with Multiple TheRecipeManager Cookbook Databases
Importing information from a friend’s TRM database to mine — I recently received a copy of a friend’s TheRecipeManager’s recipe database but couldn’t figure out how to import them into mine. Unlike when I use FileMaker Pro, I could not just double-click in the database to be able to use it. The file in question was a TRM.df1. I wanted to see which recipes Eric (Dr. Flesher of macC fame) looked interesting so I could more rapidly add them to my collection. Nothing worked but I’d like to share the feedback I got by return mail from Kelly Burgess at TRM when I shared the problem with him.
Answer — TRM always works off the TRM.df1 database file. To access another one, first back up your current data, then do a 'Revert to backup' and select the 'TRM Data (3 APR 06 Backup).df1' or another data set. To get back to your own data, do a 'Revert to backup' selecting the original backup you made. A revert will replace the data in TRM.df1 with the data in the selected backup file, and you can use this fact to shuttle different data sets in and out, just being careful to first back up the TRM.df1 that's about to be overwritten, if it's changed since the last backup.
Forgot to note that, once you've reverted to Eric's data, you can export some or all of those recipes to an empty folder, then revert to your own data and import that folder.
Just wanted to mention that the concept with v2 is that recipes are shared using export/import operations. So if Eric had instead exported his recipes to a folder and sent you that folder, you could have just imported it, and all of this revert stuff required to jockey two data files would be unnecessary.
Version 3 is planning to address this problem and deal with being able to treat each data file as a cookbook, let you create more than one, with the means to drag or otherwise export recipes into different 'books', so you could make one to share with friends, read theirs, etc. Kelly Burgess – TheRecipeManager.
§§§§§§§§§§§§§§§§§§§§§§§§§§§§§§§§
Computer Repair Tip for the Absent Minded or Mechanically Impaired
– Take pictures as you work – It beats whistling.
Have you ever been in the situation where your doing a repair job on a widget and you don’t remember where all the part go; or have a part leftover. doc_Babad, says try this tip. It even works on cars, but you’ll need more pictures.
Did you ever think of taking digital pictures as you disassemble anything on your computer? Then when you wish to put it back together you have pictures to aid you.
Another repair aid working around a computer is a three prong parts retriever in case you drop a small nut down inside the case. Mouse Droppings, Corvallis, OR Page • March 2006 www.mac-hints-tips.com with permission
§§§§§§§§§§§§§§§§§§§§§§§§§§§§§§§§
Mother I Shrank the Links — Condensing Active Hyperlinks (An MS Word, mostly, based solution)
As part of creating articles or other documents I often need to provide a reference to website. When all I am trying to do is give a cited author some credit, adding a multiple line hyperlink is a space-wasting drag. What I really need to do is to allow a click on an authors name to take me to the source of that author’s information, be it a review comment I used, or other information.
In MS word, this can be easily done using Command K Insert Hyper Link.
[Insert Menubar Item > hyperlink]
|
|
Adam Pratt in an |
|
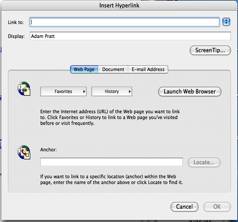

Adobe Acrobat 7 has comparable capabilities allowing one either to activate an inactive link in a text based PDF, or to attach a URL to a name or phrase. [Menu Bar > Advanced > Links]
However, for this to work, the file cannot be a graphic PDF file, one that is usually obtained from a scanner. If you want to activate a graphic PDF you must forts OCR the file either from within Acrobat [Menubar > Document > Recognize Text Using OCR] or use a program like my favorite, Read Iris 11 http://www.irislink.com/c2-73/Readiris-Pro-11-Mac.aspx.
Yes, I know – I could have shortcut this link, but than how would you be able to read it.
§§§§§§§§§§§§§§§§§§§§§§§§§§§§§§§§
Different Music Formats — File Size vs. Audio Quality
Anyone who has ripped an audio CD (that is, converted and imported its contents) in iTunes knows what a simple process it can be. Insert the CD, wait for iTunes to download track information from the Internet, click on the Import button, and go about your business while iTunes does its business. What you may not know is that you have a choice when it comes to the format in which iTunes imports that CD.
iTunes and the iPod support four audio formats — AIFF, WAV, MP3, and AAC. AIFF and WAV files are uncompressed and consume about 10 MB of hard-drive space for each minute of stereo audio. MP3 files are compressed (stripped of audio data considered to be less detectable to the human ear). With iTunes 4, Apple added a new audio-compression format: Dolby Laboratories’ Advanced Audio Coding (AAC). By default, iTunes 4 rips CD audio files at 128 Kbps to about 7 percent of the original file size. However, if you’re willing to trade hard-drive space for better sound quality, you may want to change iTunes’ default import settings.
To do so, select “Preferences” from the iTunes menu and click on the “Importing” tab. Selecting “AIFF Encoder” or “WAV Encoder” from the “Import Using” pop-up menu provides you with full-quality, uncompressed music tracks — useful for purists — but these files will take up a load of space on your Mac or iPod.
A better compromise is to leave AAC Encoder selected and bump up the resolution. To do this, select “Custom” from the Setting pop-up menu beneath AAC Encoder, and choose a higher bit rate from the Stereo Bit Rate pop-up menu.
Apple Pickers MUG, Indianapolis, IN www.mac-hints-tips.com March 2006 • Page 6 used by permission.
PS:
The same considerations hold when you use Toast Titanium as your preferred tool for working with audio cuts. Check out the help file for details. Note since I never know what I’m going to do with a ripped cut from my CD, or downloaded from the internet, I always try to acquire and initially work with the highest available quality material – hey disk space is cheep and you can l always store inactive audio files on a well indexed CD.
Alas only one of my favorite disk cataloging software packages, in conjunction with Roxio’s Toast Titanium will index CDs — DiskTracker http://www.portents.com/disktracker/ will index my audio files directly from my CDs. To-date I’ve not been able to get Illumination 1.5.7 http://www.radicalbreeze.com/illumination/index.html to handle audio files. [doc_Babad.]
§§§§§§§§§§§§§§§§§§§§§§§§§§§§§§§§
Enhancing and Using PDF Services
One of the handiest things in OS X is the ability to print as a PDF file instead of printing out to printer. Once you gain an appreciation for this ability, it is time to look into PDF Services. [Note that if you add Acrobat, not reader, to your to your software tools kit you get even more flexible ability to both printing and manipulate PDF files. Check out the Adobe Acrobat book view in this issue.]
Wouldn’t it be handy if when you find a web page on how to correct red eye, if you could place this information into your Photography folder? Alternatively, if you find a great recipe page for lobster thermador, you could place it in your Recipes folder.
If you like this idea, locate the Photograph and Recipe folders in your Documents folder, or create them. Alias them (Command/L). Now go to your user folder (Users > username) and scroll down to the Library and find the PDF Services folder. If there isn’t one, make one.
Drop your alias folders here. There may already be items in your PDF Services folder for other purposes. For example, if there is a Mail alias in the folder, it lets you attach the PDF to a new blank email, ready to send. You might want to alias Mail for this purpose.
Now go to a web page with a recipe you want located on it. Click Print (Command/P). At the bottom of the dialog, click and hold on the PDF icon and you see a list of the folder aliases you just made. Select one and a PDF of that page appears in the correct folder within your Documents folder. Keep adding folders to PDF Services folder as needed. ~ Phil Russell Mouse Droppings, Corvallis, OR; www.mac-hints-tips.com March 2006 • Page 3 with permission.
§§§§§§§§§§§§§§§§§§§§§§§§§§§§§§§§
Solving a PhotoShop Elements 4 [PSE] Installation Problem
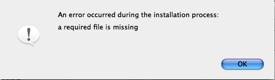
Okay, I got my Photoshop Elements version 4 disk and there I was ready to install and try out the new features and the enhanced, for newbie, interface. However, the #@#$*&$@# software would not install. All I got was a PSE Install Error message. I tried repairing permissions (rebooted), Running Disk Warrior – and after each attempt to install the software the same error message.
I called Adobe customer Service at 888-724-4508 and after just a bit of telephone button tag I got tech support. Nice people, Macintosh knowledgeable for a change. They suggested:
· Install from copy of disk on my drive – Nothing
· Try installing from a new (or existing) Administrator partition — Wonder of wonders, it worked. I rebooted into my own user account and all was well – PSE 4.0, seem like a easier to use version of an already excellent product.
After thought — I did not try a safe boot to install. The trick is to press the Shift key as the machine is starting up. Hold it down from the startup chime until you see the words "Safe Boot," in red lettering, on the login screen.-- Welcome to Safe Mode. (Bob H Thanks for the safe boot alternative, MC•MUG.)
§§§§§§§§§§§§§§§§§§§§§§§§§§§§§§§§
Big Dock, Little Dock – A dock by any other size
Sure, you can resize the Dock by dragging the vertical bar that splits the two sides. However, the Dock also has a series of preferred sizes. If your computer relies on these pre-drawn icons, it doesn’t have to spend time interpolating (or guessing) what an icon should look like, based on the nearest defined size. Using the OS's preferred sizes makes your icons appear sharper. Hold down the option key before dragging the divider line; the Dock will resize in steps, showing only its preferred sizes. — Rob Griffiths, Macworld September 2005 www.macosxhints.com.
§§§§§§§§§§§§§§§§§§§§§§§§§§§§§§§§
Worthy Web Sites: YouSendIt - a clever service for transferring large files via email by Adam C. Engst <ace at tidbits.com>
Recently, I started to need to send large files to friends relating to projects in which we were jointly involved. [Previously my needs for large file transfer were to individuals with FTP sites, so sharing large files using Transmit http://www.panic.com/transmit/ was a no-brainer.] Recently that changed; remembering an Adam Engst Tidbit, I decided to look it and share it with you.
You need to send a large file to a friend or colleague, but it's too large for email, you don't have access to an FTP server, or the recipient isn't sufficiently savvy about usernames and passwords or firewalls to log in to your server. You could always resort to a CD-R sent via overnight delivery, but that's expensive and just feels wrong in this day and age of Internet communications.
Actually, when I have really large amounts of data, I use the CD solutions. I prefer this since I can organize the material more completely. I’m also not trapped into multiple sends of large files. However, my few attempt to use the YouSendIt service worked well. I can’t however figure out their business model to determine how they keep operating. – doc_Babad
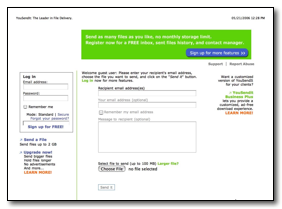
Adam noted that “for a low overhead solution, try YouSendIt. It's a free Web service that's about as simple as you could imagine. On the YouSendIt Web page, http://www.yousendit.com/ you fill in the recipient's email address, click the Browse button to locate the file you want to send, optionally enter your email address and a message, and click the Send It button. The recipient then receives an email message containing a link that downloads the file. If you don't want to reveal your recipient's address to YouSendIt, just send the link to yourself and forward it manually with whatever additional text you'd like to add.
Files can now be up to 2 GB in size, and “YouSendIt scans all files for viruses (not being a virus-infected Windows user, I don't know what happens if they discover a virus in something you send). Files remain available for 7 days and allow only a limited number of downloads to prevent abuse. The recipient can also click a link to delete the file after downloading. If you want secure transfers, you can switch to a version of the page that uses secure HTTP for both you and your recipient; of course, that assumes you trust YouSendIt in general. You can even put a link like the one below on your Web site that others can use to send you files via YouSendIt.”
I too haven't used YouSendIt that many times, as Adam noted, “it's hard to find a negative point, short of the lack of progress feedback when uploading a very large file via a Web browser. The company has a reasonable privacy policy and terms of service … YouSendIt also publishes a DMCA policy regarding the illegal distribution of copyrighted materials.“
I also checked out another item listed by Adam, YouShareIt, but the side did not seem to be functional. <http://s3.youshareit.com/> . I then checked the Dropload site, which has a 100 MB file size limit. It appears to follow the same model as YouSendIt., http://www.dropload.com/. Since most of my contacts have both broadband with about a 100 MB size limit, I did not check our this alternate service. In any case, its good email manners to let someone know you’ll need to be sending him or her a large file and asking them how they want that handled.
I too suggest as did Adam that you give it a try next time you need to send a file that's too large for email. --- Article modified from Adam Engst TidBITS #764/31-Jan-05; Reuse governed by Creative Commons license.
PS:
And if you have tips to share send them to me at hbabad@maccompanion.com ——— I’ll also share them with Paul Taylor
doc_Babad