doc_Babad's Macintosh
Tips - A Macintosh Tip or Three…
b>June
2008 Edition
By Harry {doc} Babad ©
2008 |

|
This month, after
hopefully winning a battle with cancer, which involved high doses of radiation
therapy, I decided to do some Spring-cleaning. I found that I had several
hundred unread tips/hints and other Macintosh related stuff in my Eudora In
Box. I subscribe to a variety of tip/help/hints related electronic publications
— I’ve worked through my accumulation and am passing on those that most
interested me.
Some of the software
related tips were tested on an 2.8 GHz Intel Core 2 Duo iMac with 2 GB 667 MHz
DDR2 SDRAM; running under Macintosh OS X OS X 10.5.3. The remainder are
untested, but since I’ve never had a problem with any tip from either Macworld
or MacFixIt, as far as I’m concerned they are good to try. My call folks, don’t
like my MacFixIt picks, subscribe for your self. It’s well worth the $25 USD
price. Of course, most of us have long learned the value of
the information available in Macworld, both the print and online edition.
Next month I’ll continue
sharing my other tip related finds with you including some of the Tips from
Paul Taylor's Hints & Tips column . When I use any one else’s tips for this column, I acknowledge both their source
and their contributors.
Product and company names and
logos in this review may be registered trademarks of their respective
companies.
Disclaimer: When briefly reviewing share-freeware I will often
use the developers’ product, functions and features descriptions. All other
comments are strictly my own and based on testing. Why need I rewrite the developers’ narratives, if they
are clearly written? |
- - - - - - - - - - - - - - - - - -- - - - - - - - -
Tips I’ve provided this
month, as always in a random order, include:
- Open new windows via Command-Tab in Leopard
- Add
More Solid Desktop Color Options To Your Desktop
- Disappearing Photos In iPhoto — Rebuilding
The Library
- Apple’s Mail.app Is Only Printing Message Headers
- DiskWarrior 4.1 CD Updater Finally Released
- Custom Icons in the Dock Disappearing
- Problems Opening Files with Some Apps? Check the
temp directory permissions.
- Problems Opening Files with Some Apps? Check the
temp directory permissions.
- Column View Tricks in Open/Save Dialogs
- Easily View and Use An Application’s Icons
Open new windows via
Command-Tab in Leopard
As
you probably know, most OS X programs will run without any open
windows—close the last window, and the program keeps running. If you
switch to that program by clicking its Dock icon, a new window will appear,
ready for your use. But if you use the Command-Tab application switcher, the
program will activate without opening a new window. You then have to press
Command-N to open a new window in the application.
Here’s
a trick you can use—in OS X 10.5 only—to force the application
switcher to open a new window when you activate an application without any
active windows. Let’s say you’ve launched Safari, browsed for a bit, and then
closed your last browser window.
You’ve
switched over to TextEdit for a bit, but now want to go check a Web page. To
activate Safari with a new window, just press Command-Tab until Safari is
highlighted in the application switcher. Still holding down the Command key,
press and hold the Option key. Finally, release the Command key first, and then
the Option key, and Safari will spring to the foreground with a new window, all
ready for your use. (If the program already has an open window, this trick won’t
open a second window; instead,
the already-opened window will be active when you switch.)
If
the program you’re switching to has a docked window—but no other open
windows—this trick will spring that window free from the Dock. This is a
handy way to free docked windows without relying on the mouse or navigating the
Dock via keyboard shortcuts and arrow keys.
Note that this trick may not
work on every application. The good news is that it’s quick and easy to test it
yourself with your regularly-used programs.
By Rob Griffiths, Macworld.com Apr 24, 2008
~ * ~ * ~ * ~ * ~ * ~ * ~ * ~ * ~ *
~ * ~
Add
More Solid Desktop Color Options To Your Desktop
When it comes to customizing
your desktop, OS X seemingly provides anything you could want -- there are a
number of Apple-provided images, there are connections to your user's Pictures
folder and iPhoto library, or you can use any of 10 provided solid colors for
your desktop background. But if you're a fan of solid colors, you may not agree
with the 10 that Apple has provided. Thankfully, there are two relatively easy
ways to get additional color choices.
 One way to get more solid
color choices is to actually add them to the Solid Colors section of the
Desktop & Screen Saver System Preferences panel. The 10 colors shown here
(Mac OS X 10.4 users -- there's a 'hidden' solid white color at the end of your
list; it shows up with a drop shadow in 10.5) are just PNG files stored in a
folder on your Mac. To create more colors, navigate to the top-level Library
-> Desktop Pictures folder in the Finder. Select any one color in that
folder, and duplicate it (Command-D, or File -> Duplicate), and then rename
it to reflect the color you'd like to use. Note that colors appear in the
Desktop & Screen Saver System Preferences panel based on their name. As a
result, to make your colors show up at the top of the list, for instance,
preface their names with a space. (You'll need to be logged in as an
administrator to change this folder.)
One way to get more solid
color choices is to actually add them to the Solid Colors section of the
Desktop & Screen Saver System Preferences panel. The 10 colors shown here
(Mac OS X 10.4 users -- there's a 'hidden' solid white color at the end of your
list; it shows up with a drop shadow in 10.5) are just PNG files stored in a
folder on your Mac. To create more colors, navigate to the top-level Library
-> Desktop Pictures folder in the Finder. Select any one color in that
folder, and duplicate it (Command-D, or File -> Duplicate), and then rename
it to reflect the color you'd like to use. Note that colors appear in the
Desktop & Screen Saver System Preferences panel based on their name. As a
result, to make your colors show up at the top of the list, for instance,
preface their names with a space. (You'll need to be logged in as an
administrator to change this folder.)
Now open the duplicated and
renamed image file in your favorite image editor, and change its color to the
one you'd like to use. Read the rest of the hint for a solution that doesn't
require any file duplication or image editing.
By Rob Griffiths <mailto:macosxhin
ts@macworld.com
~ * ~ * ~ * ~ * ~ * ~ * ~ * ~ * ~ *
~ * ~
 Disappearing Photos In iPhoto — Rebuilding
The Library
Disappearing Photos In iPhoto — Rebuilding
The Library
MacFixIt
readers semi-frequently report an issue in which photos suddenly disappear from
iPhoto, generally after some change -- the addition or deletion of images, etc.
-- has been made to the library. For instance, MacFixIt reader David Wizig
recently wrote: "I have a 4 year old Mac and I am running Tiger on it.
Every time I download a picture someone emails me on the Internet, all of my
pictures (about 900) disappear from iPhoto."
The
general remedy for this issue is to backup your photo library (~/Pictures/iPhoto
Library), then rebuild the iPhoto library by quitting the application if it is
open, then launching it while holding down the shift and option keys for iPhoto
4.x or the command and option keys for iPhoto 5.x or later. You will be
prompted to rebuild the library. We recommend making frequent backups of your
iPhoto library.
MacFixIt: Tuesday, March 04 2008.
~ * ~ * ~ * ~ * ~ * ~ * ~ * ~ * ~ *
~ * ~
Apple’s Mail.app Is Only Printing Message Headers
Several
readers have reported an issue in which Mail.app only prints message headers,
leaving message body text out. The problem appears to manifest more often when
the "Command + P" keyboard combination is used to print documents.
As
such, some users have had success with opening messages in their own windows
(by double-clicking them in the mail browser) then using the Print button at
the top of the window.

Other users have been able to
alleviate this problem by delete then re-adding printers and/or resetting the
printing system. Open Printer Setup Utility, located in Applications/Utilities
and look at the "Printer List" Highlight and delete all entries.
Alternatively, go to the "Printer Setup Utility" menu at the top of
the screen and select "Reset Printing System". Click the
"Add" button and re-add your printer(s).
MacFixIt: Friday, March 14th 2008
~ * ~ * ~ * ~ * ~ * ~ * ~ * ~ * ~ *
~ * ~
DiskWarrior 4.1 CD Updater Finally Released
 Introduction — DiskWarrior
is my favorite utility program when having non-permission related problems on
my Macintosh. Designed by Alsoft from the ground up with a totally different
approach to preventing and resolving directory damage, which is the leading
cause of Mac instability. I use it once a month just for insurance, just as I
insist on weekly bootable backups of my hard drive.
Introduction — DiskWarrior
is my favorite utility program when having non-permission related problems on
my Macintosh. Designed by Alsoft from the ground up with a totally different
approach to preventing and resolving directory damage, which is the leading
cause of Mac instability. I use it once a month just for insurance, just as I
insist on weekly bootable backups of my hard drive.
DiskWarrior
resolves existing disk damage by rebuilding your disk directory using data
recovered from the original directory, thereby recovering files and folders
that you thought were lost. The directories DiskWarrior creates are also
optimized for maximum directory performance.
DiskWarrior
is not a disk repair program in the conventional sense. It does not attempt to
solve all of the possible problems that can occur with a disk. It specializes
in eliminating directory errors - the most common problems Mac OS users have
with their disks.
DiskWarrior
rebuilds your disk directories making them error-free, eliminating any problems
the errors would have caused, and recovering lost files.
It
fixes any problem with master directory blocks and alternate master directory
blocks (HFS), volume headers and alternate volume headers (HFS Plus), volume
bitmaps, catalog trees, and extents trees.
A
Free Version 4.0 Updater — Nearly two months after DiskWarrior 4.1
was made available to new buyers [$100 USD] of the venerable disk repair
utility, the update has been released as a free CD updater for existing
customers. An upgrade priced of $50.00 is available to usurers of earlier
(than 4.0) version of the product.
This
free updater will allow you to create a new startup CD containing the updated
DiskWarrior application from your version 4.0 disk.
Alsoft adds:
"Please note that the new startup CD will start up the same set of Macs as
your current DiskWarrior CD. Your new CD will not start up any Mac that your
current DiskWarrior CD can not." The current DiskWarrior CD cannot start
up the new Mac Pro and Xserve models introduced on 01/08/2008, the MacBook Air
introduced on 01/15/2008, the MacBook/MacBook Pro models introduced on
02/26/2008, or the iMac models introduced on 04/28/2008.
DiskWarrior
4.1 features full compatibility with Mac OS X 10.5.x (Leopard). Primarily, this
release includes the ability to repair Time Machine backups by working with
damaged directory.
MacFixIt: Monday, March 17 2008, as augmented by doc_Babad
~ * ~ * ~ * ~ * ~ * ~ * ~ * ~ * ~ * ~ * ~
Custom Icons in the Dock Disappearing
MacFixIt reader Scott Rose reports an issue in which custom icons for folders harbored
in the Dock disappear after a restart. The icons revert to the standard, blue
Mac OS X folder graphic. Scott writes:
"We
have added our own custom icons to almost all of our folders in the Finder: the
Applications folder, the Utilities folder, the Desktop folder, etc. When we
drag these folders to the right-hand side of the dock and choose to display
them as a folder, the dock correctly shows the custom icons for these folders.
However, after a restart of our computer, the folders in the dock change back
to their default icons that were assigned by Mac OS X. In the Finder, the
folders still show their custom icons, but the dock has reverted them back to
the default Mac OS X icons."
As noted by Scott, you need
to control-click (or right-click) custom-icon folders in the Dock and select
"Display as Folder" in order to show custom icons. However, for some
users, the custom icons do not persist after restarting.
MacFixIt: Monday, April 14 2008
~ * ~ * ~ * ~ * ~ * ~ * ~ * ~ * ~ *
~ * ~
Problems Opening Files with Some Apps? Check the
temp directory permissions.
If
you are having problems opening documents with certain applications --
particularly after an iterative Mac OS X update -- make sure that permissions
are correct for the user-specific temp directory.
First,
launch the Terminal (located in /Applications/Utilities) and enter the
following command:
sudo
chmod 775 $TMPDIR
Then press return. You will be prompted
to enter your administrator password. Try logging out then back in and check
for resolution of the issue.
MacFixIt: Tuesday, May 06 2008
~ * ~ * ~ * ~ * ~ * ~ * ~ * ~ * ~ *
~ * ~
Column View Tricks in Open/Save Dialogs
As much as I like column view mode, one of its
challenges, especially in the usually-smallish Open and Save dialogs, is that
the column widths never seem to be correct for the files and folders that I’m
browsing. There are a couple shortcuts (in both OS X 10.4 and 10.5) that can
help with this problem. You probably know that if you double-click the icon at
the bottom of a column, it will “right size” that column, so you can see the entire
file name. If you Option-double-click that icon, then all columns will be “right sized” to the maximum width
necessary to display the longest item in the column. (Confusingly, it doesn’t
work like this in the Finder. Option-double-clicking sets all columns equal to
the width of the widest column in the path, which can lead to some truly wide
columns. Sadly, there isn’t a “right size all columns” option in Finder.)
In 10.5, Apple apparently felt these shortcuts were
too hidden; there’s now a contextual menu hiding under the column resize
widget, too. Just control-click on it, and three choices will appear:

These options are fairly self-explanatory; the first
affects only the column whose divider icon you Control-clicked. (It’s the same
as a double-click on the indicator). The second will figure out the needed
width of the widest column, and set all columns to that width (the equivalent
to an Option-double-click in the Finder). The third will set each column only
as wide as necessary to fit the longest filename in that column (the same as
Option-double-clicking in the Open/Save dialog).
So now, if you have trouble
remembering the shortcuts, the contextual menu is but a Control-click away.
Hopefully someday Apple will figure out how to get the “right size all columns”
feature into the Finder, where it would be truly useful. Until then, though, at
least it works in the Open and Save dialogs.
By Rob Griffiths, Mar 20, 2008 Macworld.com.
~ * ~ * ~ * ~ * ~ * ~ * ~ * ~ * ~ *
~ * ~
Easily View and Use An Application’s Icons
If you’re ever in a situation where you need a high
quality version of an OS X application icon—for use in a presentation,
review of a program, or other such use—it can be a bit of a chore to get
that icon. The usual method, which I call the “find the icon file in the
haystack” game, goes like this. Control-click on the program in question,
select Show Package Contents from the pop-up menu, then navigate into Contents
-> Resources. Inside that folder, somewhere, you should find a file whose
name ends in .icns. Open that in
Preview, and there are the icons.
The problem with this approach is that there can be hundreds
of files in the Resources folder, and the naming of the .icns file isn’t necessarily logical, so it can take a bit
of digging—or help from Spotlight—to find the file.
 It turns out that there’s a much> simpler—though completely non-obvious—way to get a full
set of an application’s icons, at least if you’re running OS X 10.4 or 10.5. In
the Finder, select the program in question, and press Command-C (or if you love
menus, select Edit -> Copy). You’ve now got a full copy of the application
on your clipboard. (Don’t believe me? Press Command-V after switching to
another folder in the Finder—if you’re going to do this, I suggest
copying a small program, and not
something like the 337MB iWeb.)
It turns out that there’s a much> simpler—though completely non-obvious—way to get a full
set of an application’s icons, at least if you’re running OS X 10.4 or 10.5. In
the Finder, select the program in question, and press Command-C (or if you love
menus, select Edit -> Copy). You’ve now got a full copy of the application
on your clipboard. (Don’t believe me? Press Command-V after switching to
another folder in the Finder—if you’re going to do this, I suggest
copying a small program, and not
something like the 337MB iWeb.)
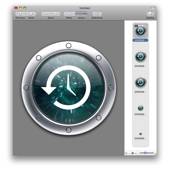
Now launch Preview, and press Command-N (File ->
New from Clipboard for you menu users). You may be surprised at the result: a
full copy of the chosen application’s icons, in every available size. For
instance, the image at right (click it for a full-size version) is what you’ll
see if you copy Time Machine and paste it into Preview. (If you’re running
10.4, you won’t see the massive 512-by-512 pixel icons; 10.4 icons were limited
to 128-by-128 pixels.)
In Preview’s sidebar, you can then click the desired
icon size, and then use File -> Save As to save it to your drive in a format
of your choice. (If you want to retain the transparency, you’ll need to use PNG
or TIFF as the file type.)
This trick worked with every application I tested it
with. You can also use it to get document icons for things like Excel
spreadsheets, Word documents, etc. If you try it with a PDF, though, you’ll
find that Preview will actually paste in the entire PDF, not its icon.
If you do much work with
images of OS X applications and documents, then this trick is a great
timesaver. Even if you don’t, though, it’s a nifty way to check out the details
in some of the amazing 512-by-512 icons you’ll find in OS X 10.5.
Happy Macin’ – More
next Month
Harry {doc} Babad
