Doc_Babads Macintosh
Tips – A Macintosh Tip or Three
June
2009 Edition
By Harry {doc} Babad ©
2009
|

|
Product and company names and logos in this review may be
registered trademarks of their respective companies.
Reviews were carried out on
my iMac 2.8 GHz Intel Core 2 Duo with 2 GB 667 MHz DDR2 SDRAM running Mac OS
X version 10.5.7
|
Disclaimer and Boiler Plate: When briefly reviewing
share-freeware I will often use the developers product, functions and
features descriptions. All other comments are strictly my own and based on
testing. Why need I rewrite
the developers narratives, if they are clearly written?
|
|
Acknowledgements
— As the occasion warrants, some of the Tips I share come from Paul
Taylor's Hints & Tips column, and are used with his
permission. If you have tips to share send them to Paul. I
also use user group published tips with their consent if I can make the contact
with the appropriate officer. Where I use any one elses tips for this column, I acknowledge both
their source and their contributors. Yes, I do write down and share some of the
tips Ive discovered while Macin around. If a tip or hint comes from a more
traditional commercial source, I both acknowledged that fact and almost always
modify the tip to personalize it for our readers.
Oh,
I almost forgot! Unless otherwise noted, all the tips and tidbits I share,
where appropriate, work on my computer. If I don't own the software but if the
tip sounds interesting, I'll so note that information at the end of that
specific write-up.
- - - - - - - - - - - - - - - - - - - - - - - - - - -
Tips
Ive provided this month, as always in a random order, include:
-
- - - - - - - - - - - - - - - - - - - - - - - - -- - - - - - - - -
Four Ways take a Desktop Screenshot
At least a
couple times a month, I hear people ask how to take a screenshot of their Macs
desktop (Geoff...). The ability to easily take desktop screenshots is an occasionally
essential feature of Mac OS X. Here are four easy, built-in ways to take
screenshots on your Mac:
- To take a
screenshot of your Macs entire desktop, hold down Command/Shift/3 all at the
same time. This records the entire desktop at full resolution. In Leopard and
Tiger, the selection will be saved to your desktop as a PNG file. Panther saves
the image as a PDF.
- To capture
only a part of your desktop, hold down Command/Shift/4. The cursor will turn
into a trigger. Drag the trigger across the part of the screen you want to
record and then release the mouse. If your Macs sound is on, you will hear a
snapshot sound. In Leopard and Tiger, the selection will be saved to your
desktop as a PNG file. Panther saves the image as a PDF.
- To take a
screenshot of an individual application window (say an individual Safari
window, or a single email, or single Preview image), hold down
Command/Shift/4/spacebar. A camera icon will suddenly appear. You can rotate
through application windows with this camera, until you land on the application
window you wish to record. In Leopard, the selection will be saved to your
desktop as a PNG file. In Leopard and Tiger, the selection will be saved to
your desktop as a PNG file. Panther saves the image as a PDF.
All this screenshot
fun is powered by the Grab application that is stored in your Macs
Utilities folder. Additionally, it does something particularly cool: it allows
you to take a timed screenshot.
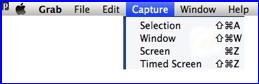 To take a timed screenshot, browse to your
Applications folder, and then browse to the Utilities folder contained within.
Open the Grab application, then click Capture in the menu bar. At the bottom
of the list is the option for Timed Screen. The Timed Screen grab gives you a
10 second countdown to taking a screenshot. Once a screenshot is saved to your
desktop, you can open the PNG file in Preview or any image editing application
to shrink its size or perform other edits as needed. You can also drag the
screenshot into an email, document, or IM to send to someone else.
To take a timed screenshot, browse to your
Applications folder, and then browse to the Utilities folder contained within.
Open the Grab application, then click Capture in the menu bar. At the bottom
of the list is the option for Timed Screen. The Timed Screen grab gives you a
10 second countdown to taking a screenshot. Once a screenshot is saved to your
desktop, you can open the PNG file in Preview or any image editing application
to shrink its size or perform other edits as needed. You can also drag the
screenshot into an email, document, or IM to send to someone else.
Extra
credit: Instead of saving files to your desktop, you can
save a screenshot to your Macs clipboard, to be pasted into an application
such as Photoshop, Word, or an email. To do this:
- Hold down Command/Control/Shift/3 to take a
screenshot of the screen and save it to the clipboard
- Hold down Command/Control/Shift/4, then select an
area, to take a screenshot of that area and save it to the clipboard
- Hold down Command/Control/Shift/4, then space,
then click a window to take a screenshot of a specific window and save it to
the clipboard
- Extra-extra
credit: Take screenshots within Preview! To do this, launch
Preview, then navigate to File > Grab, where all the screenshot options
above are also available by using the Grab submenu in the File menu.
Ed
Shepard
Small Dog Electronics
Courtesy: Paul Taylor November 2008
-
- - - - - - - - - - - - - - - - - - - - - - - - -- - - - - - - - -
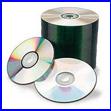
Choosing Blank CDs and DVDs
Blank
recordable CDs and DVDs come in so many flavors that its often difficult to
figure out which you should be purchasing.
 Youre
probably familiar with designations such as CD-RW and DVD+R, so lets start
there. Obviously, the first part of this designation tells you whether youre
looking at a CD or a DVD. They are the same physical size but a DVD can hold
more than 6 times as much data as a CD can. It is the only practical choice for
very large files such as movies, but can in fact be used for any kind of data.
Youre
probably familiar with designations such as CD-RW and DVD+R, so lets start
there. Obviously, the first part of this designation tells you whether youre
looking at a CD or a DVD. They are the same physical size but a DVD can hold
more than 6 times as much data as a CD can. It is the only practical choice for
very large files such as movies, but can in fact be used for any kind of data.
An R
alone at the end of the designation indicates that this is a recordable write
once disc; that is — it cant be erased and reused. An RW, on the other hand, indicates a
rewriteable disc that can be erased and reused numerous times. These were
popular for a while but fell into disfavor, as problems of poor reliability and
short life of RW discs became better understood. Few people would recommend
using RW discs today.
Between the
two sets of letters theres an arithmetic sign, which will be either a plus (+)
or a minus (-). These indicate two different methods of disc formatting which
are not compatible, though happily there are many disc drives that are built to
read and write both types of disc.
A
relatively new disc type in the computer world is the dual-layer DVD, which can
hold twice as much data as a normal DVD. These carry the letters DL following
the normal designation.
To see
which kinds of disc your Mac can use, go to the Apple menu and choose About
this Mac; then in the small window that opens, click the More Info button,
which will open the System Profiler. Look for the heading Hardware in the left
hand column and if necessary, click the small black disclosure triangle
beside the word Hardware so that you can see the list of hardware items.
Click Disc
Burning and refer to the right hand panel. Look for the lines labeled CD-Write
and DVD-Write and youll see the types of disc your Mac can burn (record).
So far, so
good; but what about the device on which you hope to view your CD or DVD, if
this isnt just the same Mac that recorded it — a Windows PC or a
domestic DVD player, for instance?
Broadly
speaking, most modern computers can read the disc types mentioned so far, but
if the computer is a few years old you may find that it can read only minus
discs if its a Mac, or only plus discs.
If its a
Windows PC, and it may not be able to read DL discs at all.
If you plan
to view your discs on a domestic DVD player, the situation is similar. Players
a few years old may be able to play only plus or only minus discs,
depending on the manufacturer. Later models are likely to be more
accommodating, and most will play DL discs as those are commonly used for
commercial movies.
Despite all
your careful research and disc purchasing you may find that discs burned on
your Mac may simply refuse to play on one particular domestic DVD player,
though they may well play perfectly on another. This isnt as uncommon as you
might think, and possible solutions are to use a different brand of disc, burn
at a slower speed, or burn on a different Mac. If none of these measures work,
its probably time the troublesome media player was replaced with a newer
model.
If youre
tempted to try using dual-layer (DL) DVDs to take advantage of their greater
data capacity, be aware that getting these to play in machines other than the
one that burned them can be especially tricky. Whichever kind of disc you
decide to buy, there is one well-researched rule — you get what you pay
for. Buy only well-known brands such as Sony, TDK, Imation, Maxell and
Verbatim. Then to help extend their lives, store your discs in a dark place at
moderate temperature. Light and heat are the enemies of recordable discs of any
type or brand.
Finally, it
may surprise you to learn that the most common cause of an inability to read an
optical disc is fingerprints! Wash the disc carefully in very diluted warm
detergent solution, rinse and wipe dry with a soft cloth.
Steve Cooper
AUSOM News, Melbourne, Australia
Paul Taylors Hints and Tips May
2009
- - - - - - - - - - - -
- - - - - - - - - - - - - -- - - - - - - - -
Changing the Mouse Pointer Size
For those (like me) who have trouble seeing the small mouse
pointer among a clutter of other things on the screen, Apple offers help. Go to
System Preferences, click Universal Access, click Mouse & Trackpad.
Near the bottom of this window is a slider labeled Cursor Size. It can be
moved to the right (by the mouse) to make the mouse pointer bigger.
Bruce Craven
AUSOM News, Melbourne, Australia
Paul Taylors Hints and Tips May 2009
- - - - - - - - - - - -
- - - - - - - - - - - - - -- - - - - - - - -
Finding Mac Software
and Heres Apple
If you need some software to perform a particular task it can
often be difficult to know where to start looking. Old hands will tell you
about VersionTracker and MacUpdate but you may find it difficult to interpret
what you see there.
Time to take another look at your Apple menu. There, right below
the Software Update item, is Mac OS X Software, which is quite a different
animal. Click this item and youll actually be taken to <http://www.apple.com/downloads/> where
youll immediately see a number of interesting applications, but perhaps not
the kind you need.
Now click the All Downloads bar at top left, and you can begin
to explore the complete library of listed software. Note that theres a
Search box as well, in case you want to search by keyword(s).
Try this resource next time you need an application of a
particular kind. You may be surprised at the volume of information available
there. Commercial software, shareware and freeware are all covered.
Steve
Cooper
AUSOM News, Melbourne, Australia
Paul
Taylors Hints and Tips May 2009
- - - - - - - - - - - -
- - - - - - - - - - - - - -- - - - - - - - -
Eliminating App Crashes and Freezes by
Checking PLIST Files
Many
application-based problems users experience seem to be stem from faulty .plist
files. The standard solution in these cases has been to remove the plist files
and have the application recreate them. While this is a quick solution, it also
resets the settings stored in the .plist files, and requires the user to
recreate custom settings.
Apple
includes a command line utility with Mac OS X dubbed "plutil" which
can be used to check plist files for damage and manage their properties. This
program should be used prior to resorting to the default delete of plist files.
With the utility, you can check for syntax errors and convert them between XML
and binary format.
To
use this utility, launch the Terminal (located in /Applications/Utilities, then
enter the following command, replacing "filepath" with the path the
target .plist file. Most pertinent plist files are located in
~/Library/Preferences.
Checking
for errors
plutil
-lint filepath
If
a program is not properly storing settings, or seems to be acting oddly and you
suspect it is a property list file error, run this utility to first check for
errors and then try switching between the two formats before resorting to
deleting the file and starting over.
Converting
to different formats
plutil
-convert fmt filepath
("fmt"
in the command is either "xml1" or "binary1", depending on
whether XML or binary format is desired).
MacFixIt
Site
Monday, June 30 2008
- - - - - - - - - - - -
- - - - - - - - - - - - - -- - - - - - - - -
Open Just About Anything
File Juicer (shareware), $17.95)
is a drag-and-drop can opener and data archaeologist. Its specialty is to find
and extract images, video, audio, or text from files that are hard to open in
other ways.
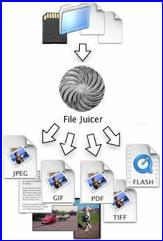
It finds and extracts: JPEG, PNG, GIF, PDF, BMP, WMF, EMF, PICT,
TIFF, Flash, Zip, HTML, WAV, AVI, MOV, MP4, MPG, MP3, AIFF, AU, WMV, or text
from files which contain data in those formats.
Lossless extraction — File Juicer doesnt convert the
images, sounds, or videos it finds, but saves them unchanged in their original
format when possible. See the manual for details about supported formats.
This is useful if:
- You have old files you can no longer
open with current applications.
- You receive emails with attachments
you cannot open.
- You have corrupt files or databases.
- You have damaged or accidentally
erased flash cards for your digital camera.
- You receive self-extracting EXE files
designed for Windows.
- Or if this is just faster than
copying and pasting from the file.
When you have extracted some files — for instance from an
accidentally erased flash card — you can then check that they are intact
with QuickTime Player or convert them with other applications.
For images, checking validity is done by letting File Juicer
generate icons for the files. Then the files with icons are the ones that are
intact.
Phil
Russell
Mouse Droppings, Corvallis, OR
Paul
Taylors Hints and Tips May 2009
- - - - - - - - - - - -
- - - - - - - - - - - - - -- - - - - - - - -
How to Protect Your Email Address Book
I learned a computer trick today thats really ingenious in its
simplicity.
As you may know, when/if a worm virus gets into your computer,
it heads straight for your email address book and sends itself to everyone in
there, thus infecting all your friends and associates.
This trick wont keep the virus from getting into your computer,
but it will stop it from using your address book to spread further, and it will
alert you to the fact that the worm has gotten into your system.
Heres what you do:
First, open your address book and click on new contact, just
as you would do if you were adding a new friend to your list of email
addresses.
- In the window where you would type
your friends first name, type in A.
- For the screen name or email address,
type AAA@ AAA.AAA.
Now, heres what youve done and why it works: The name A will
be placed at the top of your address book as entry #1. This will be where the
worm will start in an effort to send itself to all your friends.
When it tries to send itself to AAA@AAA.AAA, it will be
undeliverable because of the phony email address you entered. If the first
attempt fails (which it will because of the phony address), the worm goes no
further and your friends will not be infected.
Heres the second great advantage of this method: If an email
cannot be delivered, you will be notified of this almost immediately. Hence, if
you ever get an email telling you that an email addressed to AAA@ AAA.AAA could
not be delivered, you know right away that you have the worm virus in your
system. You can then take steps to get rid of it!
Pretty slick, huh?
If everybody you know does this then you need not ever worry
about opening mail from friends. DO IT NOW and pass this on to all your friends.
Malkin Strong, Long Beach, CA
Paul Taylors Hints and Tips May 2009
- - - - - - - - - - - -
- - - - - - - - - - - - - -- - - - - - - - -
Spring into spring-loaded folders
Todays
easy-peasy fix comes courtesy of reader Paul Sarlis, who writes: With older
versions of OSX I could grab a file that I saved to my Desktop and hold it over
my hard drive icon. When I did that the hard drive would open so that I could
place the file where I needed it. Is this option still available or is there a
new way to do this?
Yes
the option — called spring-loaded folders — is still there. In your
case, it appears that its 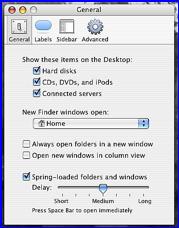 been switched off. To
switch it on, choose Finder -> Preferences, click the General tab if its
not already selected, and enable the Spring-Loaded Folders and Windows option.
With the Delay slider below you can determine how long the Finder delays
springing open a folder or volume after youve dragged an item to it.
been switched off. To
switch it on, choose Finder -> Preferences, click the General tab if its
not already selected, and enable the Spring-Loaded Folders and Windows option.
With the Delay slider below you can determine how long the Finder delays
springing open a folder or volume after youve dragged an item to it.
Easy
and peasy though this question and answer are, its a nice reminder of a
feature that far too many people fail to use. If this spring-loaded thing is
new to you, it works this way: Drag an item to a volume or folder and continue
holding down the mouse button. The volume or folder will blink a couple of
times and then its root folder will open. You can let go of the mouse button
and the item will drop into this folder. Or, you can hold the item over yet
another folder and, sure-as-shootin, that folder will also blink and then
open. Continue this process until you dig down into the folder you want to
access.
Doc
Sez; "I plan on trying the tip with my Eudora address book, but Im not sure it
will work."
Christopher Breen Mac
911
Finder Newsletter — Mid-Columbia Macintosh
Users Group May 2009
- - - - - - - - - - - -
- - - - - - - - - - - - - -- - - - - - - - -
Business Card Design 101 — Before you create your own business cards, consider these
principles
It's easy to make custom business cards using today's online printing
services. But
before you start, take a moment to review these tips from designer Walter Gray Lamb, who
has been designing business cards for more than 30 years.
Remember Your Profession —
Carefully consider the message you want your card to send. If youre in a
conservative field like finance or law, an outrageous design could undermine
the recipients confidence in you. If you have a creative job, a card thats
too dull might cast doubts on your creative abilities.
Pick the Right Font — Text
on a business card should be sized between 8 and 10 points. Serif fonts are
more traditional and easier to read than sans serif fonts, which are more
modern and less personal. Italics are conversational. Boldface should be used
sparingly.
Make Your Name Pop — To
make your name stand out from the rest of the information on your card, put
extra white space around it, make it bold or a different color, or set it in
all caps.
Dont Make Your Mark — Unless you have design experience, do
not attempt to create your own logo. Its more difficult than it seems. Using a
poorly designed logo is the easiest way to look like an amateur.
Keep it Simple — Avoid piling
too many design elements and colors onto your card. Consider leaving some
negative space or one side of your card blank for notes. (Keep in mind that
glossy cards are difficult to write on.)
Leave Something Off — A
classic calling card trick is to not print one piece of information— your
cell phone number, for instance. Before handing your card to someone, hand-write
your number on the back of the card. This creates a personal connection between
you and the recipient and makes them feel special.
Doc Sez, use business card software such as Business
Card Composer, or
better yet their entire Printfolio Collection for most of your graphics needs.
By Heather Kelly,
Business
Card Design 101| Working Mac | Macworld 2/16/09
- - - - - - - - - - - -
- - - - - - - - - - - - - -- - - - - - - - -
Improve Your Google Searches — Search
smarter with these expert query tips
If
you turn to Google.com for the bulk of your Web searches, learning some of its
lesser-known tricks is worthwhile. Simply by adjusting your preferences and
using some special expressions, you can home in on the right results more
quickly.
Set
your Preferences — In your Web browser, go to www.google.com and click on the Preferences
link to the right of the search field. Two options here can be particularly
useful. In the Number Of Results section, use the pop-up menu to change the
default Display 10 Results Per Page option to a nice large number (such as
100). Having more results on each page means less clicking.
Likewise,
save yourself some typing by selecting the Provide Query Suggestions In The
Search Box option in the Query Suggestions section. Google will now guess the
rest of a search term as you enter it, providing common search terms and likely
matches. (A pop-up list of suggested terms will appear; use the arrow keys to
navigate the list, and press return to select a term.)
Once
youve customized your settings, click on Save Preferences. Note that you must
repeat this procedure in each browser you use—Mozilla Firefox and Apples
Safari. For example — but that the settings will apply not only when you
search from the Google page, but also when you use your browsers toolbar
search field.
Get
Specific With Quotes — Most people simply type
one or more words into Googles search field, press return, and then scan the
results for something that looks like a match. But you can increase the chances
that what youre looking for appears among the first few hits by being more
specific with your searches. For example, by default, Google looks for pages
containing all the words you enter in the search field, in any order and in any
location on the page
.
Suppose
you remember reading the phrase motion itself is impossible the first 1,000 matches,
that article wont show up in the first 1,000 matches, because so
many
pages contain all four of those words somewhere.
However,
enclose the phrase in quotation marks ("motion itself is impossible"), and my article about Zenos
Paradoxes o n"Interesting Thing of the Day" is the first hit. Whenever you
want to find a phrase that includes common words, you can improve your odds by enclosing the phrase in quotation
marks.
Leave
Out What You Dont Want — If you want Google to
omit pages that contain a word, put a minus sign (-) in front of that word.
For example, if youre searching for information on Pluto the astronomical body, you might want to weed out mentions of Pluto the
cartoon character. To do this, try a search like Pluto - Disney.
Find
This OR That — Sometimes you dont want Google to search for all the terms you enter,
but rather to show you pages with any of the terms you enter. To broaden a
search this way, you can type the word OR (in capital letters) between two
words. Say you want to find a recipe that uses either of the two cheeses you
have in your refrigerator. If you search for Recipe Emmenthaler Mimolette, youll find only pages
that mention all three words — recipe, Emmenthaler and Mimolette. If you
search for recipe Emmenthaler OR Mimolette, Google returns results that contain
the word recipe and either the word Emmenthaler or the word Mimolette.
Find
Similar Words — When
searching the Web, you often know approximately what youre looking for but are
unsure exactly how something may be phrased on a particular site. For example,
say youre looking for a wearable Bluetooth audio device, but you dont know
whether to search for headphones, earphones, ear buds, headsets, or any of
numerous other similar terms. In that case, place a tilde (~), which means,
words like this (in other words, synonyms or near synonyms) in front of the
word youre unsure of. Search for blue tooth ~headphones, and Google returns
pages with the word Bluetooth as well as the word headphones and similar terms.
Learn
More Google Tricks — To
learn about more special Google search features, such as weather reports, airport flight information, package tracking, and movie show
times, see Googles Search Features page.
Senior
Contributor Joe Kissell is the senior editor of TidBits and the author of
numerous e-books about OS X.
By Joe Kissell, Macworld.com
Improve your Google
searches | Working Mac | Macworld 2/16/09
-
- - - - - - - - - - - - - - - - - - - - - - - - -- - - - - - - - -
Thats all folks
Harry
{doc} Babad
