CocoaBooklet 2.0.1 — Create a booklet from of a PDF file or other document including web pages
reviewed by Harry {doc} Babad
Publisher: Fabien Conus http://www.iconus.ch/fabien/cocoabooklet/ Released: January 24, 2006 Clear and complete Manual available as a Readme file. Donationware File Size: ca. 2.4 MB Requirements: Mac OS X 10.3.9 or Tiger. Strengths: It works, with no glitches as described. Indeed, but not important to me it does it does save paper when printing PDFs as booklets, at the cost of reducing of page size. Weaknesses: No serous ones were identified during my limited testing. Product and company names and logos in this review may be registered trademarks of their respective companies. |
|

Introduction
Although at present I have no need to convert my PDFs into booklets, the description caught my eye. To use it, I simply copied the application to my applications folder. I read the author’s excellent readme file and I was ready to go. Now all I have to do, after months pass by, is to remember I have this fine tool in my collection when I need to blow a friend away by handing him a PDF file transformed into a booklet. As Kristie Masud of Spymac.com noted, “CocoaBooklet is incredibly easy to use.” http://www.spymac.com/news/article.php?contentid=4023.
Within a few minutes of installation, I was able to create booklets directly from a PDF file, as well as this review formatted as an MS word and the author’s Readme file that was formatted as an HTML file by using built-in print service feature.
Publisher’s Description of CocoaBooklet’s Function
This program lets you create a booklet out of a PDF file, which is known as pages imposition. It is a useful tool to reduce the number of pages that has to be printed, which lets you save a lot of paper.
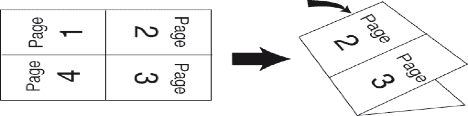
A booklet is book that is bound in the middle. Which means that a booklet has four pages printed on one sheet of paper (two on each sides). A booklet is usually a half page in size while a mini-booklet is a quarter page in size.
How the software works — You just have to drop your PDF files on the application icon, or on the drop window to create a booklet. A progress window will show up giving you an estimation of the progress. The first step (initialization) can be quite long if you document is big, so be
Patient...
Such a booklet has a number of pages that is a multiple of 4. If your document does not have the required number of page, CocoaBooklet will automatically add blank pages at the end of the document, to achieve this multiple of 4.
As you deal with the product, most of the design of your booklet is done my way of the preferences panel. Once you’ve set your preferences, which will fifer for booklets of different lengths, you’re ready to use the software.
CocoaBooklet Has Three Preferences Tabs
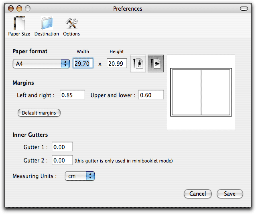 Page
Setup — This first tab lets you set
the page size. The default page orientation is landscape. This is what you will
use most of the time to create a booklet out of a portrait PDF document. If you
have a landscape formatted document (for example PowerPoint slides) ,you should
enter a portrait page size for the booklet. The preference tab also lets you
change the margins. These will mainly depend on the margins allowed by your
printer and create gutters for “binding”.
Page
Setup — This first tab lets you set
the page size. The default page orientation is landscape. This is what you will
use most of the time to create a booklet out of a portrait PDF document. If you
have a landscape formatted document (for example PowerPoint slides) ,you should
enter a portrait page size for the booklet. The preference tab also lets you
change the margins. These will mainly depend on the margins allowed by your
printer and create gutters for “binding”.
Destination — The second tab sets the destination of the created booklet. The default behavior is to ask you for a destination for each created booklet. However, you may also choose to save it in the same directory as the original PDF document. The booklet will have the same name as the original file but with an added suffix that you can choose (default: -booklet). You can also decide to use a specified directory. The suffix is not mandatory in this last case but you should still set it in order to avoid replacing the original file.
Options — The third preferences tab holds some additional options:
Make a mini-booklet
Make a double-sided mini-booklet (see below)
Do not flip odd pages
Split the document into several booklets
Split the booklet into odd and even pages
Add fold and cut guides
You drop your PDF files on the CocoaBooklet application icon, which I’ve placed in my dock. As Kriste Masuda noted, and I verified, “with a document that is less than 20 pages the process takes just seconds. Large documents will take significantly longer”.
Remember a booklet has a number of pages that are arranged and printed as a multiple of 4. If your document does not have the required number of page, CocoaBooklet will automatically add blank pages at the end of the document, to achieve this multiple of 4.
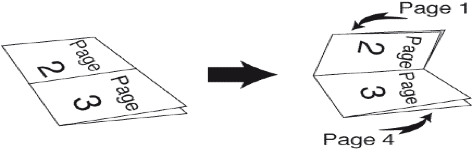
CocoaBooklet also lets you create a mini-booklet. This is especially useful for printers that cannot print on both sides. What you will get is this:
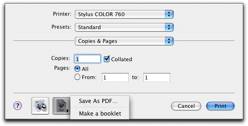
Using CocoaBooklet as a PDF Service — CocoaBooklet lets you use it as a PDF service. That service is only available for Mac OS X 10.2.4 and above.
Once this is done, try printing a document (from your favorite browser or text editor or whatever). On the print window, you will find a button with a PDF icon. if you click on this button you will have the opportunity of not only creating a PDF file but also to directly create a booklet from within any document that supports printing.
For more information about PDF services you can checkout Apple’s website at http://www.apple.com/applescript/print/.
A few Minor Problems
Printing Booklets inside of Acrobat — Although I could create a booklet from an HTML file, I could not make a booklet from within the print menu of an Acrobat file [opened in Acrobat 7]. To do so, I had to drop the closed PDF file onto the CocoaBooklet Icon or into application window.
Changing Between Booklets and Mini-Booklets — In order to change your selected (e.g., preferred) booklet format, you must reset your CocoaBooklet preferences. I attempted to create a service booklet for each but did not succeed. Perhaps Monsieur Fabien Conus can provide that ability in the next update of this otherwise excellent product.
Conclusions
What more can I tell you? The software works in the manner described by the developer. If creating booklets from your PDFs appeals, download it and donate to its developer. I rate this product 4.5 macC's.
PS:
The Developer: Fabien Conus, if I’ve translated the French correctly, is an engineer and physician who lives in Lausanne, Switzerland.