Doc_Babad's
Macintosh Tips - A Macintosh Tip or Three…
November
2007 Edition
By
Harry {doc} Babad ©
2007 |

|
Product
and company names and logos in this review may be registered trademarks of
their respective companies.
The
software related tips were tested on a 1 GHz dual processor PowerPC G4
Macintosh with 2 GB DDR SDRAM; running under Macintosh OS X OS X 10.4.10.
|
This
month I continue sharing my occasional tip related finds with you. Most, but
not all of the Tips I share come from — Paul Taylor's Hints & Tips
column and are used with his permission. Where I use any one else’s tips for this
column, I acknowledge both their source and their contributors.
Oh,
I almost forgot! Unless otherwise noted, all the tips and tidbits I share,
where appropriate, work on my computer. If I don't own the software but if the
tip sounds interesting, I'll so note at the end of that specific write-up.
Tips
I’ve provided this month, as always in a random order, include:
* % * % * % * % * % * % * % * % * % * % * % *
% *
Hacking Toward Happiness — Life hacking
 Time Magazine picked up one of the most
interesting new movements in computing. A developing art called Life hacking. “Beneath
the bits and bytes that shape the character of Silicon Valley, there's a
booming digital subculture committed to the art of self-improvement, geek
style. It's known as life hacking, and it's all about sweating out the best
ways to crank through e-mail, sabotage spam, boost productivity and in general
be happier.” Check out the article by Jeremy Caplan or delve deeper at http://www.Lifehack.org
Time Magazine picked up one of the most
interesting new movements in computing. A developing art called Life hacking. “Beneath
the bits and bytes that shape the character of Silicon Valley, there's a
booming digital subculture committed to the art of self-improvement, geek
style. It's known as life hacking, and it's all about sweating out the best
ways to crank through e-mail, sabotage spam, boost productivity and in general
be happier.” Check out the article by Jeremy Caplan or delve deeper at http://www.Lifehack.org
Doc_Babad for macCompanion
* % * % * % * % * % * % * % * % * % *
% * % * % *
The
Perils of Flash Drive Backup
Many
of use routinely share data with our friends who work on a windows platform,
requiring that our flash drive be configured as DOS drives. The reason is that
our Macintosh computers have always been able read PD formatted media, but the
reverse is seldom true.
For
most things we use our drives for, having it formatted DOS doesn’t matter.
Indeed we, unless checking get Info, don’t even realize the drives as not
Macintosh formatted the Macintosh OS doesn’t care.
 Don’t copy applications onto a DOS
formatted volume, like a flash drive. They will lose their resource forks and
report a -39 end of file error. There are also file name restrictions on a DOS
volume as well. To preserve them if you must, use .zip or .sit compression to
encapsulate them. An advanced tip would be to put a read/write disk image
(.dmg) or Sparse Disk Image (.sparseimage) file on the flash drive, mount that
and copy Mac files onto that. Then unmount the image before unmounting the
Don’t copy applications onto a DOS
formatted volume, like a flash drive. They will lose their resource forks and
report a -39 end of file error. There are also file name restrictions on a DOS
volume as well. To preserve them if you must, use .zip or .sit compression to
encapsulate them. An advanced tip would be to put a read/write disk image
(.dmg) or Sparse Disk Image (.sparseimage) file on the flash drive, mount that
and copy Mac files onto that. Then unmount the image before unmounting the
flash drive. Of course, if this flash drive will
be exclusively used with Macs, it’s easier to just erase it, with OS 9 drivers,
as a Mac OS Extended volume with Disk Utility.
Bradley Dichter LIMac Forum, Long Island, NY
Hints & Tips August 2007
*
% * % * % * % * % * % * % * % * % * % * % * % *
Activity Monitor Tips — End the hidden
activities some applications
Reader Randy H. would like to know how
to end the hidden activities of some of his applications. He writes: "How
do I list all the running programs in my Mac -- and stop the hidden parts of
the ones I've quit? This question assumes that covert remnants of programs are
running subsurface and do not show on the Force Quit list, as evidenced when
the Mac gets slow or even locks up or almost. Not a frequent event, but when it
happens I give up and do a time wasting restart. (On the PC, many programs run
hidden; same with Mac?)"
Activity Monitor (which you'll find in
the Utilities folder inside your Applications folder) lists all currently
running applications -- both those that Force Quit can see as well as hidden
applications. When I suspect that a hidden process is mucking up the works, I
launch Activity Monitor and, from the pop-up menu at the top of the window,
choose My Processes. This shows just running "real" applications (and
their associated helper programs) and widgets. None of the hidden Unix stuff
appears in the window (which is good, because you don't want to mess with this
stuff unless you really, really know what you're doing.)
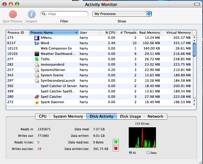
Most items that appear are
intuitively named and some even have icons that hint at their association. For
example, Microsoft's Database Daemon, which is associated with Entourage, has
an Entourage-like icon. iChatAgent likewise bears an iChat icon.
When I've located an item that appears
to be gumming up the works (a helper application that didn't quit with its host
application, for example), I select it and click the Quit Process button at the
top of the window.
Activity Monitor offers this
additional advantage: It can show you what's occupying your Mac's mind. Just
click the % CPU column to see which applications are hammering on your Mac's
CPU. Or take a look at the Real memory column to view the RAM-hogs you're
running.
Note that quitting the hidden
processes may do you no good whatsoever. For example, if I've had a browser
open for a few days, my Mac slows down. Quitting processes in Activity Monitor
does no good. Rather than mess around looking for the culprit, I do the
expedient thing -- I restart my Mac -- and I'm back to working at normal speed.
Hunting
Processor Hogs
Christopher
Breen
mac911@macworld.com
* % * % * % * % * % * %
*
Getting Help from Apple
 If you don’t often visit it,
you might be surprised at the volume of useful information available on the
Apple website. In particular, the Knowledge Base has thousands of articles,
many of which deal with recognized problems and difficulties with Apple
software and hardware.
If you don’t often visit it,
you might be surprised at the volume of useful information available on the
Apple website. In particular, the Knowledge Base has thousands of articles,
many of which deal with recognized problems and difficulties with Apple
software and hardware.
These articles cover ground not
mentioned in the relevant applications’ Help files, which are designed to help
you with normal use of the applications, rather than to trouble-shoot them.
Some articles extend the information in the Help files; for instance, there are
several dealing with backup and recovery of iTunes music libraries.
In recent times, Apple has made access
to the Knowledge Base easier. Simply go to the basic Support page <http://www.apple.com/support> and
click the product icon most relevant to your query. (If you can’t see the one
you need, click the link “Show me the complete product list.”) Arriving at the
appropriate product page, you’ll find a number of headings and links that may
well lead you to the information you need.
Otherwise, enter a few key words in
the provided search box and press Return.
The search results will almost
certainly include a number of references to Knowledge Base documents. Further,
many Knowledge Base documents have internal links to other relevant documents,
so that while you can print them out, reading them on-line may really be the way to
go.
Steve Cooper
AUSOM News, Melbourne,
Australia
Hints & Tips August 2007
* % * % * % * % * % * % * % * % * % * % * % * %
*
Erasing
Safari's Memory — Shortening Safari's Long Memory
Question: Reader Bill Zagotta is
unhappy with Safari's long memory. He writes: "Safari does a nice job of
trying to guess and fill-in the web address I am about to type...sometimes. But
after a restart, when I type "g" to go to Google, it guesses I want
to go to a genealogical web page. I have tried to clear out caches and to reset
Safari and to delete the items it seems to be remembering for a 'g.' Nothing
will eliminate Safari's memories of web addresses I have visited. How can I
erase all or undesired web address in the Safari brain?"
 Response: Regrettably, Safari
doesn't provide a single command for getting rid of these memorized entries. They're
concocted from Safari's bookmarks, cache, and history. You can get close by
choosing Reset Safari from the Safari menu but using it can be problematic. In
the first place, it doesn't touch your bookmarks so some of those entries will
still appear. Secondly, it will clear more data than you probably want it to.
In addition to clearing the history and emptying the cache, it clears the
Downloads window, removes all cookies, and gets rid of any names and passwords
you may have asked it to save.
Response: Regrettably, Safari
doesn't provide a single command for getting rid of these memorized entries. They're
concocted from Safari's bookmarks, cache, and history. You can get close by
choosing Reset Safari from the Safari menu but using it can be problematic. In
the first place, it doesn't touch your bookmarks so some of those entries will
still appear. Secondly, it will clear more data than you probably want it to.
In addition to clearing the history and emptying the cache, it clears the
Downloads window, removes all cookies, and gets rid of any names and passwords
you may have asked it to save.
You
can do this piecemeal. Start by choosing Safari -> Empty Cache. Then choose
History -> Clear History. Then go into the Bookmarks area and clear out
bookmarks you don't want. [Doc sez, this is a one at a time ort shift-clickkind of effort.]
Or
you can just adopt one of a couple of new habits. The first would be to type
more than just that first letter "g." Try "go" and see if
that brings up Google. Or bypass the whole autofill thing by clicking in the
Address field, pressing the Space Bar once, and start typing. Autofill doesn't
work if the first character is a space.
Finally,
you can help prevent additional entries from being added by choosing Private
Browsing from the Safari menu. With this
By Christopher Breen
Mac 911 Tip of the Week
mac911@macworld.com
* % * % * % * % * % *
% * % * % * % * % * % * % *
Dictionary Help in Adobe Acrobat 7 Professional
If you’re ever proofreading a PDF and
realize there may be a better word to use than the current one, you’re in luck.
You can find word definitions or access a thesaurus by Control/Clicking when
using the Hand tool.
Select
“Add Note” from the Contextual Menu that appears. Type the word into the Note
window and highlight it. Control/Click once again and select Lookup “.”
Dictionary.com
will launch in your Web browser, already pointing the definition for the
highlighted word.
Note: Of course, this won’t work if you’re not connected
to the Internet.
Doc
sez, of course if you were using the macC recommended Spell Catcher, now in
version 10.2.3 you’d be connected without having to be online. Read all about
it in the April 2007 macCompanion.
Layers Magazine via LIMac Forum, Long Island, NY
Hints & Tips August
2007
* % * % * % * % * % * %
* % * % * % * % * % * % *
We’ve
Ranted About Backups – Another Reminder to Stay out of Trouble
Invest
in an external FireWire hard drive for backup purposes. Sooner or later you’ll
have directory damage that can’t be repaired. Use the free Carbon Copy Cloner
to copy everything to the drive. Start off the drive and use Disk Utility to
erase your internal drive, then use Mike Bombich’s outstanding Carbon Copy
Cloner (now version 3) to copy everything back, then reset Startup Disk back to
internal drive.
 I reviewed Carbon Copy Cloner 2.3 in the
June 2004 issue; it been updated but never superceded. I’ve got a couple of
partitioned LaCie F.A. Porsche designed 250 GB drives that I alternate between
smart backup and a full backup. I like these, aside from their dependability,
because they take very little desk space (1.4 x 4.4 x 7.4 in. (H x W x L) A
word to the wise, it pays every few month to take 5 minutes and start up your
computer from your backup drive; a precaution most people for get to take. If
the backup drive boots wonderful. If not you’ll have more problems recovering
from a crashed hard disk. It can be done, but that’s another tip. The only time
I could not get a backup to boot, I erased that partition and backed up my
drive again.
I reviewed Carbon Copy Cloner 2.3 in the
June 2004 issue; it been updated but never superceded. I’ve got a couple of
partitioned LaCie F.A. Porsche designed 250 GB drives that I alternate between
smart backup and a full backup. I like these, aside from their dependability,
because they take very little desk space (1.4 x 4.4 x 7.4 in. (H x W x L) A
word to the wise, it pays every few month to take 5 minutes and start up your
computer from your backup drive; a precaution most people for get to take. If
the backup drive boots wonderful. If not you’ll have more problems recovering
from a crashed hard disk. It can be done, but that’s another tip. The only time
I could not get a backup to boot, I erased that partition and backed up my
drive again.
Bradley Dichter LIMac
Forum, Long Island, NY
Hints
& Tips August 2007
with adlibs by doc_Babad
* % * % * % * % * % * % * % * % * % * % * % * %
*
Linotype’s Free FontExplorer X — Master Your Font Collection
Among
those who use (or just own) many fonts, there is always a debate over which
font management utility does the best job, or is most reliable, or is easiest
to use.
 For most of us, the one that comes with Mac OS X (Font Book)
does a great job, especially now that the Tiger version is so much more
reliable than its predecessors. Most “power users,” however, prefer a third
party alternative such as FontAgent or Suitcase.
For most of us, the one that comes with Mac OS X (Font Book)
does a great job, especially now that the Tiger version is so much more
reliable than its predecessors. Most “power users,” however, prefer a third
party alternative such as FontAgent or Suitcase.
Recently,
many of these users, including doc_Babad, have found a new favorite —
Linotype FontExplorer X, published by the famous font foundry Linotype.
According to all reports it works extremely well and is free of the problems
and bugs that have plagued its competitors. It uses a layout very similar to
that of iTunes, making it easy to understand how it works.
Best
of all, it’s free! When the beta was released some months ago in a free
version, everyone assumed that the final release would be commercially priced,
but that wasn’t the case. Version X 1.2.2 is still free from www.linotype.com/font explorerX or http://www.macupdate.com/info.php/id/19514/linotype-fontexplorer-x.
Evidently expects to make some money from the fact
that FontExplorer X incorporates a link to the Linotype store where you can buy
more fonts (just as iTunes has a link to the Music Store). Be that as it may,
the “store” part of the utility is quite unobtrusive. If you’re interested in
font management and like a freebie, Linotype FontExplorer X is certainly worth
a careful look.
AUSOM News,
Melbourne, Australia
Hints & Tips June 2007
* % * % * % * % * % * % * % * % * % *
% * % * % *
Creating Thin Spaces in MS Word
Word does not include a feature to automatically create “thin
spaces.” Some people require a space that is narrower (thinner) than the
regular space, to place just a small amount of space between items on a line.
There are a few workarounds you can use, however.
The first workaround is to use a regular space, and then format
that space (and only that space) to a point size smaller than what is used for
the surrounding text. This requires some trial and error to get the appearance
just as you like it. The drawback to this approach is that if you use
justified text, Word for the Mac automatically adjusts the width of the spaces
on a line to fit the overall goal of justifying both margins. This, of course,
defeats your purpose.
You can also use non-breaking spaces, and then format them to a
smaller point size. Non-breaking spaces are not “resized” by Word when
justifying text. A final option is to adjust the character spacing before and
after the item that you want to include additional space. This does not add a real
“thin space,” but instead instructs Word to “space out” the items.
This is done by following these steps:
- Select the item (such as an em dash) together
with the space before and after it.
- Choose the “Font” option from the Format
menu. Word displays the Font dialog box.
- Make sure “Character Spacing” tab is
selected.
- In the Spacing drop-down list, select
“Condensed” or “Expanded,” depending on your needs.
- Using the “By” setting to the right of the
Spacing drop-down list, indicate in points how much you want spacing
condensed or expanded.
- Click on “OK” to close the dialog box.
Again, this approach may take a bit of trial and error on your
part to get the desired effect.
MacWordTips.com
Hints
& Tips August 2007
*
% * % * % * % * % * % * % * % * % * % * % * % *
 Copy CDs or DVDs with
Apples Disk Utility
Copy CDs or DVDs with
Apples Disk Utility
OS
10.4’s Disk Utility makes it easy to make an exact copy of a CD or DVD that can
be stored on a hard drive as a disk image, or burned to a CD or DVD for future
use. First, insert the CD or DVD you want to backup into your Mac. Next, drag
the icon of the CD or DVD to the Disc Utility application (which is usually
stored in the Applications Folder > Utilities Folder.) In other words, drag
and drop the CD or DVD icon on top of the Disk Utility icon. (Or, launch Disk
Utility, and select the CD in the menu bar at the left margin of the Disk
Utility window.)
Disk
Utility will launch, and then it will immediately open a window asking you to
name the new disk image, and where to save it. Go ahead and save the image to
your desktop.
In
the Image Format drop-down menu, choose DVD/CD master. This is especially
important if you want to burn a copy of the disk, and have it function as an
exact clone of original CD or DVD you hope to backup.
Now
click “Save.” A new disk image will be created on your Desktop, with the
extension “.cdr,” It may take a few minutes to create this file.
If
you click on the disk image, you’ll see it works just like a CD or DVD. You can
store this new disk image on a hard drive. If you want to burn it to CD or DVD,
you should again use Disk Utility. Otherwise, you’ll only be burning a copy of
the disk image, and not an actual CD or DVD master.
To
burn a CD or DVD master, open Disk Utility and look for the disk image of your
CD or DVD, on the left side of the window. Usually it’s at the bottom of the
list of drives. Now, simply select the image, and then click “Burn.” Follow the
directions to burn the disk.
This
is a great way to back up expensive software titles and game titles. Many games
that require a disk to run will run off of the disk image - great for
traveling.
Doc
sez, you can also easily to this with Roxio’s Toast, my favorite tool for
copying information to CD/DVD as well as to a disk image. The details differ slightly,
but the doing so is quite intuitive.
Ed Shepard
LIMac Forum, Long Island, NY
Hints & Tips August 2007
* % * % * % * % * % * %
* % * % * % * % * % * % *
Harry
{doc} Babad That’s all folks…
