doc_Babad's Macintosh Tips - A Macintosh Tip or Three
By Harry
{doc} Babad © 2008
November 2008 Edition |

|
Product
and company names and logos in this review may be registered trademarks of
their respective companies.
Reviews were carried out on my iMac 2.8 GHz Intel Core 2 Duo
with 2 GB 667 MHz DDR2 SDRAM running Mac OS X version 10.5.5.
|
Disclaimer: When briefly reviewing
share-freeware I will often use the developers product, functions and
features descriptions. All other comments are strictly my own and based on
testing. Why need I rewrite
the developers narratives, if they are clearly written?
|
This
month I continue sharing my almost stumbled upon or homegrown tip related finds
with you. As I was did some house keeping on my macCompanion folder, I
discovered a trove of tips that space limits had not allowed me to use. I of
course being a logical {sic} person had three choices. Use them — Toss
them — Ignore them
Acknowledgements — As the occasion warrants,
some of the Tips I share come from Paul Taylor's Hints & Tips column and are used with his permission. I also use
user group published tips their consent. Where I use any one elses tips for this column, I acknowledge both
their source and their contributors. Yes, I do write down and share some of the
tips Ive discovered while Macin around. If a tip or hint comes from a more
traditional commercial source, I both acknowledged that and often modify the
tip to personalize for our readers.
Oh, I
almost forgot! Unless otherwise noted, all the tips and tidbits I share, where
appropriate, work on my computer. If I don't own the software but if the tip
sounds interesting, I'll so note that information at the end of that specific
write-up.
As an
aside — Im still providing Office 2004 tips, despite the fact that
Office 2008 has been released. Why? I have too many customizations created in
2004 — so far its not been worth the time to switch although I own a
copy of 2008.
Doc
- - - - - - - - - - - - - - - - - - - - - - - - - -
-
Tips
Ive provided this month, as always in a random order, include:
- How
to Extract All the Graphics, at Once, from MS Word
- Change
MS Offices Registration
- Securely Removing Your Data
– All or in part
- Missing A TWAIN Driver
- Dealing with Microsoft Font Problems
- Cannot Eject An
External Drive
- Problems Resizing Pictures
for Insertion into PDF Files
How to Extract all the Graphics at Once from MS
Word
I do a
lot of work with Microsoft documents from colleagues and friends. Until I found
this tip, I captured documents in a MS Word documents the hard way One at a
time.
If you
get a Microsoft Word document with embedded graphics, you can extract all the
graphics at once by using Words File > Save as Web Page feature.
This
creates a text file that you can throw away, and a folder that contains the
full-resolution images in PNG format and lower resolution versions of the
images in JPG format.
Sandee Cohen — InDesign Magazine via
Design Tools Monthly
January-February Hints and Tips
– Used by Permission
Change MS Offices Registration
Question: I just recently noticed that I
made a typo when I registered my copy of Microsoft Office 2004. When I select
Word: About Word (or the equivalent in any other Office application), my name
appears misspelled after This product is licensed to. Is it possible to fix
this? ~ Meng Thao
Answer: Launch
Offices Remove Office utility (/Applications/Microsoft Office 2004/Additional
Tools/Remove Office). In the Welcome To Remove Office window that appears,
youll see a Continue button in the lower right corner. Hold down the Option
key, and the button name changes to Remove Licensing Information Only. Click
on that button to acknowledge that this is what you really want to do, and
Remove Office will delete the files containing the registration information.
When you next launch an Office application, the Office Setup Assistant will
appear and prompt you for your name and product key, which are to be found
on the products DVD box. Doc sez there are only three keys so use them judiciously.
Chris Breens Mac 911, Macworld
January-February Hints and Tips – Used by
Permission
Securely
Removing Your Data – All or in part
Background — Doc sez that
Ive never tried this. My problem
has always been to remove my personal files from an older computer before I
pass it on to my children or grandchildren.
There are two circumstances data
needs to be permanently deleted.
First, if I partitioned my hard
drive e.g., (created several additional volumes on my hard disk to store unique
information. I may want to erase permanently erase their contents before I pass
on the computer. This can do that using Apples Disk Utilities, which offer a
number of secure erase options. [Applications > Utilities > Disk Utility]
These include zero out data, 7-pass erase or 32 pass erase. Obviously the more
security you want the longer it takes. For my pass-ons I just zero out the
data.
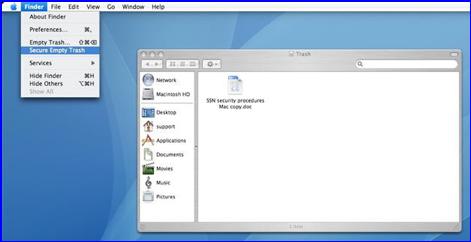
Second, I have files that need
trashing irreversibly, but want to leave the contents of hard drive essentially
intact. I use the secure delete option when emptying trash [Apple Menu >
Finder > Secure Empty Trash.] Simple. Remember, secure trashing an item(s)
will take longer than a normal empty trash. Although I suspect this secure
delete just zeros out the data, Ive not had time to research the subject. But
again, I am only slightly paranoiac.
Back to the Delemain Tip — In essence the process of securely deleting files or data on your HD is
just about overwriting that file data with binary data that is useless to any
user, including yourself. I might add! The benefit of this is clear, but in
what instances might you want to do this and how can you go about it?
- Well, when you have files that you are no longer using and would
like to dispose of in such a way that no one else can retrieve them, via
whatever means.
- You might also have sold your laptop or desktop computer and wish
to remove all traces of data from the hard drive(s) contained within it,
including files that contain credit card numbers, social security numbers
and other forms of personal data.
Secure Erase with Apple's Disk
Utility
Making the assumption that you do
not have an external drive from which you can
boot and run OSX, or that you do
no have another Mac system you can plug the old
Systems into using FireWire Disk
Mode, then the best way to securely erase the data on your hard drive is by
using the original OSX install CDs (Mac OS 10.2 or later).
The process is pretty simple and
runs as follows:
1. Insert the install CD and
reboot the system.
2. Hold down the C key directly
after you hear the startup sound.
3. Once the installer appears,
select "Open Disk Utilities" from the Installer menu.
4. In the left device menu select
the drive you wish to securely erase.
5. Click the "Erase" tab
in the window that loads on the right.
6. Choose the HFS+ format from the
volume > format > drop menu options.
7. Click the "Options"
button and select the "Zero All Data" checkbox.
8. Click OK and then Erase.
9. Hey Presto! Its Done
Remember theres no going back from this step!
And so there you have it, a simple
guide on how to erase files, data and hard drives on the Mac. As you can see
there is no need to purchase or use any third-party apps, as the functionality
is built right into the operating system, though that being said, the
functionality does not preclude third-party software from providing the same
kind of functionality to the end user.
Harry {doc}
Babad and Delamain IT © 2008
 Missing A TWAIN
Driver
Missing A TWAIN
Driver
Question: My PowerMac G5
had to have the software reinstalled and I reinstalled the Epson scanner
software with the CD it came with, but I get a message about missing TWAIN driver?
How can I fix it?
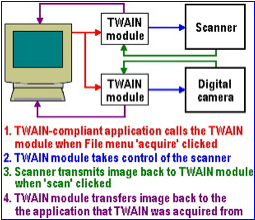
Answer: TWAIN is the
scanner driver framework. The Epson installer will put in a TWAIN Data Source
file. (It goes in the /Library/Image Capture/TWAIN Data Sources/ folder. You
forgot to go to Epsons Web site and download the updated software that
actually works with your Macs operating system. You may have to uninstall what
is there now, before installing the new version.
Apple
changed things for scanners with Mac OS 10.3. A large number of printer and
scanner drivers required updates. (Some models were left behind and not
updated. Anybody got an old UMAX or Microtek scanner?) Pretty much 99.9% of any
hardware you might find, the software that came with it on a disc is out of
date and needs an update.
The
Software Update (you find in the Apple menu) is only good for updating your
Apple software. The third party software like Microsoft, Adobe, Epson, HP, you
name it, all need to be updated separately. Even firmware updates for your
cable/DSL router or your fancy printer come out every so often. You know there
have been dozens of iPod updaters, right? Do you think anyone got it right the
first time? There is a reason the current Mac OS is version 10.4.7, because
there were problems with 10.4.0, and still more with 10.4.1, etc., up to 10.4.7
itself. There will be a 10.4.8 update.
When in
doubt, go to http://www.versiontracker.com/macosx to see if there is a software update for something you use. You wont find
every firmware update there, too, but some are listed. I remember calling a
friend who had just ordered some new software but he hadnt received it yet.
After checking VersionTracker, I told him, while youre waiting, download the
update for it; it fixes a serious problem.
Updaters
can be tricky, too. Some are very incremental, like FileMaker Pro 8.0v3 updater
wont update the original release from the CD, version 8.0v1. You have to first
download the 8.0v2 updater, install that before the 8.0v3 can find a valid
application to update. More and more programs check for an update for
themselves when they launch, but many require you to select from a menu to
check for updates now. Some, like Adobe Creative Suite, can check for updates
across most of the suite, but you have to check Adobe Acrobat Pro separately.
Bradley Dichter — LIMac Forum, Long
Island, NY
January-February Hints and Tips – Used by
Permission
How to
Deal With Microsoft Font Problems
Microsoft
Office 2004 users sometimes have their programs report that numerous fonts are
damaged and must be replaced — this happens, even though the fonts may be
Microsofts own and/or may have just been installed. Just what triggers this
problem is uncertain, but at least a cure has been defined.
If you
look in the Microsoft Office 2004 folder (inside your Applications folder)
youll find a folder named Office, and inside one named Support Files. Look in
there and youll find an item named Font Cache Tool. The remedy for the problem
is to move this Font Cache Tool to a different folder (any one will do), or to
trash it altogether if you feel adventurous.
As far as
anyone has been able to determine, this has no adverse effect on the operation
of Office programs, and it certainly fixes this problem.
Some time
ago there was another Microsoft font problem, and if you seem to be having any
trouble with fonts at all and are running an older (than 2004) version of
Office, its worth downloading the latest versions of Times and Arial from the
Microsoft website. Go to http://www.microsoft.com/mac and look at the right hand column.
Scroll down until you can see and click
View all downloads. Now scroll down to Office 2001 and click Core Fonts
Update. Download and install the file you find here.
Steve Cooper - AUSOM News, Melbourne, Australia
Somewhat Hidden Printing Options
Ive noted over time that many Mac
OS X users are unaware of some very important options that are tucked away in
the Print dialog: Whenever you use an applications Print menu command, you
will normally arrive at the standard Print dialog.
One of the features of this is a
pop-up menu which, when you first see it, is labeled Copies & Pages.
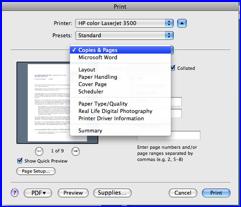
No matter which application youre
working with, or what sort of printer you have, youll find groups of other
useful settings in this pop-up menu. The first one is Layout, where you can
choose to print multiple (reduced size) pages of your document on a single
sheet of paper — very handy for saving paper when printing long
documents, as long as the font size is large enough to remain legible when
there are two pages of it on each sheet.
There are several more groups of
settings that you can investigate for yourself. Some of them are common to all
printer and application setups, while some apply only to the current
application/printer combination. There will often be one group that carries the
current applications name (e.g. AppleWorks, FileMaker Pro), where youll find
settings that apply specifically to that application.
Other settings to look for are
those that enable you to tell the software what kind of paper youre printing
on (plain, matte, glossy, etc) and how you want color management to be handled.
Often, you can tweak the printers color settings in this area.
If you want to print documents
using only black ink (to help avoid using up your color cartridge quite so
quickly), theres usually a relevant setting here.
Of Special Note — If you
establish a particular combination of all these options and settings, you can
save it, for reuse, with an identifying name. Click
on the Presets pop-up and choose Save. Give your preset a name and in
future, youll be able to recreate that combination of settings simply by
choosing its name from the Presets pop-up.
AUSOM News,
Melbourne, Australia
January-February
Hints and Tips – Used by Permission
Cannot
Eject An External Drive
Several users have experienced an
issue in which an attached FireWire or USB drive will not eject. Instead, an
error message pops up claiming the drive cannot be ejected because it is in
use. This may occur with hard drives, flash drives, or any other storage
system. As Apple discussion member, vburger writes:
"I have a Maxtor 500GB HD attached
via USB to my laptop. Quite often, when I want to detach it I get the message:
'The Volume could not be ejected because it is currently in use'. However, I am
not aware of any active application that is still using the HD."
Warning: Unless it cannot be
avoided, do not unplug or shut off an external drive unless it is first
unmounted. Data corruption and potential system crash could result.
Fixes:
Disable spotlight indexing for the
drive The most common culprit for this issue seems to be Apple's Spotlight
indexing services, which maintain an index of all local file system for quick
finding of search queries. Many times the indexing can take a while, and will
keep the drive in use. To disable spotlight indexing for the drive, open the
Spotlight system preferences and add the drive to the "Privacy" list.
If that does not stop the indexing, the drive's spotlight index could be
corrupted, in which case Spotless 2.01 to manually remove the Spotlight index.
Spotless is a shareware program
you can download from MacUpdate, as is CloneEject 1.0 a freeware program.
[Disclosure: Doc has never used these products, I just wait the system out
— the timeout a cup of coffee usually does the job. This usually happens
to me after backing up my drive (cloning it) to an external drive partition
using SuperDuper.
Download the utility Spotless.
Use the tool to erase the
Spotlight index.
Restart your Mac.
Close all open documents and/or
applications. If an application has a document open on the drive, then the
drive will not eject. Ensure all applications on the computer are closed and
try to eject the drive.
Check the file open status on the
affected hard drive. Sometimes a utility or background process that might not
present itself as an open application will access the drive. To see a full list
of the files that are open on the drive and the corresponding
applications/processes that have those files open, run this command in the
terminal:
lsof
/Volumes/VOLUME_NAME
This will output a list, which
will pinpoint the specific process that has an open file on the drive. You can
then locate and quit the process using Activity Monitor. If the process is
owned by anything but yourusername then it might be best to restart the system
instead of quitting the process, as this may destabilize the computer.
Restart the computer. If none of
the above works, shutting down or restarting the computer will quit all
processes and allow the release the drive. If the problem keeps returning then
formatting the drive with Disk Utility may help.
MacFixIt —
Trouble Shooting Solutions for the Macintosh
Wednesday, May
21 2008 @ 11:00 AM PDT
Resizing
Pictures for Insertion into PDF Files
As you
might remember from my articles on altering web downloaded materials to make
them better looking, I add graphics to many items that I download in text
format as either MS Word or Adobe Acrobat (PDF) documents.
- Annotating & Making
Text Recipes Pretty, March 2006 macCompanion. and
- Tutorial: Shrinking and
Enhancing Multi-Page PDF Recipes October 2008 macCompanion.
Now dont
get me wrong. Most of the time copying an image from Google Images or a web
site works fine. You can paste the image into a PDF or Word document and you
get a good looking picture whose corner anchor points are available to you for
resizing. When resizing, the picture quality is fine, and all thats may be
need is to move the image to where it belongs.
Two
Tidbits to Remember:
 An image pasted into MS Word
can be easily resize by sing one or more of the eight anchor points that
surround it when you selected it with your mouse. Then using the
softwares tools in the Format Drawing pallet to place the image
not only where you want it with respect to the text, but to wrap the text
around the image in a manner that pleases you. The tools you use are found
in the Format > Picture > Layout.
An image pasted into MS Word
can be easily resize by sing one or more of the eight anchor points that
surround it when you selected it with your mouse. Then using the
softwares tools in the Format Drawing pallet to place the image
not only where you want it with respect to the text, but to wrap the text
around the image in a manner that pleases you. The tools you use are found
in the Format > Picture > Layout.
When
dealing with a PDF the pasted image dopes not extend beyond the right and left
margins of the document, using the anchor points is easy. Note that unlike MSW
(Microsoft Word), images in Acrobat can only be resized on the diagonal.
Remember, , the software has a mind of its own and the image is usually both in
the wrong place and covers up some of the text. No matter – Anchors
aweigh! Or is that away?
There are
three kinds of problems that can occasionally occur when you try to add an
image from Google Images or other web source to a PDF
;
Too
Large |
Too
Small |
Too
Blurred |
If this sounds like a problem
from Alice in Wonderland, so be it. |
1. 
 Too Large — The anchor points fall
outside the margins of the PDF you can:
Too Large — The anchor points fall
outside the margins of the PDF you can:
[a] Make the image larger, not by
magnifying it with the enlarge pages tool with the zoom tools but by expanding
the view window size using the enlarge window tool (Lower right hand corner a
the bottom of every apple document window.
With a little bit of luck you will expand the window so that you can see the
image anchor points beyond the edges of the document page. Grab an anchor point
and size the image to meet your needs.
[b] An alternative that sometimes works when selecting the pasted image. Look for the rotate loop. Image See if twisting the picture diagonally
allows you too see one of the anchor points. If so shrink the image, straighten
the picture and put it where it is needed.
[c] Finally, if all fails paste or drop and drag the image from its source into
a blank MS Word document. Sometime s drag works better than paste; paste gives
the Internet address link at times, not the image. The copy the image from MS Word into you PDF. It will now
fit on the page. Why does this work — ask someone else
I have no idea.
2. Too
Small — Use
the anchor point. If the image blurs, go to 1(c) above. Microsoft to the
rescue. [Did I write that?]
3. Too
Blurred —
At times, moving an image from GraphicConverter to a PDF by cutting and pasting
results in a badly blurred or pixilated image. This happens for some unknown
reason despite the fact that the original image from the web source is greater
than 35 to 50K. Okay, KISS — use alternative 1(c)
Of course
you all remember the ways to grab an image from the Internet:
You can
grab a web image by right clicking on it (copy image) The you can paste it
where you need it to be; your final document or into an image processing
program to make it uniquely yours.
You can
grab it, or part of it, to your desktop using Apples Command-Shift 4. I like
this for truncating large web headers into just the piece I want. Alternatively
you can drag and drop the image on you desktop. Two things could then happen. A
new image file results. You use as you would any other image. Or, based on the
way I have my computer configured, the image downloads into my downloads
folder. That can be done directly using apples contextual menu feature,
right-clicking on the image.
Im sure
there are more variations on this team but its time to move onto another
article.
Harry {doc} Babad at macCompanion.com
Thats
all folks
Harry
{doc} Babad
