Babad's Macintosh Tips - A Macintosh Tip or Three…
October 2008 Edition
By
Harry {doc} Babad © 2008 |

|
Product
and company names and logos in this review may be registered trademarks of
their respective companies.
The
software related tips were tested on a 2.8 GHz Intel Core 2 Duo iMac with 2
GB 667 MHz DDR2 SDRAM; running under Macintosh OS X OS X 10.5.5
|
Disclaimer: When briefly reviewing
share-freeware I will often use the developers’ product, functions and
features descriptions. All other comments are strictly my own and based on
testing. Why need I rewrite
the developer’s narratives, if they are clearly written? |
This
month I continue sharing my almost stumbled upon or homegrown tip related finds
with you. For a change I’ve emphasize, and augmented as necessary, tips found
in Macworld and the MacFixIt Site. As the occasion warrants, some of the Tips I
share come from Paul Taylor's Hints & Tips column http://www.mac-hints-tips.com.
Where I use any one else’s tips for this column, I acknowledge both their
source and their contributors.
- - - - - - - - - - - - - - - - - -- - - - - - - -
-
Tips
I’ve provided this month, as always in a random order, include:
- Quickly reset a Finder view
to defaults
- Users having problems
unzipping archive files
- Administrator Password Lost
- Keep Track of Your
Disks
- Send Clickable Links in
Mail's Subject Field
- CD/DVD Disk Read
Problems
- Applications
Will Not Minimize
- Launch System Preferences
with a Keyboard Shortcut
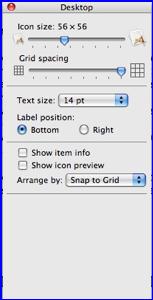
Quickly reset a Finder view to defaults
As
you’re probably well aware, the Finder’s View Options dialog (View -> Show
View Options, or Command-J) in OS X 10.5 is the key to customizing your folder
views. Using this dialog, you can enable and disable a number of features for
each folder on your system. The options available (and what they do) vary based
on your view—in column view mode, for instance, there aren’t a lot of
options you can set, and whatever changes you make are reflected in all column
view windows. In list, icon, and Cover Flow view modes, however, you have a
plethora of options, and those settings can vary by window.
So what
do you do when you’ve gone and customized a folder with the view you think
you’d like to use…and then decide that, really, you don’t like that particular
setup at all? You could, of course, go through and reverse each change you’d
made, but that’s time consuming. For all but column view windows (because every
change you make to their view options is global), here’s an easier
solution…just hold down the Option key with the View Options window open. When
you do, you’ll see the button labeled Use as Defaults change to Restore to
Defaults. (As best as I can recall, this only works in 10.5.)
Click
the button, and marvel at the instantaneous return of your folder to your
default settings for that view type. Sometimes the simple tricks really are the
best!
Mac OS X Hints by Rob Griffiths, Macworld, September 2008
Users having problems unzipping archive files
Some
users are experiencing problems in which files they pack into zip archives via
the Finder are not accessible. After selecting some files or folders and using
the Finder's "Compress" feature (in the File menu or in the
contextual menus) the process seems to work, but upon trying to unzip the
archive errors appear.
Per
Apple Discussions poster Stephen Pocock: "I compressed a
folder. Put it on my external drive. Now, when I try to unarchive it, I get a
message that says 'Error 1 - operation not permitted'. I tried using Stuffit Expander, but it quits."
Users
have not been able to rectify the problem by a seemingly obvious step to modify
permissions on either the archive file or the enclosing folder. While it is
unclear exactly why this problem is occurring, users have had success with
using alternate third-party uncompressing utilities to handle the archives.
Fixes
and Workarounds
Attempt
command-line decompression — Open the terminal and type the following command followed by
a space: sudo unzip
Then
either type in the full file path to the archive, or drag the archive to the
terminal window to automatically complete the file path. Then press enter and
supply the administrator password when prompted. If successful the files should
unarchive to the same folder as the .zip file.
Use
A Third-Party Unarchiver
 Users have found that the utility
"Unarchiver now version 1.6.1" [http://wakaba.c3.cx/s/apps/unarchiver.html]
seems to work well when the system archiving processes give these errors.
However, while this may work for some users, other similar programs may be the
solution for other users and it is recommended to try several (available by
searching at http://www.versiontracker.com)
Users have found that the utility
"Unarchiver now version 1.6.1" [http://wakaba.c3.cx/s/apps/unarchiver.html]
seems to work well when the system archiving processes give these errors.
However, while this may work for some users, other similar programs may be the
solution for other users and it is recommended to try several (available by
searching at http://www.versiontracker.com)
I’ve
used, sez Doc, Zip 2..2.2 on the occasion that the latest version (13.0) of
Stuffit Expander did not work. Alas, these days there aren’t many choices out
there.
Use
another computer
Archive
files are stored in the .zip format, which is common and easily readable on a
variety of operating systems. If users have another Mac handy, or a PC running
Windows XP, copying the file to this computer may enable proper decompression
of the files. The methods for un-archiving the zip files depend on the
computer, but in a Windows environment they should open in Windows Explorer
itself as a compressed folder, or be manageable with applications such as
WinRAR or WinZip. In a Linux/Unix environment there should be many third-party
compression applications available as well, but in addition should also contain
the "unzip" command as is described in Fix #1 above.
MacFixit Daily Newsletter,
August 11 2008
Administrator Password Lost
Problem: My son Bruce, who
inherited my G4 Macintosh earlier in the summer, lost his administrator
password along the way. Since the computer contains all sorts of goodies he was
interested in, we don't want to wipe the disk, as Apple recommends. I recalled
reading, either in email newsletters (Tidbits, Macworld or some paper
publication) a means of installing a new administrator password without erasing
the hard drive but had not saved the article for future reference. So I sent
out a technical support request to my local Macintosh User Group.
Collective Reply from the many
Mid-Columbia Macintosh Users Group Members Users:
Summary — You can reset the password if you boot the Mac to an Installer CD.
Choose Reset Password from the
Utilities or Installer menu (depends on which version of OS X you're booting
from)
Here's the Apple Support Article
link: http://support.apple.com/kb/HT1274
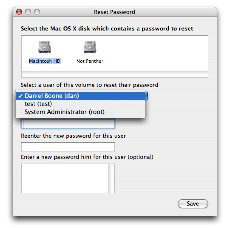
Details — Resetting the original administrator
account password
Follow these steps
to reset a password when there is only one administrator account on the
computer, or if the original administrator account (of several) needs a
password reset. "Original" administrator account refers to the one
that was created immediately after installing Mac OS X. If the original
administrator password is known, the original administrator user may reset the
passwords of other administrator accounts using the steps described below.
 Start up from a Mac OS X Install CD (one whose version is
closest the version of Mac OS X installed). You should first disable Open
Firmware password protection, if it is enabled. Hold the C key as the computer
starts.
Start up from a Mac OS X Install CD (one whose version is
closest the version of Mac OS X installed). You should first disable Open
Firmware password protection, if it is enabled. Hold the C key as the computer
starts.
Choose Reset
Password from the Installer menu (or Utilities menu in Mac OS X 10.4 Tiger).
Tip: If you don't see this menu or menu choice, you're probably not started
from the CD yet.
Select your Mac OS X
hard disk volume.
Set the user name of
your new original
administrator account.
Enter a new
password.
Click Save.
Important: Do not select "System Administrator (root)". This is
actually a reference to the root user. Do not confuse it with a normal
administrator account.
After following these steps,
you'll want to also follow the steps in Mac OS X 10.4: Keychain Access asks for
keychain "login" after changing login password. [I never used the
keychain on my G4 so this instruction was irrelevant — doc)
Harry (doc) Babad and Apple
Support
Keep Track of Your Disks
Problem: As a regular and long time user of Toast,
I have accumulated quite a collection of backup media over the years. Once in a
while I require some little piece for a project and I am then faced with the
daunting task of finding the bit I need, amongst the ever-growing pile of CDs
and DVDs.
Solution: One way to manage this is to take
advantage of Toast’s ability to keep the file and folder structure intact. If
you copy any folder in a Toast window and paste it into a word processor, the
entire contents of that folder and all the folders contained within will be
listed in a nested fashion, as it is on the disk. From there it is simply a
matter of a quick tidy up, perhaps delete any unwanted info and away you go
-— a quick and easy way to keep track of your backups.
 I, Doc, find it easier to index
my disks using Disk Tracker, now version 2.4, my long time favorite cataloging
tool. It is easy to pop each disk into the program to create a catalog. I add
the disk’s catalog to the disk I’m burning, as well as keeping a copy on my
drive for easy access. I’ve found for reference purposes, I can combine all the
related catalogs into a master Disk Tracker file, and do a search of the while
collection to find what I need.
I, Doc, find it easier to index
my disks using Disk Tracker, now version 2.4, my long time favorite cataloging
tool. It is easy to pop each disk into the program to create a catalog. I add
the disk’s catalog to the disk I’m burning, as well as keeping a copy on my
drive for easy access. I’ve found for reference purposes, I can combine all the
related catalogs into a master Disk Tracker file, and do a search of the while
collection to find what I need.
Ivan Radywonik
AUSOM News,
Melbourne, Australia
Send Clickable Links in Mail's
Subject Field
Today’s hint would probably fall
into the “did you know?” category—if we had such a category. Consider it
a tidbit, a morsel of knowledge to file away for possible use in the future…or
not. In any event, today’s hint concerns Mail and its ability to make embedded
URLs into clickable links.
You’re probably well aware that
embedding an http://www…. address in the body of your
e-mail will create a clickable link in the message as seen by its recipients.
This definitely works with Mail as the receiving client, and I would assume
with other e-mail clients as well. The link will look much like it does on any
website, in color with an underline indicating its clickable state.
What you may not have known is
that you can send clickable links as the subject of e-mail messages as
well—at least if the recipient is using Mail in OS X 10.5 to read your
message. Again, this may work in other e-mail clients, but I only have Mail set
up here to test with.
There are a couple of caveats to
this tip, though. First, the link will not show as clickable in the subject, even though it is. You won’t see an
underline, nor will the cursor change states when you mouse over it. Second, in
order for the link to be clickable, there are two things you must do when
composing the message. You must write the message in rich text mode (Message
-> Make Rich Text, or via Mail’s Composing preferences to set rich text mode
as the default). The other requirement is that the body of the message must
have some text in it—when I tested this with just a URL in the Subject
field, it didn’t show up as clickable on the receiving end. As soon as I added
any text to the body, the URL in the Subject field became clickable.
Mac
OS X Hints by Rob Griffiths, Aug 7, 2008
CD/DVD Disk Read Problems
 A number of times recently I’ve had to attend to CD
or DVD players that weren’t reading discs. One of them was my own! In all cases
the problem was that the player’s lens needed cleaning.
A number of times recently I’ve had to attend to CD
or DVD players that weren’t reading discs. One of them was my own! In all cases
the problem was that the player’s lens needed cleaning.
Your CD/DVD
player uses a laser beam that is focused on the disc by a lens. If this lens
accumulates dust the beam will be diffused or incorrectly focused, and the
player won’t function correctly.
Your local
music store, or an office supply store like Staples or Office Depot, will sell
you a cleaning disc that incorporates a number of minute brushes (see image).
Load this disc into your player and follow the instructions for cleaning. The
process will take only a minute or so, though I usually repeat it just for
luck.
Buy a cleaning
disc before you forget, and be ready for the inevitable.
Steve
Cooper
AUSOM News, Melbourne, Australia
From Paul
Taylor's May/June 2008 Hints & Tips column
MacFixit
Daily Newsletter, Thursday, August 14 2008
Launch System Preferences with
a Keyboard Shortcut
You may need to open System
Preferences from time to time to adjust network settings, change user account
options, or some other task. If you don’t keep System Preferences in your Dock,
you can set a keyboard shortcut to make it launch.
To create the shortcut, open the
Keyboard & Mouse System Preferences panel, click on the Keyboard Shortcuts
tab, then click the plus (+) sign. In the dialog that appears, leave
Applications set to All Applications, set the Menu Title to System Preferences…
(that’s an ellipsis—use the Option-; key combo—and not three
sequential periods), and enter your desired shortcut in the Keyboard Shortcut
box.
Since the standard keyboard
shortcut for preferences in any application is Command-, (Command-comma), you
might want to use Command-Option- (Command-Option-dash) or something similar.
After you set the keyboard shortcut, you’ll need to log out and log in again,
or restart your Mac, for it to be available.
Mac
OS X Hints, Macworld, by Kirk McElhearn, August 14 2008
That’s
all folks…
Harry
{doc} Babad
