doc_Babad's Macintosh Tips - A Macintosh Tip or Three…
September
2008 Edition
By
Harry {doc} Babad ©
2008 |

|
Product
and company names and logos in this review may be registered trademarks of
their respective companies.
The
software related tips were tested on a 2.8 GHz Intel Core 2 Duo iMac with 2
GB 667 MHz DDR2 SDRAM; running under Macintosh OS X OS X 10.5.4 |
Disclaimer: When briefly reviewing
share-freeware I will often use the developers’ product, functions and
features descriptions. All other comments are strictly my own and based on
testing. Why need I rewrite
the developers’ narratives, if they are clearly written? |
This month I continue sharing my almost stumbled
upon or homegrown tip related finds with you. As the occasion warrants, some of
the Tips I share come from Paul Taylor's Hints & Tips column and are used with his
permission. Where I use any one else’s tips for this column, I acknowledge both
their source and their contributors. Yes, I do write down and share some of the
tips I’ve discovered while Macin’ around.
Oh,
I almost forgot! Unless otherwise noted, all the tips and tidbits I share,
where appropriate, work on my computer. If I don't own the software b
ut if the
tip sounds interesting, I'll so note that information at the end of that
specific write-up.
- - - - - - - - - - - - - - - - - -- - - -
- - - - -
Tips
I’ve provided this month, as always in a random order, include:
- Desktop Drive Icons
Moved After Restart
- Sending Bulk Emails a
Non-Spammy Way
- How-To: Making Files
and Folders Hidden
- Work
With Preview icons in Get Info Windows
- Help Menu Does Not
Work; Fixes
- File Naming Dos and Don'ts
- Safari Browser
Windows Madness
- Resizable Partitions
In Mac OS X Tiger and Leopard.
- Directly
Accessing the Downloads Folder
Desktop Drive Icons Moved After Restart
Question: Several users have noticed an issue in which mounted drive appear in
different locations upon reboot. MacFixIt forum member pgwerner writes: "I've been having a
bit of a problem with my desktop drive icons jumping around to different parts
of the desktop when the system is rebooted. I was hoping this would go away
when I upgraded from 10.3.9 to 10.5.3, and while icons are now more stable, the
problem hasn't gone away entirely."
Response:
This
problem has occurred, in particular, for users who have upgraded from previous
versions of OS X, and could be from a corrupt hidden ".DS_Store" file
in the desktop folder.
Fixes
Remove
the .DS_Store file from the desktop folder — The Finder uses
".DS_Store" files to store organization and display information about
Finder windows and content and keeps one in the every folder, including the
Desktop, for this purpose. Use the following command in the terminal to remove
the .DS_Store file on the Desktop (The Finder will recreate a healthy .DS_Store
file when needed): sudo rm ~/Desktop/.DS_Store
Use
drive alias files on the desktop Instead of showing drives on the desktop, create
alias files of the drives and put those on the desktop instead. Then in the
Finder preferences in the "General" section, uncheck the "Hard
disks" and "External disks" options.
MacFixIt Daily Newsletter
Monday, July 21 2008
Sending Bulk Emails a Non-Spammy Way
We
are hosting an event at our office next month and are inviting 500 people. How
can I use Apple Mail to send out 500 emails and make sure that they won’t be marked
as spam? Also, how can I see if a particular recipient has opened an email?
There’s
no guarantee that your email messages won’t be marked as spam on the
recipient’s end, because you never know what sort of spam filters are in place.
And if you’re sending a large number of messages from your email account, your
own ISP may mark your messages as spam before they even get to their final
destination.
To
further compound your dilemma, there’s no way to reliably track what happens to
your email after it’s sent—without going through the hassle of embedding
a different server-side image into each one of your messages and checking your
server logs to see which images have been viewed. And even then, many email
programs block server-side images unless the recipient specifically chooses to
view them. Instead of trying to do all of this yourself, your best bet is to
use one of the many reputable email-marketing companies on the Internet, such
as Constant Contact or Emma.
These
companies have developed relationships with major ISPs to help ensure that
their messages are not marked as spam at the server, and they stay up-to-date
on antispam legislation and regulations to make sure that your email messages
comply. They can also help you track whether your recipients have read your
emails or forwarded them onto others by managing server-side images for you.
And best of all, they’ll help you create professional-looking templates so that
your emails have maximum impact when they’re viewed.
Mac|Life Tip of the Day by Scott Rose
How-To: Making Files and Folders Hidden
By
default, there are many hidden system files, which users can interact with
albeit directly, in Mac OS X. The restrictions prevent inadvertent tampering
with files that need not be accessed by the average user. For example, upon
opening "Macintosh HD" there are four obvious folders: Applications,
Library, System, and Users; however, in reality there are many more in that
location.
MacFixIt
Solution
To
see these folders, open the terminal and type the following command (replace
"Macintosh HD/" with the name of the desired volume):
ls
-p /Volumes/Macintosh HD/
This
will output a list of the files and folders at the root of "Macintosh
HD", and put slashes by the names of all directories.
Users
may wish to take advantage of the feature and create personal hidden folders
for many reasons including keeping some data relatively private from others who
may use the same user account. In order to do this, follow these steps:
Open
the Terminal application
Type
the following, followed by a single space: chflags hidden
Locate
the desired file or folder in the Finder
Drag
the folder to the terminal, and the command should complete itself as such: chflags
hidden path_to_file_or_folder
Pressing
enter after the full path has been entered should hide the item from view in
the Finder. To reverse this process, repeat the process from step 1 and use
"nohidden" instead of "hidden" in the command.
NOTE: While this command can be used to unhide the system files and folders that are
hidden by default, doing this is not recommended, as they can accidentally be
targeted for modification or deletion. This is especially true in a multi-user
environment.
Doc
Sez: Alternatively you can check MacUpdate Site for Hide Folders
{Protect Folders} simply check Folders for a larger number of
varied tools for working with you visible and invisible folders.
MacFixIt Daily
Newsletter
Thursday, July 24 2008
Work With Preview icons in Get Info Windows
Apple added a small feature to OS X 10.4 that not many people
know about: you can now do things
with the Preview section of the Get Info window. In earlier OS X releases, the image shown in Preview wasn’t really usable for anything other than,
well, a preview. But in 10.4, that Preview image now behaves (with one minor
exception) exactly as icons in window title bars do—you can use the
Preview section to move, copy, or create an alias of a file, just as you can
with the small icons in a Finder window’s title bar.
With any file (except a movie file; that’s the exception I’ll
discuss shortly) or folder selected in the Finder, choose File -> Get Info,
and then click the triangle next to the Preview section to make the icon
visible (see image below). With the Preview icon visible, you can now move,
copy, or make an alias to the associated file or folder. Specifically, here’s
what happens when you do any of the following:
Drag the icon to a new location: If you drag to a location on the
same volume, you’ll move the file or folder. If you drag to another volume,
you’ll create a copy. If you want to copy to a new location on the same volume,
hold down Option before you drag. Command-Option drag the icon to a new location: Regardless of whether
the destination is on the same volume or not, this action will create an alias
to the original file or folder.
Command-drag the icon to a new location on another volume: Move
the original file or folder to the new volume, erasing the original in the
process.
These are the exact same shortcuts you can use with title bar
icons—and they also work in the Inspector (hold the Option key then
choose File -> Show Inspector). Because every rule needs an exception,
QuickTime movie files don’t follow these rules.
But for everything other than movie files, it’s nice to have the
ability to work with the files as you can in the title bar of a “real” Finder
window.
Mac OS X Hints by Rob Griffiths
Macworld - July 10, 2007
Help Menu Does Not Work; Fixes
In
some cases, the Help Menu may cease, either completely or partially, to
function. While users may be able to search for help topics, the topics may
either not appear or not display when clicked on. For one user, the latter was
the case: Apple Discussions poster randykimo wrote: "I recently bought
an Intel iMac with Leopard 10.5.4; however, the Help menu doesn't seem to work.
I get the drop down menu, can enter a term in the search box, and see a list of
topics. However, clicking on any of the topics does nothing."
MacFixIt Answer — There are several
approaches to fixing this problem, though for this user the one that worked was
reinstalling the Help Viewer from the installation disk.
Fixes
Throw
out relevant Help Viewer settings files The Help Viewer utilizes three preferences files
and one cache file that can be removed, triggering a reset. These files are
located in the user's preferences folder (/Users/username/Library/Preferences/)
and are labeled as follows:
com.apple.help.plist
com.apple.helpui.plist
com.apple.helpviewer.plist
Delete
these files. In addition, go to the /Users/username/Library/Caches/ folder and
throw out the folder labeled "com.apple.helpui". Then restart (or
logout and log back in) to have the help viewer and support files reload and
reset themselves.
Run
a permissions fix on the drive Open "Disk Utility" located in the /Applications/Utilities/
folder, and run a permissions fix on the hard drive.
Reinstall
the Help Viewer Use the application Pacifist. Next, insert your Leopard or Tiger
installation disc and locate the Help Viewer application thereon using Pacifist
and force a reinstall.
Reinstall
the operating system For users who have just purchased their computers, performing a reinstall of
the operating system fresh from the provided installation DVDs may be a
desirable alternative. See our tutorial for instructions on doing so.
MacFixIt Daily Newsletter
Monday, July 28 2008
File Naming Dos and Don'ts
Every day you do this task without giving it a second
thought: naming files and folders. Yes, it's easy to name things in as x, but
there's a bit more to it than meets the eye.
Don't
Start with a Period — If you
try to use a period at the beginning of a file or folder name, the Finder will
let you know that such a name is "reserved for the system" (it makes
any file or folder whose name begins with a period invisible in the Finder).
Don't
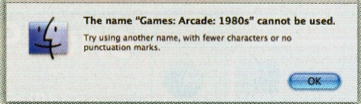
Use a Colon — You can't use a colon (:) anywhere in an
item's name. That's because Mac as x uses
the colon to indicate a directory (or folder) in the as x file
system-for example, Applications: Utilities. If you try, you'll get a
somewhat cryptic error message about the length of the item's name and its
included punctuation (see "Illegal File Names"). The object's name
won't change.
If you try to use a colon in a file name when you're saving
from within a program, most of the time your Mac will replace the colon with a
minus sign (-). In some programs, such as Microsoft Word, you'll just hear
a beep and the colon won't appear.
Do
Create Cross-Platform-Friendly Names — Even though the colon is
the only character you can't use in as x, you
might want to avoid some others: the asterisk (*), angle
brackets « and», double-quotation marks ("), forward and backward
slashes (/ and \), the semicolon (;), the pipe (I), and
the question mark (?). Microsoft
Windows XP reserves all these characters for its own use, so putting them in as
x file names may cause problems if you then send those files to Windows XP
users.
Do
Keep It Short — The Mac limits how long your file name can be. Thankfully,
the limit is quite high-255 characters. That's longer than this paragraph!
Do
Give Descriptive Names — Instead of pushing that 255-character limit, use names
that make things easier to find.
For instance, while Beef Recipe may seem like a perfectly adequate file name,
it won't seem quite so precise when you reach
Beef Recipe #17. Instead, try something more specific, like
Braised Beef with Broccoli [5 stars].
?
— If you see this odd-looking error message, chances are you
tried to use a colon (:) in a file's or folder's name. OS X forbids
the use of some characters in names.
Mac OS X 101
Macworld (lost the link/mia culpa; doc.)
Safari Browser
Windows Madness — If you sometimes find your desktop cluttered with multiple browser
windows, try using tabs in Safari.
Tabs let you open multiple web pages in a
single Safari window, so you can easily flip between them. They’re one of the
best ways to amp up your web-browsing experience — especially once you’ve
tamed them via a few simple key commands. This tip covers the basic moves.
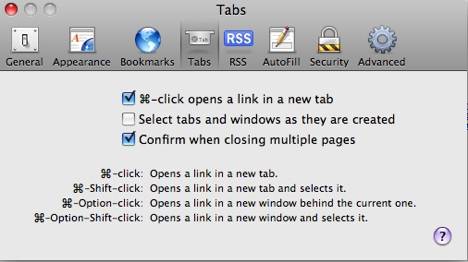
First, make sure Safari is configured for
tabbed browsing. From the Safari menu, select Preferences and click on the Tabs
icon. Select the “Opens a link in a new tab” option, but leave the others
unchecked for now. But take a moment to read the fine print, since it covers
some of the tricks we’re about to tackle.
Now open a web page in Safari and try it
out. Click on a link while pressing the Command key, and the link opens in a
new tab nestled behind the current page. Holding down Command-Shift creates a
new tab and brings the new page to the front. You can also open an empty tab by
typing Command-t, then type in a URL or load a bookmarked web page. To close a
tab, select it and type Command-w, or click on the small x on the left side of
the tab.
You can reorder tabs within the Tab Bar
simply by dragging them to the left or right. And you can switch from one
tabbed page to another via key commands: Type Command-shift-] (or
Command-Shift-Right Arrow Key) to move forward to the next tab to the right,
and Command-shift-[ (or Command-Shift-Left Arrow Key) to go to the next tab to
the left.
For
more cool tab tricks, try Control-clicking on any tab. Or simply
right-click Mighty Mouse, and use the contextual menu that appears to create
new tabs, close them, move them to new windows, reload them, or bookmark
them. Note that Command-T brings up a new tab.
|
Setting
Tabs preference in Safari |
By
Phil Russell, Corvallis (OR) MUG
Member
August
Mouse Droppings – Used by CMUG Permission
Resizable Partitions In Mac OS X Tiger and
Leopard
One
of the big under-the-hood features that was lacking in Tiger was the ability to
create and resize partitions without reformatting a hard drive. Disk Utility now offers complete
support for resizing partitions as well as adding and deleting partitions
without reformatting, as long as the disk has a GUID Partition Table (the
default option for Intel-based Macs).

By Phil Russell, Corvallis (OR) MUG Member
August Mouse Droppings – Used by
CMUG Permission
Directly Accessing the Downloads Folder
Reader Charles Bilkin is unsatisfied with a
Safari feature, he writes: When I used Safari running under Tiger, my
downloads would go to the Desktop. Now that I’m using Leopard, they go into the
Downloads folder. I know that my Desktop is cleaner now, but I don’t like
having to open my Downloads folder whenever I want to get a file I’ve
downloaded. Is there some way to turn this off?
Sure, just open Safari’s preferences, click
the General tab, and, from the Save Downloaded Files To pop-up menu, choose Other. In the sheet that
appears, navigate to the Desktop folder in your user folder and click Select.
Files you download will appear on the Desktop.
But before you do that, consider this:
Perhaps you can have both easy access to your downloaded files and a clearer
Desktop. Like so:
Enter an address like this in Safari’s
Address field:
file:///Users/yourusername/Downloads
(Naturally yourusername would be the name
of your user account.)
Drag the small icon of the Downloads folder
that appears just to the left of the address into the Bookmarks Bar and name it
something like Downloads. Now when you want quick access to files you’ve
downloaded, just click this new Downloads bookmark. When you do, the Downloads
folder opens in the Finder.
Similarly,
in Safari’s Downloads window you can quickly get to your downloaded file by
clicking the Magnifying Glass icon next to its name. The Finder comes to the
fore with the Downloads window open and your file highlighted (unless it’s
a disk-image file that was automatically opened, in which case clicking this
icon takes you to the window that shows you all the mounted volumes on your
Mac). I also make it a point to drag the Downloads folder into a Finder
window’s Sidebar so that I can quickly open it from any Finder window.
Mac 911
by Christopher Breen, Macworld Magazine
June 2, 2008
That’s
all for this month… Remember
Where
there’s a will, there’s almost always a way, especially if work on Googling it!
Harry
{doc} Babad
