
Under the Magnifying Glass
Storycrafting Part 2
By Steven H. Fyffe
sfyffe@maccompanion.com
Welcome back to another adventure. Did you
enjoy discovering the power of Automator in Leopard (1) and
the hidden talents of Te xt Edit. What? You haven't read my February column (2)
yet. OK. The joy still awaits you. If you're like me, these frigid days are
good excuses to vegetate in front of the fireplace and a perfect time for a Mac
safari, discovering the hidden gems, ... not that I really need an excuse.

Anyway, I would like to take you back to my
January column "Our Storytelling-Storycrafting Apparatus" (3).
Recently, I had the opportunity, at our local Macintosh User Group (4), to
share my perspective on Keynote 4 (5) and other applications which
facilitate our storycrafting. Therefore, I needed a good story to tell.
 Larry is a good friend who honored my request to share his life
story. I used Keynote as the canvas for crafting the visual
story from the fabric of his life. In this column, I would like to briefly
describe how the story materialized. I am not going into precise detail of the
"how to", but hope to spark within you the desire to craft a story of
your own and to discover for yourself how these applications can help you
orchestrate your own symphony.
Larry is a good friend who honored my request to share his life
story. I used Keynote as the canvas for crafting the visual
story from the fabric of his life. In this column, I would like to briefly
describe how the story materialized. I am not going into precise detail of the
"how to", but hope to spark within you the desire to craft a story of
your own and to discover for yourself how these applications can help you
orchestrate your own symphony.
Where to begin? Have a Vision!
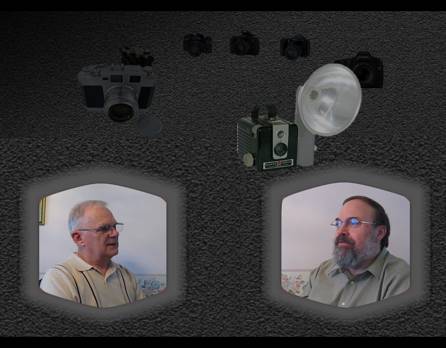
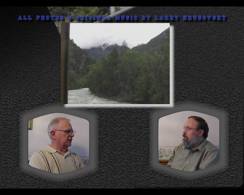
I visualized a Charlie Rose-like interview
between myself and Larry. On the Keynote canvas, the video clips would be
layered in front. Photos or graphical illustrations with
animation would be displayed behind and above us. I had hoped to a achieve
a three dimensional, warm atmosphere. I envisioned one camera on myself, a
second on Larry, and the third capturing both of us ... two friends having a
chat together ... sound familiar? This is also my vision when I undertake
writing this column. Between video clips of our interview, I would display
photos or movies with appropriate musical background.
Video Logistics
To capture our video interview, I used three cameras, an
older Canon Optura MiniDV digital camcorder, my Canon Elph PowerShot 850 IS
(6), and Larry's Canon Elph. It took awhile to figure out the logistics of the
shot. Originally I had hoped to have a dark background similar to the one on
the Charlie Rose show or like the current Apple iPhone commercials. Lighting
and the size of our black backdrop cloth became an immediate
stumbling block. The background was too narrow for us to sit comfortably for
our camera arraignment and the lights cast a deep shadow behind us, since we
were working in a restricted space. After about a half hour fussing with
cameras, lights, chairs, and us, we decided to revise our vision ... always a
good idea when reality brings out it's hammer. We settled on Larry's dining
room as the set for our "meeting place". We used the ambient light
coming through the windows. Ah. This worked great. We both sat on the same
side of his dining room table, facing one another while we chatted. We placed
the two Canon Elphs on the table to capture closeups of our profiles while we
chatted and the Canon Optura captured the two of us in a longer shot.
We sure learned a lot from just the
logistics of setting up our shot. Two important lessons was to listen
for undesired sounds and recruit someone as a cameraman. After about five
minutes into take one of the interview, I realized that there was a radio
playing in the background, so scratch take one. When we started over for take two,
I mistakenly placed one of the close-up cameras so it obstructed the view of my
long-shot camera ... bummer ... and later I realized that the closeup camera on
me had stopped recording. A cameraman could have kept an eye on the cameras
while Larry and I focused on the interview.

I also discovered, afterwards, that
our cameras were not capturing sound with the same volume and quality. We
should have done sound checks before doing the whole interview. Also, using a clap board or just clapping our hands, would
have facilitated synchronization between the video clips ... yes, at
times my lips looked like one of those dubbed in foreign films ... OK,
you can stop chuckling now.
Gathering the Resources - First, the
Story
The first and paramount resource
was Larry's story.
The interview went very well, actually with
very few verbal stumbles. Although, both Larry and I were not quit as
relaxed as I envisioned ... two friends having a chat ... but it didn't sound
like we were reading from a Teleprompter either. I think it helped a lot to
face one another instead of looking into the camera lens. Prior to the
interview, I had e-mailed Larry some possible questions I planned to ask.
Originally, I had thought about writing down the questions, but
didn't do that after all. I think that turned out to be a good thing, since it
gave the interview a more natural tone in our voices. It did result in me
forgetting some of the questions I had intended to ask, but later we recorded
follow-up questions over an iChat which went very well.
Gathering the Resources
... continued
Driving through the park on my journey
home, I started thinking about Larry's story. What would I need to
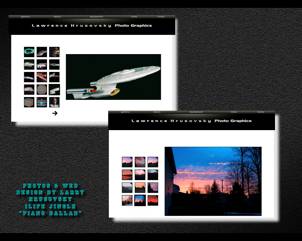
illustrate the story in Keynote? Of course, I would need a
sample of his photos, since his passion is photography. I would also need to
capture screen shots of his web pages, since he has become an
accomplished web designer for his photo portfolio.
What else would I need to add warmth and
feeling to the story of my friend? In the interview, he shared with me
his roots in the coal mining towns of southwestern Pennsylvania, his family's
move to Cleveland as a teenager, how he met his beloved, and his career at
General Motors. I also asked Larry about the types of photos he enjoys
taking, his trip out west, including a train ride, and his plans to visit Italy
next fall. He also discussed the cameras and Macs he has used over the
years.
For Larry's early years growing up in a
coal mining town, I asked him to share photos. I also searched Google for
typical scenes of coal miners and coal mining towns.
Larry also sent me photos to
illustrate his teen years, early adulthood in Cleveland, marriage, and
career. I did Google searches for the different kinds of cameras and Macs
he has owned.
What would I use for musical ambiance?
Tennessee Ernie Ford's "16 Tons" would make a great musical
background for the coal mining town section. And "Kookie, Kookie,
Lend Me Your Comb" was perfect for his teen pictures ... yes, Larry's
hair style had a remarkable resemblance to Edd Byrnes … and brought quite a
chuckle from members of our MUG and Larry also. Frank Sinatra's song "All
the Way" would be great for the photos of him with his beloved. I
wanted to include only a short clip from the songs, therefore, I used Amadeus Pro
(7) to trim music clips and adjust the volume to fade out. I own
iLife '08 so I did a Spotlight search for "piano". I knew that there
are several musical jingles installed and sure enough I found Piano Ballad
tucked away in a Jingles folder on my hard drive.
In his .Mac (8) iDisk Public
folder, Larry also placed a copy of a movie he created from his photos
using Photo-to-Movie (9). I used Quick Time Pro (10) to select a
couple sections of his movie to create a trailer, inviting people to
visit his web page. I also used Quick Time Pro to export the music
from the movie to use as a sound track for the screen shots from his
movie. I also used Snapz Pro X (11) to record portions of
Larry's web pages (12) & (13).
The Texture of Our Canvas
Once I gathered all the resources for
sharing Larry's story, the storycrafting began in earnest.
Like selecting the texture of a painter's
canvas, the first thing to do in Keynote is choose a theme. This sets the mood
for our story. Apple includes several themes to choose from or you can
purchase third party themes. I purchased Galleria from KeynoteUser
(14) and felt this was the perfect atmosphere for the
visual story of my photographer friend.
Planning ahead, I had the option to choose
a slide size up to 1920 X 1080 which would fill my HDTV screen when
the finished story was exported to a Quick Time movie and displayed using Apple
TV (15). Now that Apple TV Take Two (16) has arrived, we can post our story on
a .Mac Web Gallery (17) using iMovie '08 (18) for viewing without a
computer or, if the Web Gallery is password protected, by subscribing and
streaming from our Mac to the Apple TV.
Our Story's Musical Score
Keynote 4 gives two options for musical
sound tracks. First, you can import one music soundtrack to
play or loop during the entire story. Second, you can play one
or more songs for a single slide. Although, there is no option to select a
group of slides and play a sound track for only that selection, Keynote allows
you to precisely time Builds (appearance and disappearance) of text,
photos, and objects. For example, when I played "Kookie, Kookie, Lend Me
Your Comb," I had two teenage photos of Larry which I wanted to display at
close to full size. Therefore, I timed the first photo to appear and
remain visible for several seconds, and then disappear right on cue,
just as the second one swooshed into view. Also, by exporting the Keynote story
to a Quick Time movie, you can use iMovie '08 (18) to add sound
tracks over a particular section of slides.
Smart Builds Add Pizzazz
One thing new in Keynote 4 is Smart Builds.
This allows you to display a group of photos within a single Keynote slide.
This is the easiest way to match up an audio track with a large group of
photos, because it is self contained within a single slide. For
example, I used a Smart Build to "Thumb Through" photos Larry
took out west while he discussed them with me.
Video Editing & Sound Tweaking
As I mentioned above, I had video from
three different cameras. I used Quick Time Pro (10) to create separate
video clips of questions and answers on each topic. The volume from my
long-shot camera was lower than the one used for close-ups. Therefore, I
exported the sound track using Quick Time Pro (10), used Amadeus Pro
(7) to amplify the volume, deleted the movie's original sound track,
and pasted the amplified version back into the movie, again using Quick Time
Pro (10). For most of the story, I used video from the close-up cameras, but
when Larry and I were more animated ... moving our arms around lot to
illustrate a point, I would switch over to the long shot camera.
Video Masks & Instant Alpha
In order to minimize distractions,
like my shoulder showing on the corner of Larry's
close-up video, I made a mask. For this, I needed a graphic with a
transparent area to layer on top of the video clip. I used The Print Shop (19)
to create the mask template. This was simply two identical shapes layered on
top of one another. The bottom layer was larger and I used the soften edge tool
to add warmth. The inner layer was a contrasting color (red). When imported
into Keynote 4, it was very easy to make it transparent using the Instant
Alpha tool by simply clicking on the smaller contrasting area and like magic it
disappeared. Then, I just layered the graphic with the transparent area on
top of the movie using Keynote's Arraignment tool. Sound difficult? Not in the
least. Just jump right into using Keynote and The Print Shop and you will
discover of joy of using these applications together.
Alpha again - Preview and Photoshop
Elements
Speaking of Instant Alpha, having graphics
with a transparent background is very useful for a Keynote story. I used a
Smart Build to display all the cameras which Larry has used over the years,
while he was discussing them in our video interview. I wanted them to appear to
float above our heads, as if suspended in mid-air. I first did a Google search
for each one and downloaded those which had a plain colored background, if
possible. I have used three different applications to make the background
invisible. Of course, Keynote 4 has its own built-in Instant Alpha which works
great for graphic images already placed onto the slide. However, for Smart
Builds you need to drag an image which already has a transparent
background into the clipping bin. I found that the new Preview in Leopard
(20) also has a great Instant Alpha tool to easily render the background
invisible with the added advantage of being able to save the subject with
the alpha channel (the subject alone) as a PNG file.

On occasion, it was more difficult to use
Preview and Keynote's Instant Alpha when a graphic has complicated backgrounds
(bunch of stuff instead of plain) or with background without sharp
contrast to the subject (like white iBooks on a white background or cameras
with black case displayed on a black background). For this, Photoshop Elements
(21) was my best bet. I would first use the Erasure tool on the
background making it a single color which was in sharp contrast to the subject.
Then, using the Magic wand click on the background. Click Select in the Menu
bar and choose Inverse from the drop-down menu. Now copy (Command-C) which
copies the subject without the background.
At this point, if you want to just
drop the image into Keynote, all you would need to do is switch over to
your Keynote slide and paste (Command-V). However, for a Smart Build you
need an image file, so let's move on. You have the subject in the clipboard,
but now you need to create a "transparency" slide ... remember overhead
projectors? ... don't admit it ... it will indicate just how old you are. Under
File in Photoshop's Menu bar, select New and then New Image. Make sure the
"transparency" box is checked. Photoshop creates an image box with a transparent background. Just paste (Command-V) your subject
into the new transparency image and Save As a PNG file. It will then be ready
to drag and drop into your Keynote slide's Smart Build photo bin.
with a transparent background. Just paste (Command-V) your subject
into the new transparency image and Save As a PNG file. It will then be ready
to drag and drop into your Keynote slide's Smart Build photo bin.
Animation is Moving
Please allow me share with you just
one more cool feature in Keynote 4. While Larry was discussing how his father
relocated his family from the coal town of Pennsylvania to Cleveland, I wanted
to show a map with a car slowly moving from one location to the other. Also,
when Larry talked about his upcoming trip to Italy, I wanted to have objects
move from his head over to a "thought bubble" which I made with Comic
Life (22).
And finally, in a couple slides I wanted a video clip to start
playing in the center of the slide and then move to a corner, slowly shrinking
to fifty percent of the original size. All this can easily be accomplished
using the new Animation Tool in Keynote 4. All you need do is select the
graphic you want to animate and select Action in the Inspector window. You can
designate the path you want the object to Move. You can also designate the
degree of Opacity or Size you want the object to change, and then set the
precise timing of your animation. Very cool.
Time to Tell Your Story
If you read my second column (23), you
recall that I wrote, "In my
experience ... inductive learning (24) is the fastest and surest method
for retaining knowledge." Today's column included a bunch of that
deductive stuff ... you know what I mean ... lecturing. In order for you really
learn the power of Keynote and the other applications in our storycrafting
apparatus and to experience the joy of discovering how you can use them to tell
your own story, you need to jump right in ... the water is fine and
exhilarating. I have been preaching using Keynote as a storytelling tool for
quite awhile, but not until I had the honor of crafting this visual life story
of my dear friend Larry did I really experience it for myself ... boy did I
learn a lot. You really need to try it for yourself!
Call your great aunt
that has all those photos from years gone by and ask her to let you video
record her telling you about each one. Does your grandpa love to tell tall
tales which always seems to include a moose? ... yes that's Jared's lot in
life & he knows that no matter what the story is about a big old moose will
wonder in to pester us. Anyway, first ask for the honor to share someone's
story and then use our great storytelling/storycrafting apparatus to make it
come alive.
Thanks, Larry
I want to say one more
time how much I appreciate Larry's friendship, what a great honor it was to get
to know him better while crafting his story, and how much he
has enriched my life by having the opportunity to share his
tale with others. I want to give all my readers a personal invitation to
visit Larry's web pages (12) & (13), in order that you too may experience
the depth of beauty Larry has captured in God's creation with his
lens.
Thanks again for
visiting. You all take care now.
References
(1) http://automator.us/leopard/index.html
(2) Under the Magnifying Glass - The Lonely
Dynamic Duo
http://www.maccompanion.com/macc/archives/February2008/Columns/UMG6.htm
(3) Under the Magnifying Glass - Our
Storytelling-Storycrafting Apparatus
http://www.maccompanion.com/macc/archives/January2008/Columns/UMG5.htm
(4) http://gallery.mac.com/neoac_mug#100047&view=mosaic&sel=0&bgcolor=dkgrey
(5) http://www.apple.com/iwork/keynote/
(6) http://www.usa.canon.com/consumer/controller?act=ModelInfoAct&fcategoryid=145&modelid=15262
(7) http://www.hairersoft.com/AmadeusPro/AmadeusPro.html
(8) http://www.apple.com/dotmac/idisk.html
(9) http://www.lqgraphics.com/software/phototomovie.php
(10) http://www.apple.com/quicktime/
(11) http://www.ambrosiasw.com/utilities/snapzprox/
(12) http://www.LARRYH.COM/
(13) http://www.LARRYHJR.COM/
(14) http://www.keynoteuser.com/prothemes/galleria.html
(15) http://www.apple.com/appletv/features.html#overview
(16) http://www.apple.com/appletv/features.html#photos
(17) http://www.apple.com/dotmac/webgallery.html
(18) http://www.apple.com/ilife/imovie/
(19) http://www.mackiev.com/print_shop.html
(20) http://www.apple.com/macosx/features/300.html#ical
(21) http://www.adobe.com/products/photoshopelmac/
(22) http://plasq.com/comiclife/
(23) Under the Magnifying Glass -
Observation of Trifles
http://www.maccompanion.com/macc/archives/October2007/Columns/UMG.htm
(24) http://www.thoughtfuled.com/strategies/Inductive
Learning.pdf
